GeezerVisonThe World Wide Web, restored to 800 pixels of glory. |
| Home|About|Gaming cabinet|Archives|How it works|Starter sites |
GeezerVison is showing adapt-python.github.io — Developer Guide — adapt 0.1.0 documentation Developer GuideThis page is dedicated to developers who want to contribute to the ADAPT library. The guide is divided is three parts:
1. Opening a pull request in ADAPTFirst go on GitHub at https://github.com/adapt-python/adapt and fork the repository:
On your labtop, open a command prompt and clone your fork with the following command line:
Or:
Make changes in the cloned repository on your labtop. When you have finished, commit your changes and push them to your GitHub fork with the following command lines:
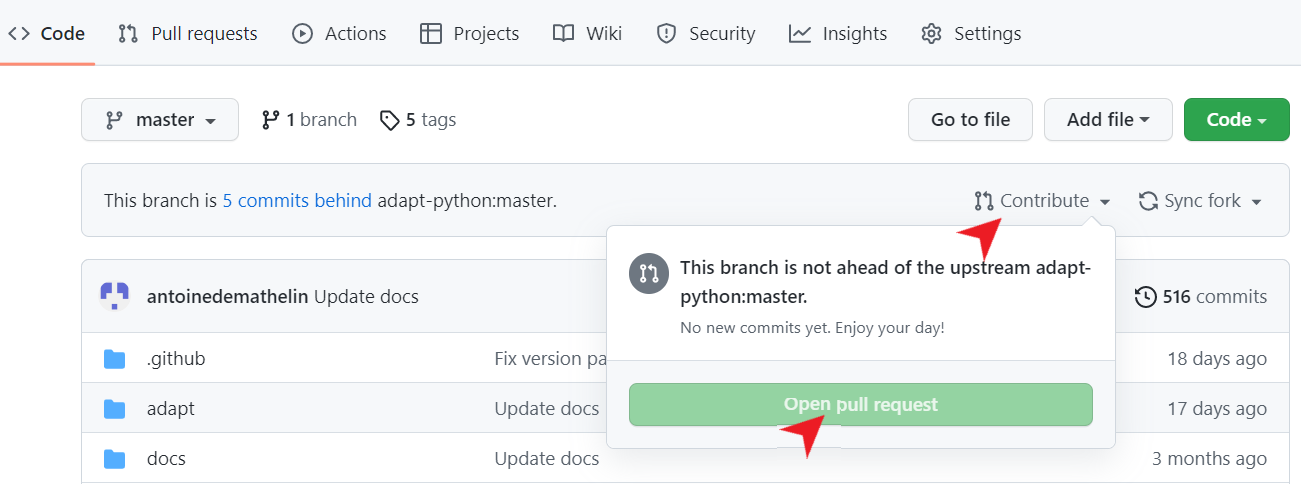
Finally,open a pull request on the main repository by selecting “Contribute” and “Open pull request” on your GitHub fork:
You can give a title to your pull request and a description of your changes. Your pull request will be reviewed and merged to the main repository if your code complies with the ADAPT library. 2. Implementing a new Domain Adaptation methodThis part explains how to implement a novel DA method in the ADAPT style. Your implementation can be done in the cloned repository on your labtop (see previous part). 2.1 Implementing a classic DA methodIf your proposed approach does not use deep learning, you should subclass the Let’s say you want to develop a simple feature-based approach which learns the PCA of the source domain and applies it to the target domain. The only thing you have to do is to implement the [22]: from adapt.base import BaseAdaptEstimator from sklearn.decomposition import PCA class SrcPCA(BaseAdaptEstimator): # Write a description of the algorithm, parameters and attributes. """ SrcPCA : Source PCA SrcPCA learns the PCA on the source domain and applies it on the target domain Parameters ---------- estimator : sklearn estimator or Tensorflow Model The task estimator. Xt : array The target input data. n_components : int (default=2) Number of principal components Attributes ---------- estimator_ : sklearn estimator or Tensorflow Model The fitted estimator """ def __init__(self, estimator=None, Xt=None, n_components=2): super().__init__( estimator=estimator, Xt=Xt ) self.n_components = n_components def fit_transform(self, Xs, Xt, **kwargs): """ Fit embeddings. Parameters ---------- Xs : array Input source data. Xt : array Input target data. kwargs : key, value argument Not used, present here for adapt consistency. Returns ------- Xs_emb : embedded source data """ self.pca_ = PCA(self.n_components) Xs_emb = self.pca_.fit_transform(Xs) return Xs_emb def transform(self, X, **kwargs): """ Return aligned features for X. Parameters ---------- X : array Input data. Returns ------- X_emb : array Embeddings of X. """ return self.pca_.transform(X) You can now test your method on a simple case. For example you can use the [42]: from adapt.utils import make_classification_da import matplotlib.pyplot as plt Xs, ys, Xt, yt = make_classification_da() plt.plot(Xs[ys==1, 0], Xs[ys==1, 1], "o", c="C0") plt.plot(Xs[ys==0, 0], Xs[ys==0, 1], "*", c="C0") plt.plot(Xt[yt==1, 0], Xt[yt==1, 1], "o", c="C1") plt.plot(Xt[yt==0, 0], Xt[yt==0, 1], "*", c="C1") plt.show() 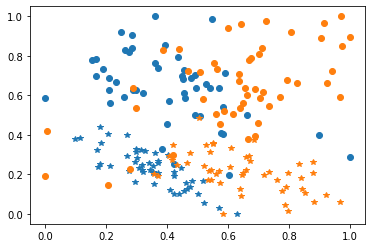
Take one estimator from sklearn and test your novel DA algorithm. Note that the [41]: from sklearn.linear_model import LogisticRegression model = SrcPCA(LogisticRegression(penalty="none"), Xt=Xt, n_components=1) model.fit(Xs, ys) print("Score: %.3f"%model.score(Xt, yt)) Fit transform... Fit Estimator... Score: 0.930 Now, add your source code for Finally, you have to create a test file to perform some unit tests on your method. For this, create a file named [ ]: from adapt.feature_based import SrcPCA from adapt.utils import make_classification_da from sklearn.linear_model import LogisticRegression def test_srcpca(): Xs, ys, Xt, yt = make_classification_da() model = SrcPCA(LogisticRegression(penalty="none"), Xt=Xt, n_components=1) model.fit(Xs, ys) score = model.score(Xt, yt) If you want to be sure that your tests are working, you can install the
In the adapt folder
2.2 Implementing a deep DA methodIf your proposed approach is deep learning specific, you should subclass the Let’s say you want to develop a feature-based approach which learns a deep representation where the source and target domains are both centered with variance close to one. The only think you have to do is to implement the [99]: import tensorflow as tf from adapt.base import BaseAdaptDeep class CenterDomains(BaseAdaptDeep): # Write a description of the algorithm, parameters and attributes. """ CenterDomains : Centering domains CenterDomains learns a deep representation where the source and target domains are both centered with variance close to one. Parameters ---------- encoder : tensorflow Model (default=None) Encoder netwok. task : tensorflow Model (default=None) Task netwok. Xt : array Target input data. lambda_ : float (default=1.) Trade-off between task and domain closeness. Attributes ---------- encoder_ : tensorflow Model Fitted encoder network. task_ : tensorflow Model Fitted task network. """ def __init__(self, encoder=None, task=None, lambda_=1., Xt=None): super().__init__( encoder=encoder, task=task, Xt=Xt ) self.lambda_ = lambda_ def train_step(self, data): # Unpack the data. Xs, Xt, ys, yt = self._unpack_data(data) # loss with tf.GradientTape() as task_tape, tf.GradientTape() as enc_tape: # Forward pass Xs_enc = self.encoder_(Xs, training=True) ys_pred = self.task_(Xs_enc, training=True) Xt_enc = self.encoder_(Xt, training=True) # Reshape ys_pred = tf.reshape(ys_pred, tf.shape(ys)) # Compute the loss value task_loss = self.task_loss_(ys, ys_pred) mean_src = tf.reduce_mean(Xs_enc, axis=0) var_src = tf.math.reduce_variance(Xs_enc, axis=0) mean_tgt = tf.reduce_mean(Xt_enc, axis=0) var_tgt = tf.math.reduce_variance(Xt_enc, axis=0) enc_loss = tf.square(mean_src) + tf.square(mean_tgt) enc_loss += tf.square(1-var_src) + tf.square(1-var_tgt) task_loss = tf.reduce_mean(task_loss) enc_loss = tf.reduce_mean(enc_loss) enc_loss = task_loss + self.lambda_ * enc_loss task_loss += sum(self.task_.losses) enc_loss += sum(self.encoder_.losses) # Compute gradients trainable_vars_task = self.task_.trainable_variables trainable_vars_enc = self.encoder_.trainable_variables gradients_task = task_tape.gradient(task_loss, trainable_vars_task) gradients_enc = enc_tape.gradient(enc_loss, trainable_vars_enc) # Update weights self.optimizer.apply_gradients(zip(gradients_task, trainable_vars_task)) self.optimizer_enc.apply_gradients(zip(gradients_enc, trainable_vars_enc)) # Update metrics self.compiled_metrics.update_state(ys, ys_pred) self.compiled_loss(ys, ys_pred) # Return a dict mapping metric names to current value logs = {m.name: m.result() for m in self.metrics} return logs You can now test your method on a simple case. For example you can use the [100]: from adapt.utils import make_classification_da import matplotlib.pyplot as plt Xs, ys, Xt, yt = make_classification_da() plt.plot(Xs[ys==1, 0], Xs[ys==1, 1], "o", c="C0") plt.plot(Xs[ys==0, 0], Xs[ys==0, 1], "*", c="C0") plt.plot(Xt[yt==1, 0], Xt[yt==1, 1], "o", c="C1") plt.plot(Xt[yt==0, 0], Xt[yt==0, 1], "*", c="C1") plt.show() 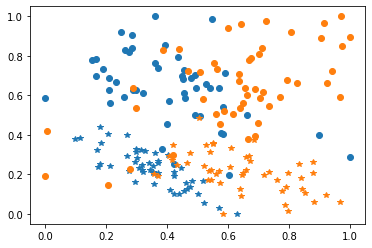
Create simple neural networks and test your novel deep DA algorithm. [102]: encoder = tf.keras.Sequential() encoder.add(tf.keras.layers.Dense(100, activation="relu")) encoder.add(tf.keras.layers.Dense(2)) task = tf.keras.Sequential() task.add(tf.keras.layers.Dense(1, activation="sigmoid")) model = CenterDomains(encoder=encoder, task=task, Xt=Xt, lambda_=1.) model.compile(loss="binary_crossentropy", optimizer="adam") model.fit(Xs, ys, epochs=100, verbose=0) print("Score: %.3f"%model.score(Xt, yt)) 1/1 [==============================] - 0s 118ms/step - loss: 0.2461 Score: 0.246 You can also check that your encoded space behave as expected [106]: Xs_enc = model.transform(Xs) Xt_enc = model.transform(Xt) print(Xs_enc.mean(0), Xt_enc.mean(0)) print(Xs_enc.var(0), Xt_enc.var(0)) [-0.02707285 0.00268192] [-0.03096193 -0.06729582] [0.9326022 0.9280451] [1.08319 1.0991981] Finally, follow the instructions in 2.1 to add your implementation in the adapt folder and make the tests. 3. Contributing to the documentationIf you want to add examples of ADAPT usage to the documentation, this can be done by modifying the First, install all the packages you need for documentation:
And,
Then, make your example in a jupyter notebook and add it to the To make your example appear in the content page, add the path to your example in either You can check the rendering of your example by compiling the documentation with the following command line (executed in the adapt folder):
You can now open the folder |
| You are visitor 01402503 — GeezerVison does not store the pages you look up. Best viewed with Netscape Navigator 4.7 or Internet Explorer 6 at 800×600. No cookies required. |