GeezerVisonThe World Wide Web, restored to 800 pixels of glory. | |||||||||||||||||||||||||||||||||||||||||||||||||||||||
| Home|About|Gaming cabinet|Archives|How it works|Starter sites | |||||||||||||||||||||||||||||||||||||||||||||||||||||||
GeezerVison is showing computingforgeeks.com — Create Qdrant Collections: Vectors and Payload | ComputingForGeeks A Qdrant collection is the box that holds your vectors, your payloads, and the indexes that make filtered search fast. Get the collection shape right and the rest of the application falls out of it. Get it wrong and you will pay for it twice, once in memory at runtime and again when you migrate. If you are coming from Postgres and weighing the trade-offs, our pgvector install guide is the place to see what a single-table approach gives up. Original content from computingforgeeks.com - post 168042This guide walks every collection-level setting you actually need to know, with a working Python script for each pattern and the matching JSON view from the Qdrant Web UI. You will see how to mix dense and sparse vectors in one collection, when to flip the storage to disk, how to enable multi-tenancy without spinning up a second cluster, and how to swap a collection out from under a running app with a single atomic alias update. Tested May 2026 on Ubuntu 24.04.4 LTS with Qdrant 1.18.1 and qdrant-client 1.18.0. All 11 collection patterns below were created and inspected on a real Docker cluster; the Web UI screenshots are from the running server, not mock-ups. Anatomy of a Qdrant collectionA collection holds points. Each point has three parts: a unique ID, one or more vectors, and an optional payload (a JSON object). The collection itself layers on top of that with HNSW graph config, optimizer thresholds, a write-ahead log, optional quantization, and any payload indexes you create. The companion code for this article lives at github.com/c4geeks/qdrant/tree/main/collections. Spin up a local instance first with the install Qdrant on Ubuntu, install Qdrant on Rocky Linux, or install Qdrant on Debian guide, then follow the steps below against your own cluster. Install the Python client and connect to the cluster: Every script in this guide starts with the same two lines: Authenticated clusters pass Vector params: size and the four distance metricsEvery dense vector collection takes two mandatory params: The Qdrant supports four distance metrics. Each one suits a different family of embedding models:
Cosine is the default if you do not know. If you trained or are using a model with a stated similarity metric, follow what the model card says. Switching metrics later means re-indexing every vector. A loop that builds one collection per metric is useful for testing: Each collection is a separate index. They are isolated from one another and you cannot search across them in a single call. Named vectors: one collection, multiple vector spacesReal production setups rarely have just one vector per item. A product needs a text embedding for the title and description, an image embedding for the photo, and possibly a sparse keyword vector. Qdrant lets you attach all three to the same point with named vectors. The collection stores them in separate indexes but keeps them lined up via the shared point ID. The Info tab in the Web UI shows the resulting config as a nested map of named spaces with independent  When you upsert points, supply each vector by name: Searches specify which named vector to use via the The pattern keeps memory accounting honest: storing the image vector is opt-in per query, and you can drop a named vector you no longer need without rebuilding the rest of the collection. Sparse vectors for keyword-style retrievalSparse vectors are the production-ready alternative to TF-IDF. Each sparse vector is a list of (index, value) pairs covering only the tokens that actually appear, which makes them very large in theory (50,000 dimensions for BERT vocab) but cheap to store in practice. Qdrant indexes them with an inverted index and can run them alongside dense vectors in the same collection. The Info tab reports the two vector spaces independently:  Sparse upserts use a different payload shape: Typical generators for the sparse side are SPLADE, BM25 (via fastembed's Payload schema and the seven index typesA payload index turns a JSON field into a B-tree (or inverted index, or geo grid) that the query planner can use to pre-filter points before running the vector search. Without it, a filter is a linear scan over the whole collection. With it, you get sub-millisecond filtered queries on 100M-point collections. Qdrant ships seven payload schemas. Create one index per field you plan to filter on: The Web UI Info tab confirms each index lands with its declared data type. Annotated JSON makes it easy to verify the result without writing a separate  Use the right schema per field. The wrong choice is silently inefficient:
With the indexes in place, filtered queries are fast and predictable. A 1000-point smoke run takes a few milliseconds for any of the seven types: Skip the index and the same queries become full collection scans. The cost is invisible at 1000 points and brutal at 10 million. On-disk vectors and payload for memory savingsBy default Qdrant keeps vectors and HNSW graphs in RAM. That gives you fast search but it caps collection size at whatever fits in physical memory. For a billion-point collection of 1536-dim OpenAI vectors you would need roughly 6 GB just for raw vectors, plus the HNSW overhead on top. Push it to disk with three flags: The Web UI Info tab shows all three flags lit at once, so a quick glance confirms every layer is mmap-backed:  Each flag changes a different layer. You give up some search latency for the memory headroom. On the Prefix Cache sample (163k points, 384-dim) the on-disk recall path is around 30% slower than the in-memory path, which is the trade-off you accept to fit 100M points on a single 64 GB machine. Multi-tenancy via the tenant payload indexRunning 1000 small tenants in 1000 separate collections is expensive. Each collection has its own HNSW graph, its own segments, its own optimizer. The recommended pattern is one collection plus a tenant-aware payload index that Qdrant uses to physically isolate each tenant's vectors at the storage layer. With Always include the tenant filter on every search: Without the filter, the search ranges over every tenant's data. With it, the search is partition-aware and the latency curve flattens. JWT-signed tokens (covered in the API key and JWT security guide later in this series) can hardwire the tenant value into the token claims so the application code does not have to enforce it. Optimizer config: segments, indexing, mmapThe optimizer thread runs in the background, merging segments and building the HNSW index. Its defaults are tuned for general use; you tune them when you have a specific workload shape (heavy ingest, big collections, low-RAM hosts). Confirm the tune landed in the dashboard's Info tab: 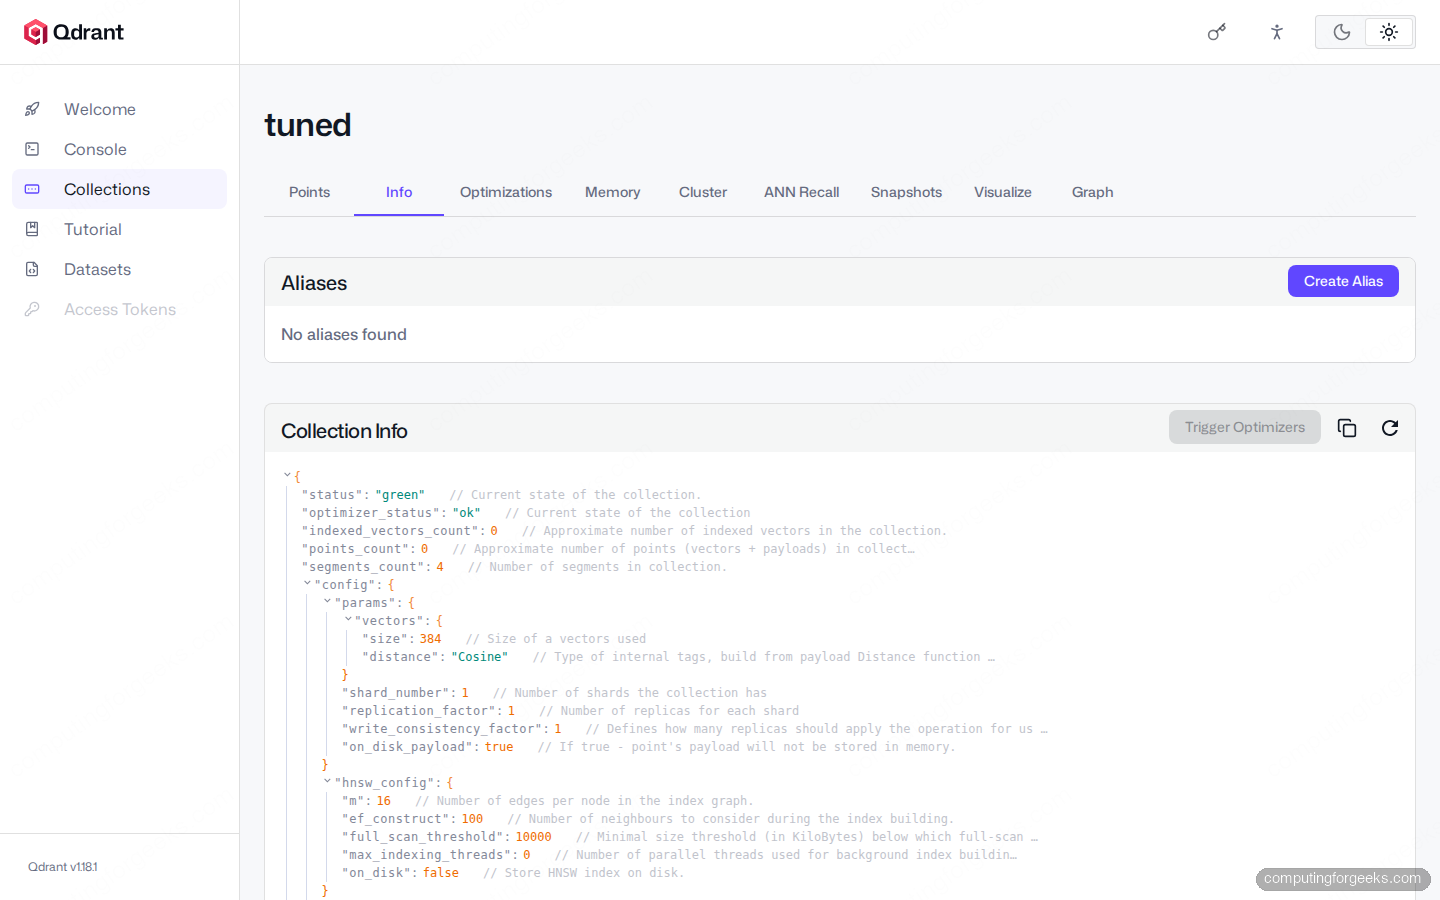 Each knob has a specific effect:
Wrong defaults are not catastrophic; they show up as slow ingest or stuck-yellow status in the dashboard. Bench, tune, redeploy. WAL config: capacity and segments-aheadThe write-ahead log is Qdrant's durability layer. Every upsert and delete is appended to the WAL before the segment is flushed to disk. Two settings shape its behaviour:
The WAL lives in Update an existing collection in placeMost settings can be changed without re-creating the collection. The change is non-destructive. Existing points stay, new ingests pick up the new params, and segments rebuild in the background using the new HNSW graph settings. The output after running an update against the basic_docs collection shows the new values immediately: What you cannot change in place: vector Aliases for zero-downtime swapThe pattern: build the new collection alongside the old, replay your data into it, then atomically point the alias from old to new. The application never sees a stale state because the alias rename is a single transaction. The application points at The two operations execute atomically inside one call, so there is no window where Drop Verify everything from one placeAfter running every snippet in this guide against a fresh cluster, the Web UI Collections list looks like this:  The Web UI panels are covered in detail in the Qdrant Web UI tour guide; the short version is that clicking a collection name opens the Info tab and lets you inspect every config field the Python SDK set above. The terminal view from the Python script run side-by-side with the dashboard makes the cross-check trivial:  Anything the dashboard reports as green is durable on disk and ready for queries. Gotchas worth knowingFive footguns that cost real time when missed: Distance and vector size are immutable. Once a collection is created with Geo payload uses lon/lat, not lat/lon. The order matters and is the opposite of what most map APIs return. Mixing them silently puts points on the wrong continent and your geo_radius filter returns nothing. The text index does not auto-create on payload. A field can hold long text, but the Aliases are not collections. You cannot Optimizer thresholds are per-segment, not per-collection. An Decision tree: which knob to reach forOne rough triage:
The next article in this series, REST and gRPC APIs in practice, moves from the SDK layer to the wire protocols and shows how to call every operation above directly via curl and grpcurl. The HNSW graph tuning and quantization knobs are covered in performance tuning. For now, the seven snippets above cover the full collection lifecycle: create, configure, fill with payload indexes, push to disk, partition by tenant, tune the optimizer, and swap atomically when the embedding model evolves. To wire a finished collection into a working chatbot, the self-hosted RAG with Ollama walkthrough shows the retrieval-augmented pattern end to end. 
Josphat Mutai
Founder of Computingforgeeks. Senior Systems Engineer with over a decade of hands-on experience building and managing production infrastructure. Core expertise in Linux/UNIX administration, cloud platforms (AWS, GCP, Azure), and Kubernetes ecosystems (EKS, GKE, OpenShift). Deep experience with virtualization (KVM, Proxmox, OpenStack), infrastructure as code (Terraform, Terragrunt, Ansible, Crossplane), GitOps workflows (ArgoCD, FluxCD), Nix/NixOS, and container orchestration at scale. Currently focused on integrating AI and LLMs into DevOps and platform engineering workflows. Every guide on this site is tested on real systems before publishing. Keep reading AI
Ollama Models Cheat Sheet: Best Models by VRAM, Tested (PDF)  AI
Open Source LLM Comparison Table (2026)  AI
Claude Code Cheat Sheet: Commands, Shortcuts and Flags (PDF)  AI
OpenClaw Security Hardening with Ollama: Sandbox, Tools, Skills  Databases
Monitor QuestDB With Prometheus and Grafana: Metrics and Alerts  AI
Install Antigravity CLI on Linux, macOS, and Windows Leave a Comment Cancel reply
| |||||||||||||||||||||||||||||||||||||||||||||||||||||||
| You are visitor 01402503 — GeezerVison does not store the pages you look up. Best viewed with Netscape Navigator 4.7 or Internet Explorer 6 at 800×600. No cookies required. |