This tutorial teaches you how to build a JavaScript console app that uses the Microsoft Graph API to access data on behalf of a user.
In this tutorial, you will:
Tip
As an alternative to following this tutorial, you can download the completed code through the quick start tool, which automates app registration and configuration. The downloaded code works without any modifications required.
You can also download or clone the GitHub repository and follow the instructions in the README to register an application and configure the project.
Prerequisites
Before you start this tutorial, you should have Node.js installed on your development machine.
You should also have a Microsoft work or school account with an Exchange Online mailbox. If you don't have a Microsoft 365 tenant, you might qualify for one through the Microsoft 365 Developer Program; for details, see the FAQ. Alternatively, you can sign up for a one-month free trial or purchase a Microsoft 365 plan.
Note
This tutorial was written with Node.js version 16.14.2. The steps in this guide might work with other versions, but that hasn't been tested.
Register an application for user authentication
Register an application that supports user authentication using device code flow. You can register an application using the Microsoft Entra admin center, or by using the Microsoft Graph PowerShell SDK.
Open a browser and navigate to the Microsoft Entra admin center and sign in using a Global administrator account.
Select Microsoft Entra ID in the left-hand navigation, expand Identity, expand Applications, then select App registrations.

Select New registration. Enter a name for your application, for example, Graph User Auth Tutorial.
Set Supported account types as desired. The options are:
| Option |
Who can sign in? |
| Accounts in this organizational directory only |
Only users in your Microsoft 365 organization |
| Accounts in any organizational directory |
Users in any Microsoft 365 organization (work or school accounts) |
| Accounts in any organizational directory ... and personal Microsoft accounts |
Users in any Microsoft 365 organization (work or school accounts) and personal Microsoft accounts |
Leave Redirect URI empty.
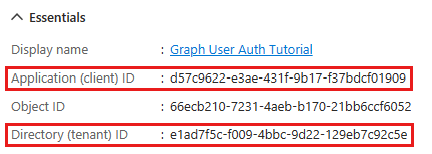
Select Register. On the application's Overview page, copy the value of the Application (client) ID and save it. You'll need it in the next step. If you chose Accounts in this organizational directory only for Supported account types, also copy the Directory (tenant) ID and save it.
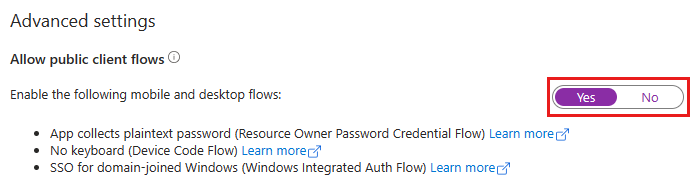
Select Authentication under Manage. Locate the Advanced settings section and change the Allow public client flows toggle to Yes, then choose Save.
To use PowerShell, you need the Microsoft Graph PowerShell SDK. If you don't have it, see Install the Microsoft Graph PowerShell SDK for installation instructions.
Important
The PowerShell script requires a work/school account with the Application administrator, Cloud application administrator, or Global administrator role. If your account has the Application developer role, you can register in the Microsoft Entra admin center.
Create a new file named RegisterAppForUserAuth.ps1 and add the following code.
param(
  [Parameter(Mandatory=$true,
  HelpMessage="The friendly name of the app registration")]
  [String]
  $AppName,

  [Parameter(Mandatory=$false,
  HelpMessage="The sign in audience for the app")]
  [ValidateSet("AzureADMyOrg", "AzureADMultipleOrgs", `
  "AzureADandPersonalMicrosoftAccount", "PersonalMicrosoftAccount")]
  [String]
  $SignInAudience = "AzureADandPersonalMicrosoftAccount",

  [Parameter(Mandatory=$false)]
  [Switch]
  $StayConnected = $false
)

# Tenant to use in authentication.
# See https://learn.microsoft.com/azure/active-directory/develop/v2-oauth2-device-code#device-authorization-request
$authTenant = switch ($SignInAudience)
{
  "AzureADMyOrg" { "tenantId" }
  "AzureADMultipleOrgs" { "organizations" }
  "AzureADandPersonalMicrosoftAccount" { "common" }
  "PersonalMicrosoftAccount" { "consumers" }
  default { "invalid" }
}

if ($authTenant -eq "invalid")
{
  Write-Host -ForegroundColor Red "Invalid sign in audience:" $SignInAudience
  Exit
}

# Requires an admin
Connect-MgGraph -Scopes "Application.ReadWrite.All User.Read" -UseDeviceAuthentication -ErrorAction Stop

# Get context for access to tenant ID
$context = Get-MgContext -ErrorAction Stop

if ($authTenant -eq "tenantId")
{
  $authTenant = $context.TenantId
}

# Create app registration
$appRegistration = New-MgApplication -DisplayName $AppName -SignInAudience $SignInAudience `
 -IsFallbackPublicClient -ErrorAction Stop
Write-Host -ForegroundColor Cyan "App registration created with app ID" $appRegistration.AppId

# Create corresponding service principal
if ($SignInAudience -ne "PersonalMicrosoftAccount")
{
  New-MgServicePrincipal -AppId $appRegistration.AppId -ErrorAction SilentlyContinue `
   -ErrorVariable SPError | Out-Null
  if ($SPError)
  {
    Write-Host -ForegroundColor Red "A service principal for the app could not be created."
    Write-Host -ForegroundColor Red $SPError
    Exit
  }

  Write-Host -ForegroundColor Cyan "Service principal created"
}

Write-Host
Write-Host -ForegroundColor Green "SUCCESS"
Write-Host -ForegroundColor Cyan -NoNewline "Client ID: "
Write-Host -ForegroundColor Yellow $appRegistration.AppId
Write-Host -ForegroundColor Cyan -NoNewline "Auth tenant: "
Write-Host -ForegroundColor Yellow $authTenant

if ($StayConnected -eq $false)
{
  Disconnect-MgGraph | Out-Null
  Write-Host "Disconnected from Microsoft Graph"
}
else
{
  Write-Host
  Write-Host -ForegroundColor Yellow `
   "The connection to Microsoft Graph is still active. To disconnect, use Disconnect-MgGraph"
}
Save the file.
Open PowerShell and change the current directory to the location of RegisterAppForUserAuth.ps1.
Run the following command, replacing <audience-value> with the desired value (see the following table).
.\RegisterAppForUserAuth.ps1 -AppName "Graph User Auth Tutorial" -SignInAudience <audience-value>
| SignInAudience value |
Who can sign in? |
AzureADMyOrg |
Only users in your Microsoft 365 organization |
AzureADMultipleOrgs |
Users in any Microsoft 365 organization (work or school accounts) |
AzureADandPersonalMicrosoftAccount |
Users in any Microsoft 365 organization (work or school accounts) and personal Microsoft accounts |
PersonalMicrosoftAccount |
Only personal Microsoft accounts |
Follow the prompt to open https://microsoft.com/devicelogin in a browser, enter the provided code, and complete the authentication process.
Copy the Client ID and Auth tenant values from the script output. You'll need these values in the next step.
SUCCESS
Client ID: 2fb1652f-a9a0-4db9-b220-b224b8d9d38b
Auth tenant: common
Note
Notice that you didn't configure any Microsoft Graph permissions on the app registration. The sample uses dynamic consent to request specific permissions for user authentication.
Create a JavaScript console app
Begin by creating a new Node.js project. Open your command-line interface (CLI) in a directory where you want to create the project. Run the following command.
npm init
Answer the prompts by either supplying your own values or accepting the defaults.
Install dependencies
Before moving on, add dependencies that you use later.
To install the dependencies, run the following commands in your CLI.
npm install @azure/identity @microsoft/microsoft-graph-client isomorphic-fetch readline-sync
Load application settings
Next, add the details of your app registration to the project.
Create a file in the root of your project named appSettings.js and add the following code.
const settings = {
  clientId: 'YOUR_CLIENT_ID_HERE',
  tenantId: 'common',
  graphUserScopes: ['user.read', 'mail.read', 'mail.send'],
};

export default settings;
Update the values in settings according to the following table.
| Setting |
Value |
clientId |
The client ID of your app registration |
tenantId |
If you chose the option to only allow users in your organization to sign in, change this value to your tenant ID. Otherwise leave as common. |
Design the app
Continue by creating a simple console-based menu.
Create a file in the root of your project named graphHelper.js and add the following placeholder code. You add more code this file in later steps.
module.exports = {};
Create a file in the root of your project named index.js and add the following code.
import { keyInSelect } from 'readline-sync';

import settings from './appSettings.js';
import {
  initializeGraphForUserAuth,
  getUserAsync,
  getUserTokenAsync,
  getInboxAsync,
  sendMailAsync,
  makeGraphCallAsync,
} from './graphHelper.js';

async function main() {
  console.log('JavaScript Graph Tutorial');

  let choice = 0;

  // Initialize Graph
  initializeGraph(settings);

  // Greet the user by name
  await greetUserAsync();

  const choices = [
    'Display access token',
    'List my inbox',
    'Send mail',
    'Make a Graph call',
  ];

  while (choice != -1) {
    choice = keyInSelect(choices, 'Select an option', { cancel: 'Exit' });

    switch (choice) {
      case -1:
        // Exit
        console.log('Goodbye...');
        break;
      case 0:
        // Display access token
        await displayAccessTokenAsync();
        break;
      case 1:
        // List emails from user's inbox
        await listInboxAsync();
        break;
      case 2:
        // Send an email message
        await sendMailToSelfAsync();
        break;
      case 3:
        // Run any Graph code
        await doGraphCallAsync();
        break;
      default:
        console.log('Invalid choice! Please try again.');
    }
  }
}

main();
Add the following placeholder methods at the end of the file. You implement them in later steps.
function initializeGraph(settings) {
  // TODO
}

async function greetUserAsync() {
  // TODO
}

async function displayAccessTokenAsync() {
  // TODO
}

async function listInboxAsync() {
  // TODO
}

async function sendMailToSelfAsync() {
  // TODO
}

async function doGraphCallAsync() {
  // TODO
}
This implements a basic menu and reads the user's choice from the command line.
Next step