GeezerVisonThe World Wide Web, restored to 800 pixels of glory. | ||||||||||||||||||||||||||||||||||||||||||||||||||||||
| Home|About|Gaming cabinet|Archives|How it works|Starter sites | ||||||||||||||||||||||||||||||||||||||||||||||||||||||
GeezerVison is showing docs.wxpython.org — Sizers Overview — wxPython 4.3.2 Docs
|


Code |
Resulting Image |
|---|---|
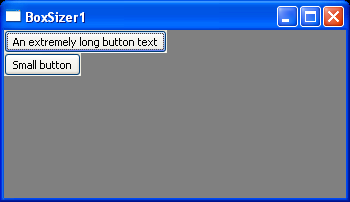
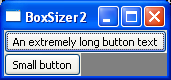
sizer = wx.BoxSizer(wx.VERTICAL) # Second button is three times as tall as first button sizer.Add(wx.Button(self, -1, 'An extremely long button text'), 1, 0, 0) sizer.Add(wx.Button(self, -1, 'Small button'), 3, 0, 0) sizer.SetSizeHints(self) self.SetSizer(sizer) |
|
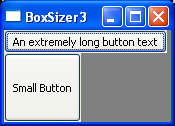
Same code as above, with window resized. Notice that the bottom button is still three times as tall as the top button. |
|
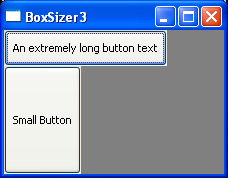
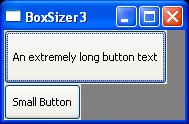
sizer = wx.BoxSizer(wx.VERTICAL) # First button is 3/2 the height of the second button sizer.Add(wx.Button(self, -1, 'An extremely long button text'), 3, 0, 0) sizer.Add(wx.Button(self, -1, 'Small button'), 2, 0, 0) sizer.SetSizeHints(self) self.SetSizer(sizer) |
|
If one of the proportion parameters is 0, that wx.Window
will be the minimum size, and the others will resize proportionally:
Code |
Resulting Image |
|---|---|
sizer = wx.BoxSizer(wx.VERTICAL) # Third button is twice the size of the second button sizer.Add(wx.Button(self, -1, 'An extremely long button text'), 0, 0, 0) sizer.Add(wx.Button(self, -1, 'Small button'), 1, 0, 0) sizer.Add(wx.Button(self, -1, 'Another button'), 2, 0, 0) sizer.SetSizeHints(self) self.SetSizer(sizer) |
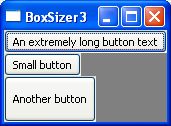
|
Same code as above, with window resized. The top button (proportion 0) is still the minimum height, and the third button is still twice the height of the second. |
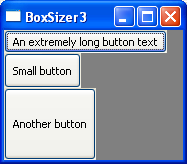
|
This is especially useful when you want, for example, a button at the bottom which is only as big as necessary, and some other control that occupies the rest of the frame. To do so, give the button proportion 0 and the other control a number greater than 0. Mac users in particular will appreciate you for not creating huge aqua-styled buttons.
The flags and border parameters
The flag argument accepted by wx.Sizer.Add is a
OR-combination of the following flags. Two main behaviours are
defined using these flags. One is the border around a window: the
border parameter determines the border width whereas the flags given
here determine which side(s) of the item that the border will be
added. The other flags determine how the sizer item behaves when the
space allotted to the sizer changes, and is somewhat dependent on the
specific kind of sizer used.
Sizer Flag |
Description |
|---|---|
wx.TOPwx.BOTTOMwx.LEFTwx.RIGHTwx.ALL |
These flags are used to specify which side(s) of the sizer item the border width will apply to. |
|
The item will be expanded to fill the space assigned to the item. |
|
The item will be expanded as much as possible while also maintaining its aspect ratio |
|
Normally wx.Sizers will use
|
|
Normally wx.Sizers don’t allocate space for hidden windows or other items. This flag overrides this behavior so that sufficient space is allocated for the window even if it isn’t visible. This makes it possible to dynamically show and hide controls without resizing parent dialog, for example. |
wx.ALIGN_CENTER or wx.ALIGN_CENTREwx.ALIGN_LEFTwx.ALIGN_RIGHTwx.ALIGN_RIGHTwx.ALIGN_TOPwx.ALIGN_BOTTOMwx.ALIGN_CENTER_VERTICAL or wx.ALIGN_CENTRE_VERTICALwx.ALIGN_CENTER_HORIZONTAL or wx.ALIGN_CENTRE_HORIZONTAL |
The |
Let’s start with the simplest case: the alignment flags. These are pretty self-explanatory.
Code |
Resulting Image |
|---|---|
sizer = wx.BoxSizer(wx.VERTICAL) # Second button is right aligned sizer.Add(wx.Button(self, -1, "An extremely long button text"), 0, 0, 0) sizer.Add(wx.Button(self, -1, "Small Button"), 0, wx.ALIGN_RIGHT, 0) sizer.SetSizeHints(self) self.SetSizer(sizer) |
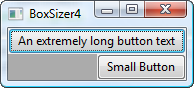
|
sizer = wx.BoxSizer(wx.VERTICAL) # Second button is center-aligned sizer.Add(wx.Button(self, -1, "An extremely long button text"), 0, 0, 0) sizer.Add(wx.Button(self, -1, "Small Button"), 0, wx.ALIGN_CENTER, 0) sizer.SetSizeHints(self) self.SetSizer(sizer) |
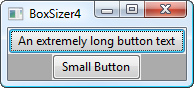
|
Next is the wx.EXPAND flag. This is synonymous with wx.GROW.
Code |
Resulting Image |
|---|---|
sizer = wx.BoxSizer(wx.VERTICAL) # Second button expands to the whole parent's width sizer.Add(wx.Button(self, -1, "An extremely long button text"), 0, 0, 0) sizer.Add(wx.Button(self, -1, "Small Button"), 0, wx.EXPAND, 0) sizer.SetSizeHints(self) self.SetSizer(sizer) |
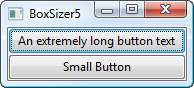
|
You can see that the first button takes its minimum size, and the second one grows to match it. This affects
controls in the opposite manner of the second parameter; wx.EXPAND in a vertical sizer causes horizontal
expansion, and in a horizontal sizer it causes vertical expansion.
Next is wx.SHAPED. This flag ensures that the width and height of the object stay proportional to each other.
It doesn’t make much sense for buttons, but can be excellent for bitmaps, which would be contorted or clipped
if not scaled proportionally.
Code |
Resulting Image |
|---|---|
sizer = wx.BoxSizer(wx.VERTICAL) # Second button will scale proportionally sizer.Add(wx.Button(self, -1, "An extremely long button text"), 0, 0, 0) sizer.Add(wx.Button(self, -1, "Small Button"), 1, wx.SHAPED, 0) sizer.SetSizeHints(self) self.SetSizer(sizer) |
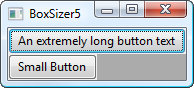
|
Same code as above, with window resized. The width grew dramatically with the height. In fact, it didn’t quite grow vertically the whole way because it couldn’t maintain the correct ratio while doing so. |
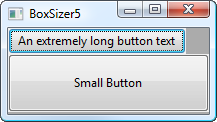
|
Finally, we have the border flags. These only make sense when the
border parameter is greater than 0, and describe the sides of the
control on which the border should appear. In order to demonstrate
this most clearly, we’ll keep the wx.EXPAND flag.
Code |
Resulting Image |
|---|---|
sizer = wx.BoxSizer(wx.VERTICAL) # Border size effects sizer.Add(wx.Button(self, -1, "An extremely long button text"), 0, 0, 0) sizer.Add(wx.Button(self, -1, "Small Button"), 0, wx.EXPAND | wx.LEFT, 20) sizer.SetSizeHints(self) self.SetSizer(sizer) |
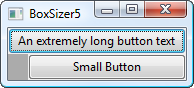
|
sizer = wx.BoxSizer(wx.VERTICAL) # Border size effects sizer.Add(wx.Button(self, -1, "An extremely long button text"), 0, 0, 0) sizer.Add(wx.Button(self, -1, "Small Button"), 0, wx.EXPAND | wx.LEFT | wx.RIGHT, 20) sizer.SetSizeHints(self) self.SetSizer(sizer) |
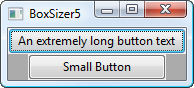
|
sizer = wx.BoxSizer(wx.VERTICAL) # Border size effects sizer.Add(wx.Button(self, -1, "An extremely long button text"), 0, 0, 0) sizer.Add(wx.Button(self, -1, "Small Button"), 0, wx.EXPAND | wx.LEFT | wx.RIGHT | wx.TOP, 20) sizer.SetSizeHints(self) self.SetSizer(sizer) |
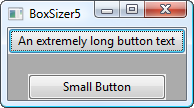
|
sizer = wx.BoxSizer(wx.VERTICAL) # Border size effects sizer.Add(wx.Button(self, -1, "An extremely long button text"), 0, 0, 0) sizer.Add(wx.Button(self, -1, "Small Button"), 0, wx.EXPAND | wx.ALL, 20) sizer.SetSizeHints(self) self.SetSizer(sizer) |
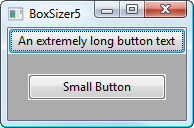
|
You can see that the button is offset from the specified edges of the sizer by the number of pixels that we specified in the border parameter.
Hiding Controls Using Sizers
You can hide controls contained in sizers the same way you would hide
any control, using the wx.Window.Show method. However,
wx.Sizer also offers a separate method which can tell the sizer
not to consider that control in its size calculations. To hide a
window using the sizer, call wx.Sizer.Show. You must then call
Layout on the sizer to force an update.
This is useful when hiding parts of the interface, since you can avoid removing the controls from the sizer and having to add them back later.
Note
This is supported only by wx.BoxSizer and wx.FlexGridSizer.
BoxSizer
wx.BoxSizer can lay out its children either vertically or horizontally, depending on what flag is being used in its constructor. When using a vertical sizer, each child can be centered, aligned to the right or aligned to the left. Correspondingly, when using a horizontal sizer, each child can be centered, aligned at the bottom or aligned at the top. The stretch factor described in the last paragraph is used for the main orientation, i.e. when using a horizontal box sizer, the stretch factor determines how much the child can be stretched horizontally. The following sample shows the same dialog as in the last sample, only the box sizer is a vertical box sizer now:
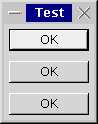
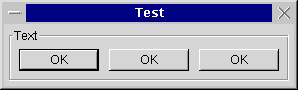
StaticBoxSizer
wx.StaticBoxSizer is the same as a wx.BoxSizer, but
surrounded by a static box. Here is a sample:
GridSizer
wx.GridSizer is a two-dimensional sizer. All children are given the same size, which is the minimal size required by the biggest child, in this case the text control in the left bottom border. Either the number of columns or the number or rows is fixed and the grid sizer will grow in the respectively other orientation if new children are added:
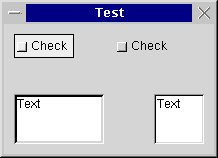
For programming information, see wx.GridSizer.
FlexGridSizer
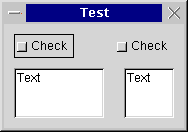
Another two-dimensional sizer derived from wx.GridSizer. The width of each column and the height of each row are calculated individually according to the minimal requirements from the respectively biggest child. Additionally, columns and rows can be declared to be stretchable if the sizer is assigned a size different from the one it requested. The following sample shows the same dialog as the one above, but using a flex grid sizer:
Programming with BoxSizer
The basic idea behind a wx.BoxSizer is that windows will most often be laid out in rather simple basic geometry, typically in a row or a column or several hierarchies of either.
As an example, we will construct a dialog that will contain a text
field at the top and two buttons at the bottom. This can be seen as a
top-hierarchy column with the text at the top and buttons at the
bottom and a low-hierarchy row with an OK button to the left and a
Cancel button to the right. In many cases (particularly dialogs
under Unix and normal frames) the main window will be resizable by the
user and this change of size will have to get propagated to its
children. In our case, we want the text area to grow with the dialog,
whereas the button shall have a fixed size. In addition, there will be
a thin border around all controls to make the dialog look nice and -
to make matter worse - the buttons shall be centred as the width of
the dialog changes.
It is the unique feature of a box sizer, that it can grow in both
directions (height and width) but can distribute its growth in the
main direction (horizontal for a row) unevenly among its
children. In our example case, the vertical sizer is supposed to
propagate all its height changes to only the text area, not to the
button area. This is determined by the proportion parameter when
adding a window (or another sizer) to a sizer. It is interpreted as a
weight factor, i.e. it can be zero, indicating that the window may not
be resized at all, or above zero. If several windows have a value
above zero, the value is interpreted relative to the sum of all weight
factors of the sizer, so when adding two windows with a value of 1,
they will both get resized equally much and each half as much as the
sizer owning them. Then what do we do when a column sizer changes its
width? This behaviour is controlled by flags (the second parameter
of the Add() function): Zero or no flag indicates that the window
will preserve it is original size, wx.GROW flag (same as wx.EXPAND)
forces the window to grow with the sizer, and wx.SHAPED flag tells
the window to change it is size proportionally, preserving original
aspect ratio. When wx.GROW flag is not used, the item can be aligned
within available space. wx.ALIGN_LEFT, wx.ALIGN_TOP,
wx.ALIGN_RIGHT, wx.ALIGN_BOTTOM, wx.ALIGN_CENTER_HORIZONTAL and
wx.ALIGN_CENTER_VERTICAL do what they say. wx.ALIGN_CENTRE (same as
wx.ALIGN_CENTER) is defined as (wx.ALIGN_CENTER_HORIZONTAL |
wx.ALIGN_CENTER_VERTICAL). Default alignment is wx.ALIGN_LEFT |
wx.ALIGN_TOP.
As mentioned above, any window belonging to a sizer may have a border,
and it can be specified which of the four sides may have this border,
using the wx.TOP, wx.LEFT, wx.RIGHT and wx.BOTTOM
constants or wx.ALL for all directions (and you may also use
wx.NORTH, wx.WEST etc. instead). These flags can be used in
combination with the alignment flags above as the second parameter of
the Add() method using the binary or operator |. The sizer of
the border also must be made known, and it is the third parameter in
the Add() method. This means, that the entire behaviour of a sizer
and its children can be controlled by the three parameters of the
Add() method.
Example:
# We want to get a dialog that is stretchable because it
# has a text ctrl at the top and two buttons at the bottom.

class MyDialog(wx.Dialog):

    def __init__(self, parent, id, title):

        wx.Dialog(parent, id, title, wx.DefaultPosition, wx.DefaultSize,
                  wx.DEFAULT_DIALOG_STYLE | wx.RESIZE_BORDER)

        topsizer = wx.BoxSizer(wx.VERTICAL)

        # create text ctrl with minimal size 100x60
        topsizer.Add(
                wx.TextCtrl(self, -1, "My text.", wx.DefaultPosition, wx.Size(100,60), wx.TE_MULTILINE),
                1,           # make vertically stretchable
                wx.EXPAND |  # make horizontally stretchable
                wx.ALL,      # and make border all around
                10)          # set border width to 10

        button_sizer = wx.BoxSizer(wx.HORIZONTAL)
        button_sizer.Add(
                wx.Button(self, wx.ID_OK, "OK"),
                0,           # make horizontally unstretchable
                wx.ALL,      # make border all around (implicit top alignment)
                10)          # set border width to 10
        button_sizer.Add(
                wx.Button(self, wx.ID_CANCEL, "Cancel"),
                0,           # make horizontally unstretchable
                wx.ALL,      # make border all around (implicit top alignment)
                10)          # set border width to 10

        topsizer.Add(
                button_sizer,
                0,                # make vertically unstretchable
                wx.ALIGN_CENTER)  # no border and centre horizontally

        self.SetSizerAndFit(topsizer) # use the sizer for layout and size window
                                      # accordingly and prevent it from being resized
                                      # to smaller size
Note that the new way of specifying flags to wx.Sizer is via wx.SizerFlags. This class greatly eases the burden of passing flags to a wx.Sizer.
Here’s how you’d do the previous example with wx.SizerFlags:
# We want to get a dialog that is stretchable because it
# has a text ctrl at the top and two buttons at the bottom.

class MyDialog(wx.Dialog):

    def __init__(self, parent, id, title):

        wx.Dialog(parent, id, title, wx.DefaultPosition, wx.DefaultSize,
                  wx.DEFAULT_DIALOG_STYLE | wx.RESIZE_BORDER)

        topsizer = wx.BoxSizer(wx.VERTICAL)

        # create text ctrl with minimal size 100x60
        topsizer.Add(
                wx.TextCtrl(self, -1, "My text.", wx.DefaultPosition, wx.Size(100,60), wx.TE_MULTILINE),
                wx.SizerFlags(1).Align().Expand().Border(wx.ALL, 10))

        button_sizer = wx.BoxSizer(wx.HORIZONTAL)
        button_sizer.Add(
                wx.Button(self, wx.ID_OK, "OK"),
                wx.SizerFlags(0).Align().Border(wx.ALL, 10))

        button_sizer.Add(
                wx.Button(self, wx.ID_CANCEL, "Cancel"),
                wx.SizerFlags(0).Align().Border(wx.ALL, 10))

        topsizer.Add(
                button_sizer,
                wx.SizerFlags(0).Center())

        self.SetSizerAndFit(topsizer) # use the sizer for layout and set size and hints
Other Types of Sizers
wx.GridSizer is a sizer which lays out its children in a two-dimensional table with all table fields having the same size, i.e. the width of each field is the width of the widest child, the height of each field is the height of the tallest child.
wx.FlexGridSizer is a sizer which lays out its children in a two-dimensional table with all table fields in one row having the same height and all fields in one column having the same width, but all rows or all columns are not necessarily the same height or width as in the wx.GridSizer.
wx.StaticBoxSizer is a sizer derived from wx.BoxSizer
but adds a static box around the sizer. Note that this static box has
to be created separately.
wx.GridBagSizer is a rather special kind of sizer which, unlike the other classes, allows to directly put the elements at the given position in the sizer. Please see its documentation for more details.
CreateButtonSizer
As a convenience, wx.Dialog.CreateButtonSizer(flags) can be
used to create a standard button sizer in which standard buttons are
displayed. The following flags can be passed to this method:
wx.YES_NO     # Add Yes/No subpanel
wx.YES        # return wx.ID_YES
wx.NO         # return wx.ID_NO
wx.NO_DEFAULT # make the wx.NO button the default,
              # otherwise wx.YES or wx.OK button will be default

wx.OK         # return wx.ID_OK
wx.CANCEL     # return wx.ID_CANCEL
wx.HELP       # return wx.ID_HELP

wx.FORWARD    # return wx.ID_FORWARD
wx.BACKWARD   # return wx.ID_BACKWARD
wx.SETUP      # return wx.ID_SETUP
wx.MORE       # return wx.ID_MORE
Best viewed with Netscape Navigator 4.7 or Internet Explorer 6 at 800×600. No cookies required.