GeezerVisonThe World Wide Web, restored to 800 pixels of glory. | |||||||||||||||||||||||||||||||||||||||||||||||||||||||||||||||||||||||||||||||||||||||||||||||||||||||||||||||||||||||||||||||||||||||||||||||||||||||||||||||||||||||||||||||||||||||||||||||||||||||||||||||||||||||||||||||||||||||||||||||||||||||||||||||||||||||||||||||||||||||||||||||||||||||||||||||||||||||||||||||||||||||||||||||||||||||||||||||||||||||||||||||||||||||||||||||||||||||||||||||||||||||||||||||||||||||||||||||||||||||||||||||||||||||||||||
| Home|About|Gaming cabinet|Archives|How it works|Starter sites | |||||||||||||||||||||||||||||||||||||||||||||||||||||||||||||||||||||||||||||||||||||||||||||||||||||||||||||||||||||||||||||||||||||||||||||||||||||||||||||||||||||||||||||||||||||||||||||||||||||||||||||||||||||||||||||||||||||||||||||||||||||||||||||||||||||||||||||||||||||||||||||||||||||||||||||||||||||||||||||||||||||||||||||||||||||||||||||||||||||||||||||||||||||||||||||||||||||||||||||||||||||||||||||||||||||||||||||||||||||||||||||||||||||||||||||
GeezerVison is showing ncas-cms.github.io (truncated) — Tutorial — Documentation Tutorial¶Version 3.21.0 for version 1.13 of the CF conventions. All of the Python code in this tutorial is available in two executable
scripts ( Sample datasets¶This tutorial uses a number of small sample datasets, all of which can
be found in the zip file Unpack the sample datasets.
$ unzip -q cf_tutorial_files.zip
$ ls -1
air_temperature.nc
cf_tutorial_files.zip
contiguous.nc
external.nc
file2.nc
file.nc
gathered.nc
parent.nc
precipitation_flux.nc
timeseries.nc
umfile.pp
vertical.nc
wind_components.nc
The tutorial examples assume that the Python session is being run from the directory that contains the zip file and its unpacked contents, and no other files. The tutorial files may be also found in the downloads directory of the on-line code repository. Import¶The cf package is imported as follows: Import the cf package.
>>> import cf Tip It is possible to change the extent to which cf outputs feedback messages and it may be instructive to increase the verbosity whilst working through this tutorial to see and learn more about what cf is doing under the hood and about the nature of the dataset being operated on. See the section on ‘Logging’ for more information. CF version¶The version of the CF conventions and
the CF data model being used may be found with
the Retrieve the version of the CF conventions.
>>> cf.CF()
'1.8'
This indicates which version of the CF conventions are represented by this release of the cf package, and therefore the version can not be changed. Note, however, that datasets of different CF versions may be read from, or written to netCDF. Field and domain constructs¶The central constructs of CF are the field construct and domain construct. The field construct, that corresponds to a CF-netCDF data variable, includes all of the metadata to describe it:
Likewise, the domain construct, that corresponds to a CF-netCDF domain variable or to the domain of a field construct, includes all of the metadata to describe it:
A field construct or domain construct is stored in a Reading field constructs from datasets¶The A field list is very much like a Python The following file types can be read:
Note that when reading netCDF4 files that contain hierachical groups, the group structure is saved via the netCDF interface so that it may be re-used, or modified, if the field constructs are written to back to disk. For example, to read the file Read file.nc and show that the result is a two-element
field list.
>>> x = cf.read('file.nc')
>>> type(x)
<class 'cf.fieldlist.FieldList'>
>>> len(x)
2
Descriptive properties are always read into memory, but lazy loading is employed for all data arrays, which means that no data is read into memory until the data is required for inspection or to modify the array contents. This maximises the number of field constructs that may be read within a session, and makes the read operation fast. Multiple files may be read in one command using UNIX wild card characters, or a sequence of file names (each element of which may also contain wild cards). Shell environment variables are also permitted. Read the ten sample netCDF files, noting that they
contain more than ten field constructs.
>>> y = cf.read('*.nc')
>>> len(y)
14
Read two particular files, noting that they contain more
than two field constructs.
>>> z = cf.read(['file.nc', 'precipitation_flux.nc'])
>>> len(z)
3
All of the datasets in one or more directories may also be read by replacing any file name with a directory name. An attempt will be made to read all files in the directory, which will result in an error if any have a non-supported format. Non-supported files may be ignored by being more specific about the file type intended for reading in using the dataset_type keyword: Read all of the files in the current working directory.
>>> y = cf.read('$PWD')  # Raises Exception
Traceback (most recent call last):
    ...
Exception: Can't determine format of file cf_tutorial_files.zip
>>> y = cf.read('$PWD', dataset_type='netCDF')
>>> len(y)
15
In all cases, the default behaviour is to aggregate the contents of
all input datasets into as few field constructs as possible, and it is
these aggregated field constructs are returned by The
CF-compliance¶If the dataset is partially CF-compliant to the extent that it is not
possible to unambiguously map an element of the netCDF dataset to an
element of the CF data model, then a field construct is still
returned, but may be incomplete. This is so that datasets which are
partially conformant may nonetheless be modified in memory and written
to new datasets. Such “structural” non-compliance would occur, for
example, if the Inspection¶The contents of a field construct may be inspected at three different levels of detail. Minimal detail¶The built-in Inspect the contents of the two field constructs from
the dataset and create a Python variable for each of
them.
>>> x = cf.read('file.nc')
>>> x
[<CF Field: specific_humidity(latitude(5), longitude(8)) 1>,
 <CF Field: air_temperature(atmosphere_hybrid_height_coordinate(1), grid_latitude(10), grid_longitude(9)) K>]
>>> q = x[0]
>>> t = x[1]
>>> q
<CF Field: specific_humidity(latitude(5), longitude(8)) 1>
This gives the identity of the field construct (e.g. “specific_humidity”), the identities and sizes of the dimensions spanned by the data array (“latitude” and “longitude” with sizes 5 and 8 respectively) and the units of the data (“1”, i.e. dimensionless). Medium detail¶The built-in Inspect the contents of the two field constructs with
medium detail.
>>> print(q)
Field: specific_humidity (ncvar%q)
----------------------------------
Data            : specific_humidity(latitude(5), longitude(8)) 1
Cell methods    : area: mean
Dimension coords: latitude(5) = [-75.0, ..., 75.0] degrees_north
                : longitude(8) = [22.5, ..., 337.5] degrees_east
                : time(1) = [2019-01-01 00:00:00]
>>> print(t)
Field: air_temperature (ncvar%ta)
---------------------------------
Data            : air_temperature(atmosphere_hybrid_height_coordinate(1), grid_latitude(10), grid_longitude(9)) K
Cell methods    : grid_latitude(10): grid_longitude(9): mean where land (interval: 0.1 degrees) time(1): maximum
Field ancils    : air_temperature standard_error(grid_latitude(10), grid_longitude(9)) = [[0.76, ..., 0.32]] K
Dimension coords: atmosphere_hybrid_height_coordinate(1) = [1.5]
                : grid_latitude(10) = [2.2, ..., -1.76] degrees
                : grid_longitude(9) = [-4.7, ..., -1.18] degrees
                : time(1) = [2019-01-01 00:00:00]
Auxiliary coords: latitude(grid_latitude(10), grid_longitude(9)) = [[53.941, ..., 50.225]] degrees_N
                : longitude(grid_longitude(9), grid_latitude(10)) = [[2.004, ..., 8.156]] degrees_E
                : long_name=Grid latitude name(grid_latitude(10)) = [--, ..., b'kappa']
Cell measures   : measure:area(grid_longitude(9), grid_latitude(10)) = [[2391.9657, ..., 2392.6009]] km2
Coord references: grid_mapping_name:rotated_latitude_longitude
                : standard_name:atmosphere_hybrid_height_coordinate
Domain ancils   : ncvar%a(atmosphere_hybrid_height_coordinate(1)) = [10.0] m
                : ncvar%b(atmosphere_hybrid_height_coordinate(1)) = [20.0]
                : surface_altitude(grid_latitude(10), grid_longitude(9)) = [[0.0, ..., 270.0]] m
Note that time values are converted to date-times with the cftime package. Full detail¶The Inspect the contents of the two field constructs with
full detail.
>>> q.dump()
----------------------------------
Field: specific_humidity (ncvar%q)
----------------------------------
Conventions = 'CF-1.11'
project = 'research'
standard_name = 'specific_humidity'
units = '1'

Data(latitude(5), longitude(8)) = [[0.003, ..., 0.032]] 1

Cell Method: area: mean

Domain Axis: latitude(5)
Domain Axis: longitude(8)
Domain Axis: time(1)

Dimension coordinate: latitude
    standard_name = 'latitude'
    units = 'degrees_north'
    Data(latitude(5)) = [-75.0, ..., 75.0] degrees_north
    Bounds:Data(latitude(5), 2) = [[-90.0, ..., 90.0]]

Dimension coordinate: longitude
    standard_name = 'longitude'
    units = 'degrees_east'
    Data(longitude(8)) = [22.5, ..., 337.5] degrees_east
    Bounds:Data(longitude(8), 2) = [[0.0, ..., 360.0]]

Dimension coordinate: time
    standard_name = 'time'
    units = 'days since 2018-12-01'
    Data(time(1)) = [2019-01-01 00:00:00]

>>> t.dump()
---------------------------------
Field: air_temperature (ncvar%ta)
---------------------------------
Conventions = 'CF-1.11'
project = 'research'
standard_name = 'air_temperature'
units = 'K'

Data(atmosphere_hybrid_height_coordinate(1), grid_latitude(10), grid_longitude(9)) = [[[0.0, ..., 89.0]]] K

Cell Method: grid_latitude(10): grid_longitude(9): mean where land (interval: 0.1 degrees)
Cell Method: time(1): maximum

Field Ancillary: air_temperature standard_error
    standard_name = 'air_temperature standard_error'
    units = 'K'
    Data(grid_latitude(10), grid_longitude(9)) = [[0.76, ..., 0.32]] K

Domain Axis: atmosphere_hybrid_height_coordinate(1)
Domain Axis: grid_latitude(10)
Domain Axis: grid_longitude(9)
Domain Axis: time(1)

Dimension coordinate: atmosphere_hybrid_height_coordinate
    computed_standard_name = 'altitude'
    standard_name = 'atmosphere_hybrid_height_coordinate'
    Data(atmosphere_hybrid_height_coordinate(1)) = [1.5]
    Bounds:Data(atmosphere_hybrid_height_coordinate(1), 2) = [[1.0, 2.0]]

Dimension coordinate: grid_latitude
    standard_name = 'grid_latitude'
    units = 'degrees'
    Data(grid_latitude(10)) = [2.2, ..., -1.76] degrees
    Bounds:Data(grid_latitude(10), 2) = [[2.42, ..., -1.98]]

Dimension coordinate: grid_longitude
    standard_name = 'grid_longitude'
    units = 'degrees'
    Data(grid_longitude(9)) = [-4.7, ..., -1.18] degrees
    Bounds:Data(grid_longitude(9), 2) = [[-4.92, ..., -0.96]]

Dimension coordinate: time
    standard_name = 'time'
    units = 'days since 2018-12-01'
    Data(time(1)) = [2019-01-01 00:00:00]

Auxiliary coordinate: latitude
    standard_name = 'latitude'
    units = 'degrees_N'
    Data(grid_latitude(10), grid_longitude(9)) = [[53.941, ..., 50.225]] degrees_N

Auxiliary coordinate: longitude
    standard_name = 'longitude'
    units = 'degrees_E'
    Data(grid_longitude(9), grid_latitude(10)) = [[2.004, ..., 8.156]] degrees_E

Auxiliary coordinate: long_name=Grid latitude name
    long_name = 'Grid latitude name'
    Data(grid_latitude(10)) = [--, ..., 'kappa']

Domain ancillary: ncvar%a
    units = 'm'
    Data(atmosphere_hybrid_height_coordinate(1)) = [10.0] m
    Bounds:Data(atmosphere_hybrid_height_coordinate(1), 2) = [[5.0, 15.0]]

Domain ancillary: ncvar%b
    Data(atmosphere_hybrid_height_coordinate(1)) = [20.0]
    Bounds:Data(atmosphere_hybrid_height_coordinate(1), 2) = [[14.0, 26.0]]

Domain ancillary: surface_altitude
    standard_name = 'surface_altitude'
    units = 'm'
    Data(grid_latitude(10), grid_longitude(9)) = [[0.0, ..., 270.0]] m

Coordinate reference: atmosphere_hybrid_height_coordinate
    Coordinate conversion:computed_standard_name = altitude
    Coordinate conversion:standard_name = atmosphere_hybrid_height_coordinate
    Coordinate conversion:a = Domain Ancillary: ncvar%a
    Coordinate conversion:b = Domain Ancillary: ncvar%b
    Coordinate conversion:orog = Domain Ancillary: surface_altitude
    Datum:earth_radius = 6371007
    Dimension Coordinate: atmosphere_hybrid_height_coordinate

Coordinate reference: rotated_latitude_longitude
    Coordinate conversion:grid_mapping_name = rotated_latitude_longitude
    Coordinate conversion:grid_north_pole_latitude = 38.0
    Coordinate conversion:grid_north_pole_longitude = 190.0
    Datum:earth_radius = 6371007
    Dimension Coordinate: grid_longitude
    Dimension Coordinate: grid_latitude
    Auxiliary Coordinate: longitude
    Auxiliary Coordinate: latitude

Cell measure: measure:area
    units = 'km2'
    Data(grid_longitude(9), grid_latitude(10)) = [[2391.9657, ..., 2392.6009]] km2
File inspection with cfa¶The description for every field constructs found in datasets also be
generated from the command line, with minimal, medium or full detail,
by using the Use cfa on the command line to inspect the field
constructs contained in one or more datasets. The “-1”
option treats all input files collectively as a single CF
dataset, so that aggregation is attempted within and
between the input files.
$ cfa file.nc
CF Field: air_temperature(atmosphere_hybrid_height_coordinate(1), grid_latitude(10), grid_longitude(9)) K
CF Field: specific_humidity(latitude(5), longitude(8)) 1
$ cfa -1 *.nc
CF Field: specific_humidity(cf_role=timeseries_id(4), ncdim%timeseries(9))
CF Field: cell_area(ncdim%longitude(9), ncdim%latitude(10)) m2
CF Field: eastward_wind(latitude(10), longitude(9)) m s-1
CF Field: specific_humidity(latitude(5), longitude(8)) 1
CF Field: air_potential_temperature(time(120), latitude(5), longitude(8)) K
CF Field: precipitation_flux(time(1), latitude(64), longitude(128)) kg m-2 day-1
CF Field: precipitation_flux(time(2), latitude(4), longitude(5)) kg m2 s-1
CF Field: air_temperature(time(2), latitude(73), longitude(96)) K
CF Field: air_temperature(atmosphere_hybrid_height_coordinate(1), grid_latitude(10), grid_longitude(9)) K
Visualisation¶Powerful, flexible, and user-friendly visualisations of field
constructs are available with the 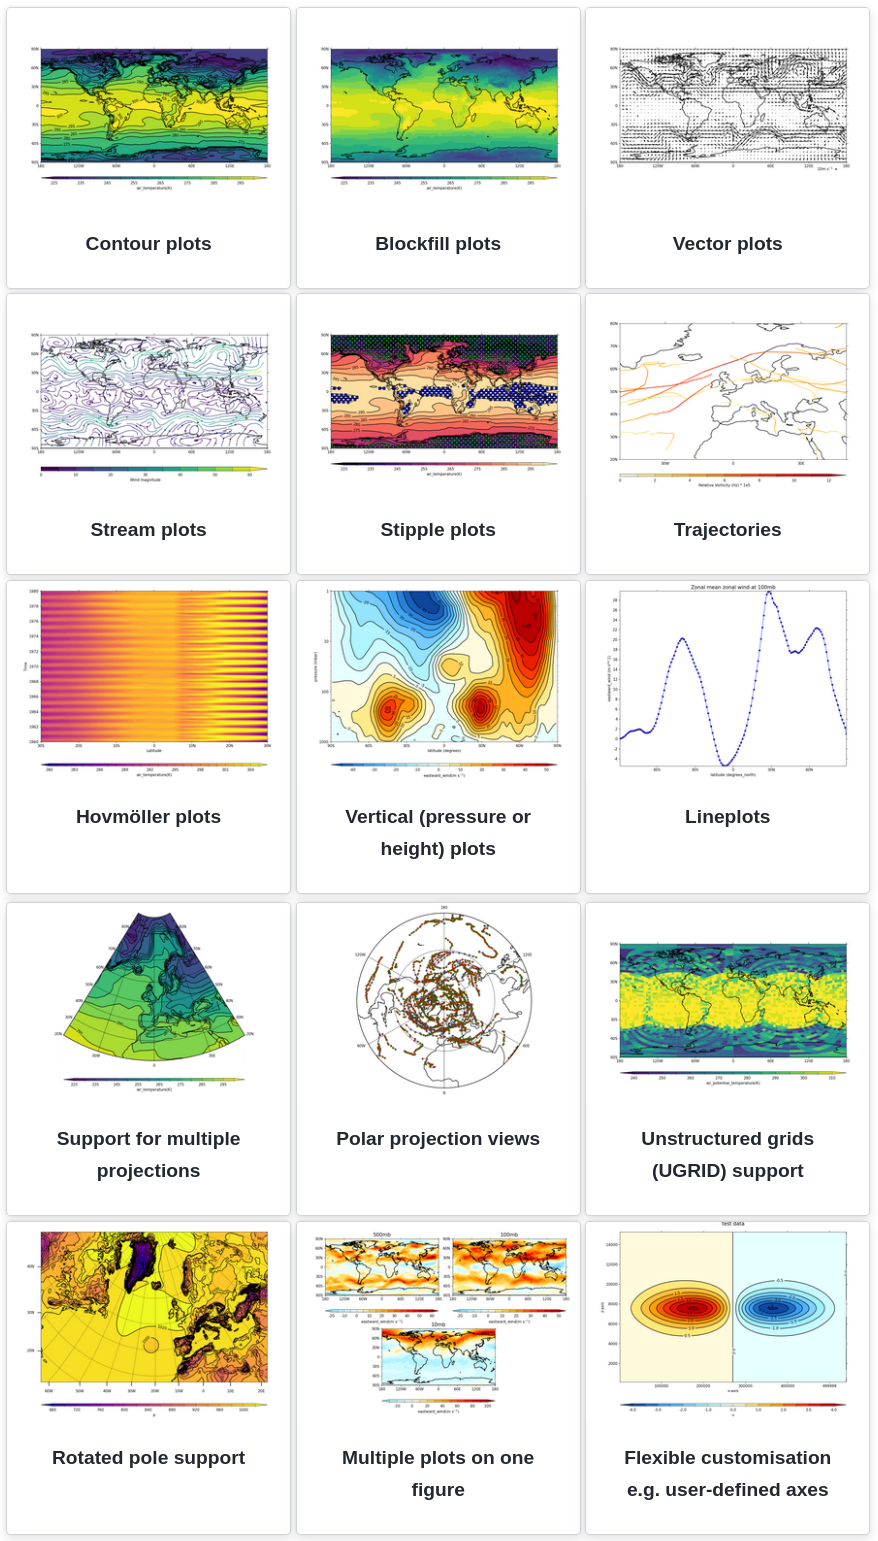
Examples gallery of plots made with the cf-plot library.¶ See the cf-plot gallery for the wide range of plotting possibilities, with example code. These include, but are not limited to:
Field lists¶A field list, contained in a List-like operations on field list instances.
>>> x = cf.read('file.nc')
>>> y = cf.read('precipitation_flux.nc')
>>> x
[<CF Field: specific_humidity(latitude(5), longitude(8)) 1>,
 <CF Field: air_temperature(atmosphere_hybrid_height_coordinate(1), grid_latitude(10), grid_longitude(9)) K>]
>>> y
[<CF Field: precipitation_flux(time(1), latitude(64), longitude(128)) kg m-2 day-1>]
>>> y.extend(x)
>>> y
[<CF Field: precipitation_flux(time(1), latitude(64), longitude(128)) kg m-2 day-1>,
 <CF Field: specific_humidity(latitude(5), longitude(8)) 1>,
 <CF Field: air_temperature(atmosphere_hybrid_height_coordinate(1), grid_latitude(10), grid_longitude(9)) K>]
>>> y[2]
<CF Field: air_temperature(atmosphere_hybrid_height_coordinate(1), grid_latitude(10), grid_longitude(9)) K>
>>> y[::-1]
[<CF Field: air_temperature(atmosphere_hybrid_height_coordinate(1), grid_latitude(10), grid_longitude(9)) K>,
 <CF Field: specific_humidity(latitude(5), longitude(8)) 1>,
 <CF Field: precipitation_flux(time(1), latitude(64), longitude(128)) kg m-2 day-1>]
>>> len(y)
3
>>> len(y + y)
6
>>> len(y * 4)
12
>>> for f in y:
...     print('field:', repr(f))
...
field: <CF Field: precipitation_flux(time(1), latitude(64), longitude(128)) kg m-2 day-1>
field: <CF Field: specific_humidity(latitude(5), longitude(8)) 1>
field: <CF Field: air_temperature(atmosphere_hybrid_height_coordinate(1), grid_latitude(10), grid_longitude(9)) K>
The field list also has some additional methods for copying, testing equality, sorting and selection. Properties¶Descriptive properties that apply to field construct as a whole may be
retrieved with the Retrieve all of the descriptive properties
>>> t = cf.read('file.nc')[1]
>>> t.properties()
{'Conventions': 'CF-1.11',
 'project': 'research',
 'standard_name': 'air_temperature',
 'units': 'K'}
Note From a Python script or using the standard Python shell, the result of methods such as the property methods given here will be returned in condensed form, without linebreaks between items. If a “pretty printed” output as displayed in these pages is preferred, use the ipython shell or wrap calls with a suitable method from Python’s dedicated pprint module. Individual properties may be accessed and modified with the
Check is a property exists, retrieve its value, delete
it and then set it to a new value.
>>> t.has_property('standard_name')
True
>>> t.get_property('standard_name')
'air_temperature'
>>> t.del_property('standard_name')
'air_temperature'
>>> t.get_property('standard_name', default='not set')
'not set'
>>> t.set_property('standard_name', value='air_temperature')
>>> t.get_property('standard_name', default='not set')
'air_temperature'
A collection of properties may be set at the same time with the
Update the properties with a collection, delete all of
the properties, and reinstate the original properties.
>>> original = t.properties()
>>> original
{'Conventions': 'CF-1.11',
 'project': 'research',
 'standard_name': 'air_temperature',
 'units': 'K'}
>>> t.set_properties({'foo': 'bar', 'units': 'K'})
>>> t.properties()
{'Conventions': 'CF-1.11',
 'foo': 'bar',
 'project': 'research',
 'standard_name': 'air_temperature',
 'units': 'K'}
>>> t.clear_properties()
 {'Conventions': 'CF-1.11',
 'foo': 'bar',
 'project': 'research',
 'standard_name': 'air_temperature',
 'units': 'K'}
>>> t.properties()
{'units': 'K'}
>>> t.set_properties(original)
>>> t.properties()
{'Conventions': 'CF-1.11',
 'project': 'research',
 'standard_name': 'air_temperature',
 'units': 'K'}
Note that the All of the methods related to the properties are listed here. Field identities¶A field construct identity is a string that describes the construct
and is based on the field construct’s properties. A canonical identity
is returned by the A field construct’s identity may be any one of the following
Get the canonical identity, and all identities, of a
field construct.
>>> t.identity()
'air_temperature'
>>> t.identities()
['air_temperature',
 'Conventions=CF-1.11',
 'project=research',
 'units=K',
 'standard_name=air_temperature',
 'ncvar%ta']
The identity returned by the Metadata constructs¶The metadata constructs describe the field construct that contains them. Each CF data model metadata construct has a corresponding cf class:
Metadata constructs of a particular type can be retrieved with the following attributes of the field construct:
Each of these attributes returns a Retrieve the field construct’s coordinate reference
constructs, and access them using dictionary methods.
>>> q, t = cf.read('file.nc')
>>> t.coordinate_references
<CF Constructs: coordinate_reference(2)>
>>> print(t.coordinate_references)
Constructs:
{'coordinatereference0': <CF CoordinateReference: standard_name:atmosphere_hybrid_height_coordinate>,
 'coordinatereference1': <CF CoordinateReference: grid_mapping_name:rotated_latitude_longitude>}
>>> list(t.coordinate_references().keys())
['coordinatereference0', 'coordinatereference1']
>>> for key, value in t.coordinate_references().items():
...     print(key, repr(value))
...
coordinatereference0 <CF CoordinateReference: standard_name:atmosphere_hybrid_height_coordinate>
coordinatereference1 <CF CoordinateReference: grid_mapping_name:rotated_latitude_longitude>
Retrieve the field construct’s dimension coordinate and
domain axis constructs.
>>> print(t.dimension_coordinates)
Constructs:
{'dimensioncoordinate0': <CF DimensionCoordinate: atmosphere_hybrid_height_coordinate(1) >,
 'dimensioncoordinate1': <CF DimensionCoordinate: grid_latitude(10) degrees>,
 'dimensioncoordinate2': <CF DimensionCoordinate: grid_longitude(9) degrees>,
 'dimensioncoordinate3': <CF DimensionCoordinate: time(1) days since 2018-12-01 >}
>>> print(t.domain_axes)
Constructs:
{'domainaxis0': <CF DomainAxis: size(1)>,
 'domainaxis1': <CF DomainAxis: size(10)>,
 'domainaxis2': <CF DomainAxis: size(9)>,
 'domainaxis3': <CF DomainAxis: size(1)>}
The construct keys (e.g. Metadata constructs of all types may be returned by the
Retrieve all of the field construct’s metadata
constructs.
>>> q.constructs <CF Constructs: cell_method(1), dimension_coordinate(3), domain_axis(3)> >>> print(q.constructs) Constructs: {'cellmethod0': <CF CellMethod: area: mean>, 'dimensioncoordinate0': <CF DimensionCoordinate: latitude(5) degrees_north>, 'dimensioncoordinate1': <CF DimensionCoordinate: longitude(8) degrees_east>, 'dimensioncoordinate2': <CF DimensionCoordinate: time(1) days since 2018-12-01 >, 'domainaxis0': <CF DomainAxis: size(5)>, 'domainaxis1': <CF DomainAxis: size(8)>, 'domainaxis2': <CF DomainAxis: size(1)>} >>> t.constructs <CF Constructs: auxiliary_coordinate(3), cell_measure(1), cell_method(2), coordinate_reference(2), dimension_coordinate(4), domain_ancillary(3), domain_axis(4), field_ancillary(1)> >>> print(t.constructs) Constructs: {'auxiliarycoordinate0': <CF AuxiliaryCoordinate: latitude(10, 9) degrees_N>, 'auxiliarycoordinate1': <CF AuxiliaryCoordinate: longitude(9, 10) degrees_E>, 'auxiliarycoordinate2': <CF AuxiliaryCoordinate: long_name=Grid latitude name(10) >, 'cellmeasure0': <CF CellMeasure: measure:area(9, 10) km2>, 'cellmethod0': <CF CellMethod: domainaxis1: domainaxis2: mean where land (interval: 0.1 degrees)>, 'cellmethod1': <CF CellMethod: domainaxis3: maximum>, 'coordinatereference0': <CF CoordinateReference: standard_name:atmosphere_hybrid_height_coordinate>, 'coordinatereference1': <CF CoordinateReference: grid_mapping_name:rotated_latitude_longitude>, 'dimensioncoordinate0': <CF DimensionCoordinate: atmosphere_hybrid_height_coordinate(1) >, 'dimensioncoordinate1': <CF DimensionCoordinate: grid_latitude(10) degrees>, 'dimensioncoordinate2': <CF DimensionCoordinate: grid_longitude(9) degrees>, 'dimensioncoordinate3': <CF DimensionCoordinate: time(1) days since 2018-12-01 >, 'domainancillary0': <CF DomainAncillary: ncvar%a(1) m>, 'domainancillary1': <CF DomainAncillary: ncvar%b(1) >, 'domainancillary2': <CF DomainAncillary: surface_altitude(10, 9) m>, 'domainaxis0': <CF DomainAxis: size(1)>, 'domainaxis1': <CF DomainAxis: size(10)>, 'domainaxis2': <CF DomainAxis: size(9)>, 'domainaxis3': <CF DomainAxis: size(1)>, 'fieldancillary0': <CF FieldAncillary: air_temperature standard_error(10, 9) K>} Data¶The field construct’s data is stored in a Retrieve the data and inspect it, showing the shape and
some illustrative values.
>>> q, t = cf.read('file.nc')
>>> t.data
<CF Data(1, 10, 9): [[[262.8, ..., 269.7]]] K>
The The field construct (and any other construct that contains data) also provides attributes for direct access. Retrieve a numpy array of the data.
>>> a = t.array
>>> type(a)
numpy.ma.core.MaskedArray
>>> print(a)
[[[262.8 270.5 279.8 269.5 260.9 265.0 263.5 278.9 269.2]
  [272.7 268.4 279.5 278.9 263.8 263.3 274.2 265.7 279.5]
  [269.7 279.1 273.4 274.2 279.6 270.2 280.  272.5 263.7]
  [261.7 260.6 270.8 260.3 265.6 279.4 276.9 267.6 260.6]
  [264.2 275.9 262.5 264.9 264.7 270.2 270.4 268.6 275.3]
  [263.9 263.8 272.1 263.7 272.2 264.2 260.  263.5 270.2]
  [273.8 273.1 268.5 272.3 264.3 278.7 270.6 273.0 270.6]
  [267.9 273.5 279.8 260.3 261.2 275.3 271.2 260.8 268.9]
  [270.9 278.7 273.2 261.7 271.6 265.8 273.  278.5 266.4]
  [276.4 264.2 276.3 266.1 276.1 268.1 277.  273.4 269.7]]]
Inspect the data type, number of dimensions, dimension
sizes and number of elements of the data.
>>> t.dtype
dtype('float64')
>>> t.ndim
3
>>> t.shape
(1, 10, 9)
>>> t.size
90
The array is stored internally as a Dask array,
which can be retrieved with the Retrieve the dask array of the data.
>>> d = t.to_dask_array()
>>> d
dask.array<array, shape=(1, 10, 9), dtype=float64, chunksize=(1, 10, 9), chunktype=numpy.ndarray>
Note that changes to the returned Dask array in-place will also be seen in the field construct. All of the methods and attributes related to the data are listed here. Data axes¶The data array of the field construct spans all the domain axis
constructs with the possible exception of size one domain axis
constructs. The domain axis constructs spanned by the field
construct’s data are found with the Show which data axis constructs are spanned by the field
construct’s data.
>>> print(t.domain_axes)
Constructs:
{'domainaxis0': <CF DomainAxis: size(1)>,
 'domainaxis1': <CF DomainAxis: size(10)>,
 'domainaxis2': <CF DomainAxis: size(9)>,
 'domainaxis3': <CF DomainAxis: size(1)>}
>>> t
<CF Field: air_temperature(atmosphere_hybrid_height_coordinate(1), grid_latitude(10), grid_longitude(9)) K>
>>> t.data.shape
(1, 10, 9)
>>> t.get_data_axes()
('domainaxis0', 'domainaxis1', 'domainaxis2')
The data may be set with the Delete the data and then reinstate it, using the
existing data axes.
>>> data = t.del_data()
>>> t.has_data()
False
>>> t.set_data(data)
>>> t.data
<CF Data(1, 10, 9): [[[262.8, ..., 269.7]]] K>
See the section field construct creation for more examples. Date-time¶Data representing date-times is defined as elapsed times since a
reference date-time in a particular calendar (Gregorian, by
default). The View date-times as elapsed time or as date-time
objects.
>>> d = cf.Data([1, 2, 3], units='days since 2004-2-28')
>>> print(d.array)
[1 2 3]
>>> print(d.datetime_array)
[cftime.DatetimeGregorian(2004-02-29 00:00:00)
 cftime.DatetimeGregorian(2004-03-01 00:00:00)
 cftime.DatetimeGregorian(2004-03-02 00:00:00)]
>>> e = cf.Data([1, 2, 3], units='days since 2004-2-28', calendar='360_day')
>>> print(e.array)
[1 2 3]
>>> print(e.datetime_array)
[cftime.Datetime360Day(2004-02-29 00:00:00)
 cftime.Datetime360Day(2004-02-30 00:00:00)
 cftime.Datetime360Day(2004-03-01 00:00:00)]
Alternatively, date-time data may be created by providing date-time
objects or ISO 8601-like date-time strings. Date-time objects may be
Creating a Data instance from a date-time objects.
>>> date_time = cf.dt(2004, 2, 29)
>>> date_time
cftime.datetime(2004-02-29 00:00:00)
>>> d = cf.Data(date_time, calendar='gregorian')
>>> print(d.array)
0.0
>>> d.datetime_array
array(cftime.DatetimeGregorian(2004-02-29 00:00:00), dtype=object)
Creating Data instances from date-time an array of
date-time objects.
>>> date_times  = cf.dt_vector(['2004-02-29', '2004-02-30', '2004-03-01'], calendar='360_day')
>>> print (date_times)
[cftime.Datetime360Day(2004-02-29 00:00:00)
 cftime.Datetime360Day(2004-02-30 00:00:00)
 cftime.Datetime360Day(2004-03-01 00:00:00)]
>>> e = cf.Data(date_times)
>>> print(e.array)
[0. 1. 2.]
>>> print(e.datetime_array)
[cftime.Datetime360Day(2004-02-29 00:00:00)
 cftime.Datetime360Day(2004-02-30 00:00:00)
 cftime.Datetime360Day(2004-03-01 00:00:00)]
Creating Data instances from date-time strings. If no
units or calendar are provided then the “dt” keyword is
required.
>>> d = cf.Data(['2004-02-29', '2004-02-30', '2004-03-01'], calendar='360_day')
>>> d.Units
<Units: days since 2004-02-29 360_day>
>>> print(d.array)
[0. 1. 2.]
>>> print(d.datetime_array)
[cftime.Datetime360Day(2004-02-29 00:00:00)
 cftime.Datetime360Day(2004-02-30 00:00:00)
 cftime.Datetime360Day(2004-03-01 00:00:00)]
>>> e = cf.Data(['2004-02-29', '2004-03-01', '2004-03-02'], dt=True)
>>> e.Units
<Units: days since 2004-02-29>
>>> print(e.datetime_array)
[cftime.DatetimeGregorian(2004-02-29 00:00:00)
 cftime.DatetimeGregorian(2004-03-01 00:00:00)
 cftime.DatetimeGregorian(2004-03-02 00:00:00)]
>>> f = cf.Data(['2004-02-29', '2004-03-01', '2004-03-02'])
>>> print(f.array)
['2004-02-29' '2004-03-01' '2004-03-02']
>>> f.Units
<Units: >
>>> print(f.datetime_array)  # Raises Exception
Traceback (most recent call last):
    ...
ValueError: Can't create date-time array from units <Units: >
Manipulating dimensions¶The dimensions of a field construct’s data may be reordered, have size one dimensions removed and have new size one dimensions included by using the following field construct methods:
Remove all size one dimensions from the data, noting
that metadata constructs which span the corresponding
domain axis construct are not affected.
>>> q, t = cf.read('file.nc')
>>> t
<CF Field: air_temperature(atmosphere_hybrid_height_coordinate(1), grid_latitude(10), grid_longitude(9)) K>
>>> t2 = t.squeeze()
>>> t2
<CF Field: air_temperature(grid_latitude(10), grid_longitude(9)) K>
>>> print(t2.dimension_coordinates)
Constructs:
{'dimensioncoordinate0': <CF DimensionCoordinate: atmosphere_hybrid_height_coordinate(1) >,
 'dimensioncoordinate1': <CF DimensionCoordinate: grid_latitude(10) degrees>,
 'dimensioncoordinate2': <CF DimensionCoordinate: grid_longitude(9) degrees>,
 'dimensioncoordinate3': <CF DimensionCoordinate: time(1) days since 2018-12-01 >}
Insert a new size one dimension, corresponding to a size
one domain axis construct, and then reorder the
dimensions.
>>> t3 = t2.insert_dimension(axis='domainaxis3', position=1)
>>> t3
<CF Field: air_temperature(grid_latitude(10), time(1), grid_longitude(9)) K>
>>> t3.transpose([2, 0, 1])
<CF Field: air_temperature(grid_longitude(9), grid_latitude(10), time(1)) K>
When transposing the data dimensions, the dimensions of metadata construct data are, by default, unchanged. It is also possible to permute the data dimensions of the metadata constructs so that they have the same relative order as the field construct: Also permute the data dimension of metadata constructs
using the ‘constructs’ keyword.
>>> t4 = t.transpose(['X', 'Z', 'Y'], constructs=True) Data mask¶See also There is always a data mask, which may be thought of as a separate
data array of Booleans with the same shape as the original data. The
data mask is Inspect the data mask of a field construct.
>>> print(q)
Field: specific_humidity (ncvar%q)
----------------------------------
Data            : specific_humidity(latitude(5), longitude(8)) 1
Cell methods    : area: mean
Dimension coords: latitude(5) = [-75.0, ..., 75.0] degrees_north
                : longitude(8) = [22.5, ..., 337.5] degrees_east
                : time(1) = [2019-01-01 00:00:00]
>>> print(q.mask)
Field: long_name=mask
---------------------
Data            : long_name=mask(latitude(5), longitude(8))
Cell methods    : area: mean
Dimension coords: latitude(5) = [-75.0, ..., 75.0] degrees_north
                : longitude(8) = [22.5, ..., 337.5] degrees_east
                : time(1) = [2019-01-01 00:00:00]
>>> print(q.mask.array)
[[False False False False False False False False]
 [False False False False False False False False]
 [False False False False False False False False]
 [False False False False False False False False]
 [False False False False False False False False]]
Mask the polar rows (see the “Assignment by index”
section) and inspect the new data mask.
>>> q[[0, 4], :] = cf.masked
>>> print(q.mask.array)
[[ True  True  True  True  True  True  True  True]
 [False False False False False False False False]
 [False False False False False False False False]
 [False False False False False False False False]
 [ True  True  True  True  True  True  True  True]]
The See if all, or any, data points are masked.
>>> q.mask.all()
False
>>> q.mask.any()
True
The mask of a netCDF dataset array is implied by array values that
meet the criteria implied by the However, this automatic masking may be bypassed by setting the mask
keyword of the Read a dataset from disk without automatic masking, and
then manually apply the mask
>>> cf.write(q, 'masked_q.nc')
>>> no_mask_q = cf.read('masked_q.nc', mask=False)[0]
>>> print(no_mask_q.array)
[9.96920997e+36, 9.96920997e+36, 9.96920997e+36, 9.96920997e+36,
 9.96920997e+36, 9.96920997e+36, 9.96920997e+36, 9.96920997e+36],
 [0.023 0.036 0.045 0.062 0.046 0.073 0.006 0.066]
 [0.11  0.131 0.124 0.146 0.087 0.103 0.057 0.011]
 [0.029 0.059 0.039 0.07  0.058 0.072 0.009 0.017]
[9.96920997e+36, 9.96920997e+36, 9.96920997e+36, 9.96920997e+36,
 9.96920997e+36, 9.96920997e+36, 9.96920997e+36, 9.96920997e+36]])
>>> masked_q = no_mask_q.apply_masking()
>>> print(masked_q.array)
[[   --    --    --    --    --    --    --    --]
 [0.023 0.036 0.045 0.062 0.046 0.073 0.006 0.066]
 [0.11  0.131 0.124 0.146 0.087 0.103 0.057 0.011]
 [0.029 0.059 0.039 0.07  0.058 0.072 0.009 0.017]
 [   --    --    --    --    --    --    --    --]]
The Subspacing by index¶Creation of a new field construct which spans a subspace of the domain of an existing field construct is achieved either by indexing the field construct directly (as described in this section) or by identifying indices based on the metadata constructs (see Subspacing by metadata). The subspacing operation, in either case, also subspaces any metadata constructs of the field construct (e.g. coordinate metadata constructs) which span any of the domain axis constructs that are affected. The new field construct is created with the same properties as the original field construct. Subspacing by indexing uses rules that are very similar to the numpy indexing rules, the only differences being:
Create a new field construct whose domain spans the first
longitude of the original, and with a reversed latitude
axis.
>>> q, t = cf.read('file.nc')
>>> print(q)
Field: specific_humidity (ncvar%q)
----------------------------------
Data            : specific_humidity(latitude(5), longitude(8)) 1
Cell methods    : area: mean
Dimension coords: time(1) = [2019-01-01 00:00:00]
                : latitude(5) = [-75.0, ..., 75.0] degrees_north
                : longitude(8) = [22.5, ..., 337.5] degrees_east

>>> new = q[::-1, 0]
>>> print(new)
Field: specific_humidity (ncvar%q)
----------------------------------
Data            : specific_humidity(latitude(5), longitude(1)) 1
Cell methods    : area: mean
Dimension coords: time(1) = [2019-01-01 00:00:00]
                : latitude(5) = [75.0, ..., -75.0] degrees_north
                : longitude(1) = [22.5] degrees_east
Create new field constructs with a variety of indexing
techniques.
>>> t
<CF Field: air_temperature(atmosphere_hybrid_height_coordinate(1), grid_latitude(10), grid_longitude(9)) K>
>>> t[:, :, 1]
<CF Field: air_temperature(atmosphere_hybrid_height_coordinate(1), grid_latitude(10), grid_longitude(1)) K>
>>> t[:, 0]
<CF Field: air_temperature(atmosphere_hybrid_height_coordinate(1), grid_latitude(1), grid_longitude(9)) K>
>>> t[..., 6:3:-1, 3:6]
<CF Field: air_temperature(atmosphere_hybrid_height_coordinate(1), grid_latitude(3), grid_longitude(3)) K>
>>> t[0, [2, 3, 9], [4, 8]]
<CF Field: air_temperature(atmosphere_hybrid_height_coordinate(1), grid_latitude(3), grid_longitude(2)) K>
>>> t[0, :, -2]
<CF Field: air_temperature(atmosphere_hybrid_height_coordinate(1), grid_latitude(10), grid_longitude(1)) K>
>>> t[..., [True, False, True, True, False, False, True, False, False]]
<CF Field: air_temperature(atmosphere_hybrid_height_coordinate(1), grid_latitude(10), grid_longitude(4)) K>
Subspacing a cyclic dimension with a slice will wrap
around the data edges.
>>> q
<CF Field: specific_humidity(latitude(5), longitude(8)) 1>
>>> q.cyclic()
{'domainaxis1'}
>>> q.constructs.domain_axis_identity('domainaxis1')
'longitude'
>>> print(q[:, -2:3])
Field: specific_humidity (ncvar%q)
----------------------------------
Data            : specific_humidity(latitude(5), longitude(5)) 1
Cell methods    : area: mean
Dimension coords: latitude(5) = [-75.0, ..., 75.0] degrees_north
                : longitude(5) = [-67.5, ..., 112.5] degrees_east
                : time(1) = [2019-01-01 00:00:00]
>>> print(q[:, 3:-2:-1])
Field: specific_humidity (ncvar%q)
----------------------------------
Data            : specific_humidity(latitude(5), longitude(5)) 1
Cell methods    : area: mean
Dimension coords: latitude(5) = [-75.0, ..., 75.0] degrees_north
                : longitude(5) = [157.5, ..., -22.5] degrees_east
                : time(1) = [2019-01-01 00:00:00]
An index that is a list of integers may also be provided as a Create a new field construct for longitudes greater than
180 degrees east.
>>> lon = q.dimension_coordinate('X')
>>> print(q[:, lon > 180])
Field: specific_humidity (ncvar%q)
----------------------------------
Data            : specific_humidity(latitude(5), longitude(4)) 1
Cell methods    : area: mean
Dimension coords: latitude(5) = [-75.0, ..., 75.0] degrees_north
                : longitude(4) = [202.5, ..., 337.5] degrees_east
                : time(1) = [2019-01-01 00:00:00]
A Create a new ‘Data’ instance by indexing.
>>> t.data[0, [2, 3, 9], [4, 8]]
<CF Data(1, 3, 2): [[[279.6, ..., 269.7]]] K>
Assignment by index¶Data elements can be changed by assigning to elements selected by indices of the data (as described in this section); by conditions based on the data values of the field construct or one of its metadata constructs (see Assignment by condition); or by identifying indices based on arbitrary metadata constructs (see Assignment by metadata). Assignment by indices uses rules that are very similar to the numpy indexing rules, the only difference being:
A single value may be assigned to any number of elements. Set a single element to -1, a “column” of elements
to -2 and a “square” of elements to -3.
>>> q, t = cf.read('file.nc')
>>> t[:, 0, 0] = -1
>>> t[:, :, 1] = -2
>>> t[..., 6:3:-1, 3:6] = -3
>>> print(t.array)
[[[ -1.0  -2.0 279.8 269.5 260.9 265.0 263.5 278.9 269.2]
  [272.7  -2.0 279.5 278.9 263.8 263.3 274.2 265.7 279.5]
  [269.7  -2.0 273.4 274.2 279.6 270.2 280.0 272.5 263.7]
  [261.7  -2.0 270.8 260.3 265.6 279.4 276.9 267.6 260.6]
  [264.2  -2.0 262.5  -3.0  -3.0  -3.0 270.4 268.6 275.3]
  [263.9  -2.0 272.1  -3.0  -3.0  -3.0 260.0 263.5 270.2]
  [273.8  -2.0 268.5  -3.0  -3.0  -3.0 270.6 273.0 270.6]
  [267.9  -2.0 279.8 260.3 261.2 275.3 271.2 260.8 268.9]
  [270.9  -2.0 273.2 261.7 271.6 265.8 273.0 278.5 266.4]
  [276.4  -2.0 276.3 266.1 276.1 268.1 277.0 273.4 269.7]]]
An array of values can be assigned, as long as it is broadcastable to the shape defined by the indices, using the numpy broadcasting rules. Assigning arrays of values.
>>> import numpy
>>> t[..., 6:3:-1, 3:6] = numpy.arange(9).reshape(3, 3)
>>> t[0, [2, 9], [4, 8]] =  cf.Data([[-4, -5]])
>>> t[0, [4, 7], 0] = [[-10], [-11]]
>>> print(t.array)
[[[ -1.0  -2.0 279.8 269.5 260.9 265.0 263.5 278.9 269.2]
  [272.7  -2.0 279.5 278.9 263.8 263.3 274.2 265.7 279.5]
  [269.7  -2.0 273.4 274.2  -4.0 270.2 280.0 272.5  -5.0]
  [261.7  -2.0 270.8 260.3 265.6 279.4 276.9 267.6 260.6]
  [-10.0  -2.0 262.5   6.0   7.0   8.0 270.4 268.6 275.3]
  [263.9  -2.0 272.1   3.0   4.0   5.0 260.0 263.5 270.2]
  [273.8  -2.0 268.5   0.0   1.0   2.0 270.6 273.0 270.6]
  [-11.0  -2.0 279.8 260.3 261.2 275.3 271.2 260.8 268.9]
  [270.9  -2.0 273.2 261.7 271.6 265.8 273.0 278.5 266.4]
  [276.4  -2.0 276.3 266.1  -4.0 268.1 277.0 273.4  -5.0]]]
In-place modification is also possible: Modifying the data in-place.
>>> print(t[0, 0, -1].array)
[[[269.2]]]
>>> t[0, 0, -1] /= -10
>>> print(t[0, 0, -1].array)
[[[-26.92]]]
A Assign to the ‘Data’ instance directly.
>>> t.data[0, 0, -1] = -99
>>> print(t[0, 0, -1].array)
[[[-99.]]]
An index that is a list of integers may also be provided as a Assign to elements which correspond to positive grid
latitudes.
>>> y = t.dimension_coordinate('Y')
>>> t[:, y > 0] = -6
>>> print(t)
[[[ -6.0 -4.0  -6.0  -6.0  -6.0  -6.0  -6.0  -6.0  -6.0]
  [ -6.0 -4.0  -6.0  -6.0  -6.0  -6.0  -6.0  -6.0  -6.0]
  [ -6.0 -4.0  -6.0  -6.0  -6.0  -6.0  -6.0  -6.0  -6.0]
  [ -6.0 -4.0  -6.0  -6.0  -6.0  -6.0  -6.0  -6.0  -6.0]
  [ -6.0 -4.0  -6.0  -6.0  -6.0  -6.0  -6.0  -6.0  -6.0]
  [263.9 -2.0 272.1   3.0   4.0   5.0 260.0 263.5 270.2]
  [273.8 -2.0 268.5   0.0   1.0   2.0 270.6 273.0 270.6]
  [-11.0 -2.0 279.8 260.3 261.2 275.3 271.2 260.8 268.9]
  [270.9 -2.0 273.2 261.7 271.6 265.8 273.0 278.5 266.4]
  [276.4 -2.0 276.3 266.1  -4.0 268.1 277.0 273.4  -5.0]]]
Masked values¶Data array elements may be set to masked values by assigning them to
the Set a column of elements to masked values.
>>> t[0, :, -2] = cf.masked
>>> print(t.array)
[[[ -1.0  -2.0 279.8 269.5 260.9 265.0 263.5    -- -99.0]
  [272.7  -2.0 279.5 278.9 263.8 263.3 274.2    -- 279.5]
  [269.7  -2.0 273.4 274.2  -4.0 270.2 280.0    --  -5.0]
  [261.7  -2.0 270.8 260.3 265.6 279.4 276.9    -- 260.6]
  [264.2  -2.0 262.5   6.0   7.0   8.0 270.4    -- 275.3]
  [263.9  -2.0 272.1   3.0   4.0   5.0 260.0    -- 270.2]
  [273.8  -2.0 268.5   0.0   1.0   2.0 270.6    -- 270.6]
  [-11.0  -2.0 279.8 260.3 261.2 275.3 271.2    -- 268.9]
  [270.9  -2.0 273.2 261.7 271.6 265.8 273.0    -- 266.4]
  [276.4  -2.0 276.3 266.1  -4.0 268.1 277.0    --  -5.0]]]
By default the data mask is “hard”, meaning that masked values can not
be changed by assigning them to another value. This behaviour may be
changed by setting the Changing masked elements back to data values is only
possible when the “hardmask” attribute is False.
>>> t[0, 4, -2] = 99
>>> print(t[0, 4, -2].array)
[[[--]]]
>>> t.hardmask = False
>>> t[0, 4, -2] = 99
>>> print(t[0, 4, -2].array)
[[[99.]]]
Note that this is the opposite behaviour to Assignment from other field constructs¶Another field construct can also be assigned to indices. The other field construct’s data is actually assigned, but only after being transformed so that it is broadcastable to the subspace defined by the assignment indices. This is done by using the metadata constructs of the two field constructs to create a mapping of physically compatible dimensions between the fields, and then manipulating the dimensions of the other field construct’s data to ensure that they are broadcastable. Transform a field construct’s data and assign it back to
the original field, demonstrating that this is a null
operation.
>>> q, t = cf.read('file.nc')
>>> t0 = t.copy()
>>> u = t.squeeze(0)
>>> u.transpose(inplace=True)
>>> u.flip(inplace=True)
>>> t[...] = u
>>> t.allclose(t0)
True
Broadcasting is carried out after transforms to ensure
field construct compatibility.
>>> print(t[:, :, 1:3].array)
[[[270.5 279.8]
   [268.4 279.5]
   [279.1 273.4]
   [260.6 270.8]
   [275.9 262.5]
   [263.8 272.1]
   [273.1 268.5]
   [273.5 279.8]
   [278.7 273.2]
   [264.2 276.3]]]
>>> print(u[2].array)
[[277.  273.  271.2 270.6 260.  270.4 276.9 280.  274.2 263.5]]
>>> t[:, :, 1:3] = u[2]
>>> print(t[:, :, 1:3].array)
[[[263.5 263.5]
  [274.2 274.2]
  [280.  280. ]
  [276.9 276.9]
  [270.4 270.4]
  [260.  260. ]
  [270.6 270.6]
  [271.2 271.2]
  [273.  273. ]
  [277.  277. ]]]
If either of the field constructs does not have sufficient metadata to
create the such a mapping, then any manipulation of the dimensions
must be done manually, and the other field construct’s Assignment of bounds¶When assigning an object that has bounds to an object that also has bounds, then the bounds are also assigned. This is the only circumstance that allows bounds to be updated during assignment by index. Units¶The field construct, and any metadata construct that contains data,
has units which are described by the Inspection and changing of units.
>>> q, t = cf.read('file.nc')
>>> t.units
'K'
>>> t.Units
<Units: K>
>>> t.units = 'degreesC'
>>> t.units
'degreesC'
>>> t.Units
<Units: degreesC>
>>> t.Units += 273.15
>>> t.units
'K'
>>> t.Units
<Units: K>
When the units are changed, the data are automatically converted to the new units when next accessed. Changing the units automatically results in conversion of
the data values.
>>> t.data
<CF Data(1, 10, 9): [[[262.8, ..., 269.7]]] K>
>>> t.Units = cf.Units('degreesC')
>>> t.data
<CF Data(1, 10, 9): [[[-10.35, ..., -3.45]]] degreesC>
>>> t.units = 'Kelvin'
>>> t.data
<CF Data(1, 10, 9): [[[262.8, ..., 269.7]]] Kelvin>
When assigning to the data with values that have units, the values are automatically converted to have the same units as the data. Automatic conversions occur when assigning from data
with different units.
>>> t.data
<CF Data(1, 10, 9): [[[262.8, ..., 269.7]]] Kelvin>
>>> t[0, 0, 0] = cf.Data(1)
>>> t.data
<CF Data(1, 10, 9): [[[1.0, ..., 269.7]]] Kelvin>
>>> t[0, 0, 0] = cf.Data(1, 'degreesC')
>>> t.data
<CF Data(1, 10, 9): [[[274.15, ..., 269.7]]] Kelvin>
Automatic units conversions are also carried out between operands during mathematical operations. Calendar¶When the data represents date-times, the The calendar of date-times is available as a property or
via the Units instance.
>>> air_temp = cf.read('air_temperature.nc')[0]
>>> time = air_temp.coordinate('time')
>>> time.units
'days since 1860-1-1'
>>> time.calendar
'360_day'
>>> time.Units
<Units: days since 1860-1-1 360_day>
Filtering metadata constructs¶A
The Each of these methods returns a new Get constructs by their type.
>>> q, t = cf.read('file.nc')
>>> print(t.constructs.filter_by_type('dimension_coordinate'))
Constructs:
{'dimensioncoordinate0': <CF DimensionCoordinate: atmosphere_hybrid_height_coordinate(1) >,
 'dimensioncoordinate1': <CF DimensionCoordinate: grid_latitude(10) degrees>,
 'dimensioncoordinate2': <CF DimensionCoordinate: grid_longitude(9) degrees>,
 'dimensioncoordinate3': <CF DimensionCoordinate: time(1) days since 2018-12-01 >}
>>> print(t.constructs.filter_by_type('cell_method', 'field_ancillary'))
Constructs:
{'cellmethod0': <CF CellMethod: domainaxis1: domainaxis2: mean where land (interval: 0.1 degrees)>,
 'cellmethod1': <CF CellMethod: domainaxis3: maximum>,
 'fieldancillary0': <CF FieldAncillary: air_temperature standard_error(10, 9) K>}
Get constructs by their properties.
>>> print(t.constructs.filter_by_property(
...             standard_name='air_temperature standard_error'))
Constructs:
{'fieldancillary0': <CF FieldAncillary: air_temperature standard_error(10, 9) K>}
>>> print(t.constructs.filter_by_property(
...             standard_name='air_temperature standard_error',
...             units='K'))
Constructs:
{'fieldancillary0': <CF FieldAncillary: air_temperature standard_error(10, 9) K>}
>>> print(t.constructs.filter_by_property(
...             'or',
...             standard_name='air_temperature standard_error',
...             units='m'))
Constructs:
{'domainancillary0': <CF DomainAncillary: ncvar%a(1) m>,
 'domainancillary2': <CF DomainAncillary: surface_altitude(10, 9) m>,
 'fieldancillary0': <CF FieldAncillary: air_temperature standard_error(10, 9) K>}
Get constructs whose data span at least one of the ‘Y’
and ‘X’ domain axis constructs.
>>> print(t.constructs.filter_by_axis('X', 'Y', axis_mode='or'))
Constructs:
{'auxiliarycoordinate0': <CF AuxiliaryCoordinate: latitude(10, 9) degrees_N>,
 'auxiliarycoordinate1': <CF AuxiliaryCoordinate: longitude(9, 10) degrees_E>,
 'auxiliarycoordinate2': <CF AuxiliaryCoordinate: long_name=Grid latitude name(10) >,
 'cellmeasure0': <CF CellMeasure: measure:area(9, 10) km2>,
 'dimensioncoordinate1': <CF DimensionCoordinate: grid_latitude(10) degrees>,
 'domainancillary2': <CF DomainAncillary: surface_altitude(10, 9) m>,
 'fieldancillary0': <CF FieldAncillary: air_temperature standard_error(10, 9) K>}
Get cell measure constructs by their “measure”.
>>> print(t.constructs.filter_by_measure('area'))
Constructs:
{'cellmeasure0': <CF CellMeasure: measure:area(9, 10) km2>}
Get cell method constructs by their “method”.
>>> print(t.constructs.filter_by_method('maximum'))
Constructs:
{'cellmethod1': <CF CellMethod: domainaxis3: maximum>}
As each of these methods returns a Make selections from previous selections.
>>> print(
...     t.constructs.filter_by_type('auxiliary_coordinate').filter_by_axis('domainaxis2')
... )
Constructs:
{'auxiliarycoordinate0': <CF AuxiliaryCoordinate: latitude(10, 9) degrees_N>,
 'auxiliarycoordinate1': <CF AuxiliaryCoordinate: longitude(9, 10) degrees_E>}
>>> c = t.constructs.filter_by_type('dimension_coordinate')
>>> d = c.filter_by_property(units='degrees')
>>> print(d)
Constructs:
{'dimensioncoordinate1': <CF DimensionCoordinate: grid_latitude(10) degrees>,
 'dimensioncoordinate2': <CF DimensionCoordinate: grid_longitude(9) degrees>}
Construct identities¶Another method of selection is by metadata construct “identity”.
Construct identities are used to describe constructs when they are
inspected, and so it is often convenient to copy these identities when
selecting metadata constructs. For example, the three auxiliary
coordinate constructs in the field construct A construct’s identity may be any one of the following
Get constructs by their identity.
>>> print(t)
Field: air_temperature (ncvar%ta)
---------------------------------
Data            : air_temperature(atmosphere_hybrid_height_coordinate(1), grid_latitude(10), grid_longitude(9)) K
Cell methods    : grid_latitude(10): grid_longitude(9): mean where land (interval: 0.1 degrees) time(1): maximum
Field ancils    : air_temperature standard_error(grid_latitude(10), grid_longitude(9)) = [[0.81, ..., 0.78]] K
Dimension coords: time(1) = [2019-01-01 00:00:00]
                : atmosphere_hybrid_height_coordinate(1) = [1.5]
                : grid_latitude(10) = [2.2, ..., -1.76] degrees
                : grid_longitude(9) = [-4.7, ..., -1.18] degrees
Auxiliary coords: latitude(grid_latitude(10), grid_longitude(9)) = [[53.941, ..., 50.225]] degrees_N
                : longitude(grid_longitude(9), grid_latitude(10)) = [[2.004, ..., 8.156]] degrees_E
                : long_name=Grid latitude name(grid_latitude(10)) = [--, ..., 'kappa']
Cell measures   : measure:area(grid_longitude(9), grid_latitude(10)) = [[2391.9657, ..., 2392.6009]] km2
Coord references: grid_mappng_name:rotated_latitude_longitude
                : standard_name:atmosphere_hybrid_height_coordinate
Domain ancils   : ncvar%a(atmosphere_hybrid_height_coordinate(1)) = [10.0] m
                : ncvar%b(atmosphere_hybrid_height_coordinate(1)) = [20.0]
                : surface_altitude(grid_latitude(10), grid_longitude(9)) = [[0.0, ..., 270.0]] m
>>> print(t.constructs.filter_by_identity('X'))
Constructs:
{'auxiliarycoordinate1': <CF AuxiliaryCoordinate: longitude(9, 10) degrees_E>,
 'dimensioncoordinate2': <CF DimensionCoordinate: grid_longitude(9) degrees>}
>>> print(t.constructs.filter_by_identity('latitude'))
Constructs:
{'auxiliarycoordinate0': <CF AuxiliaryCoordinate: latitude(10, 9) degrees_N>}
>>> print(t.constructs.filter_by_identity('long_name=Grid latitude name'))
Constructs:
{'auxiliarycoordinate2': <CF AuxiliaryCoordinate: long_name=Grid latitude name(10) >}
>>> print(t.constructs.filter_by_identity('measure:area'))
Constructs:
{'cellmeasure0': <CF CellMeasure: measure:area(9, 10) km2>}
>>> print(t.constructs.filter_by_identity('ncvar%b'))
Constructs:
{'domainancillary1': <CF DomainAncillary: ncvar%b(1) >}
The identity returned by the As a further convenience, selection by construct identity is also
possible by providing identities to a call of a Construct selection by identity is possible with via the
“filter_by_identity” method, or directly from the
“Constructs” instance.
>>> print(t.constructs.filter_by_identity('latitude'))
Constructs:
{'auxiliarycoordinate0': <CF AuxiliaryCoordinate: latitude(10, 9) degrees_N>}
>>> print(t.constructs('latitude'))
Constructs:
{'auxiliarycoordinate0': <CF AuxiliaryCoordinate: latitude(10, 9) degrees_N>}
Selection by construct key is useful for systematic metadata construct access, or for when a metadata construct is not identifiable by other means: Get constructs by construct key.
>>> print(t.constructs.filter_by_key('domainancillary2'))
Constructs:
{'domainancillary2': <CF DomainAncillary: surface_altitude(10, 9) m>}
>>> print(t.constructs.filter_by_key('cellmethod1'))
Constructs:
{'cellmethod1': <CF CellMethod: domainaxis3: maximum>}
>>> print(t.constructs.filter_by_key('auxiliarycoordinate2', 'cellmeasure0'))
Constructs:
{'auxiliarycoordinate2': <CF AuxiliaryCoordinate: long_name=Grid latitude name(10) >,
 'cellmeasure0': <CF CellMeasure: measure:area(9, 10) km2>}
If no constructs match the given criteria, then an “empty”
If no constructs meet the criteria then an empty
“Constructs” object is returned.
>>> c = t.constructs('radiation_wavelength')
>>> c
<CF Constructs: >
>>> print(c)
Constructs:
{}
>>> len(c)
0
The constructs that were not selected by a filter may be returned by
the Get the constructs that were not selected by a filter.
>>> c = t.constructs.filter_by_type('auxiliary_coordinate')
>>> c
<CF Constructs: auxiliary_coordinate(3)>
>>> c.inverse_filter()
<CF Constructs: cell_measure(1), cell_method(2), coordinate_reference(2), dimension_coordinate(4), domain_ancillary(3), domain_axis(4), field_ancillary(1)>
Note that selection by construct type is equivalent to using the particular method of the field construct for retrieving that type of metadata construct: The bespoke methods for retrieving constructs by type
are equivalent to a selection on all of the metadata
constructs.
>>> print(t.constructs.filter_by_type('cell_measure'))
Constructs:
{'cellmeasure0': <CF CellMeasure: measure:area(9, 10) km2>}
>>> print(t.cell_measures)
Constructs:
{'cellmeasure0': <CF CellMeasure: measure:area(9, 10) km2>}
Metadata construct access¶An individual metadata construct, or its construct key, may be returned by any of the following techniques:
Get the “latitude” metadata construct via its construct
identity, and also its key.
>>> t.construct('latitude')
<CF AuxiliaryCoordinate: latitude(10, 9) degrees_N>
>>> t.construct('latitude', key=True)
'auxiliarycoordinate0'
Get the “latitude” metadata construct key with its construct
identity and use the key to get the construct itself
>>> key = t.construct_key('latitude')
>>> t.get_construct(key)
<CF AuxiliaryCoordinate: latitude(10, 9) degrees_N>
Get the “latitude” metadata construct and its identifier
via its construct identity.
>>> key, lat = t.construct_item('latitude')
('auxiliarycoordinate0', <AuxiliaryCoordinate: latitude(10, 9) degrees_N>)
Get the “latitude” metadata construct via its construct
key and indexing
>>> t.constructs[key]
<CF AuxiliaryCoordinate: latitude(10, 9) degrees_N>
Get the “latitude” metadata construct via its construct
key and the ‘get’ method.
>>> t.constructs.get(key)
<CF AuxiliaryCoordinate: latitude(10, 9) degrees_N>
In addition, an individual metadata construct of a particular type can be retrieved with the following methods of the field construct:
These methods will only look for the given identity amongst constructs of the chosen type. Get the “latitude” auxiliary coordinate construct via
its construct identity, and also its key.
>>> t.auxiliary_coordinate('latitude')
<CF AuxiliaryCoordinate: latitude(10, 9) degrees_N>
>>> t.auxiliary_coordinate('latitude', key=True)
'auxiliarycoordinate0'
>>> t.auxiliary_coordinate('latitude', item=True)
('auxiliarycoordinate0', <CF AuxiliaryCoordinate: latitude(10, 9) degrees_N>)
The By default an exception is raised if there is not a
unique construct that meets the criteria. Alternatively,
the value of the “default” parameter is returned.
>>> t.construct('measure:volume')                # Raises Exception
Traceback (most recent call last):
   ...
ValueError: Can't return zero constructs
>>> t.construct('measure:volume', default=False)
False
>>> t.construct('measure:volume', default=Exception("my error"))  # Raises Exception
Traceback (most recent call last):
   ...
Exception: my error
>>> c = t.constructs.filter_by_measure("volume")
>>> len(c)
0
>>> d = t.constructs("units=degrees")
>>> len(d)
2
>>> t.construct("units=degrees")  # Raises Exception
Traceback (most recent call last):
   ...
ValueError: Field.construct() can't return 2 constructs
>>> print(t.construct("units=degrees", default=None))
None
The Metadata construct properties¶Metadata constructs share the same API as the field construct for accessing their properties: Retrieve the “longitude” metadata construct, set a new
property, and then inspect all of the properties.
>>> lon = q.construct('longitude')
>>> lon
<CF DimensionCoordinate: longitude(8) degrees_east>
>>> lon.set_property('long_name', 'Longitude')
>>> lon.properties()
{'units': 'degrees_east',
 'long_name': 'Longitude',
 'standard_name': 'longitude'}
Get the metadata construct with units of “km2”, find its
canonical identity, and all of its valid identities, that
may be used for selection by the “filter_by_identity”
method
>>> area = t.constructs.filter_by_property(units='km2').value()
>>> area
<CF CellMeasure: measure:area(9, 10) km2>
>>> area.identity()
'measure:area'
>>> area.identities()
['measure:area', 'units=km2', 'ncvar%cell_measure']
Metadata construct data¶Metadata constructs share the a similar API as the field construct as the field construct for accessing their data: Retrieve the “longitude” metadata construct, inspect its
data, change the third element of the array, and get the
data as a numpy array.
>>> lon = q.constructs('longitude').value()
>>> lon
<CF DimensionCoordinate: longitude(8) degrees_east>
>>> lon.data
<CF Data(8): [22.5, ..., 337.5] degrees_east>
>>> lon.data[2]
<CF Data(1): [112.5] degrees_east>
>>> lon.data[2] = 133.33
>>> print(lon.array)
[ 22.5   67.5  133.33 157.5  202.5  247.5  292.5  337.5 ]
>>> lon.data[2] = 112.5
The domain axis constructs spanned by a particular metadata
construct’s data are found with the Find the construct keys of the domain axis constructs
spanned by the data of each metadata construct.
>>> key = t.construct_key('latitude')
>>> key
'auxiliarycoordinate0'
>>> t.get_data_axes(key)
('domainaxis1', 'domainaxis2')
The domain axis constructs spanned by all the data of all metadata
construct may be found with the Find the construct keys of the domain axis constructs
spanned by the data of each metadata construct.
>>> t.constructs.data_axes()
{'auxiliarycoordinate0': ('domainaxis1', 'domainaxis2'),
 'auxiliarycoordinate1': ('domainaxis2', 'domainaxis1'),
 'auxiliarycoordinate2': ('domainaxis1',),
 'cellmeasure0': ('domainaxis2', 'domainaxis1'),
 'dimensioncoordinate0': ('domainaxis0',),
 'dimensioncoordinate1': ('domainaxis1',),
 'dimensioncoordinate2': ('domainaxis2',),
 'dimensioncoordinate3': ('domainaxis3',),
 'domainancillary0': ('domainaxis0',),
 'domainancillary1': ('domainaxis0',),
 'domainancillary2': ('domainaxis1', 'domainaxis2'),
 'fieldancillary0': ('domainaxis1', 'domainaxis2')}
A size one domain axis construct that is not spanned by the field
construct’s data may still be spanned by the data of metadata
constructs. For example, the data of the field construct Time¶Constructs (including the field constructs) that represent elapsed
time have data array values that provide elapsed time since a
reference date. These constructs are identified by the presence of
“reference time” units. The data values may be converted into the
date-time objects of the cftime package with the Inspect the values of a “time” construct as elapsed
times and as date-times.
>>> time = q.construct('time')
>>> time
<CF DimensionCoordinate: time(1) days since 2018-12-01 >
>>> time.get_property('units')
'days since 2018-12-01'
>>> time.get_property('calendar', default='standard')
'standard'
>>> print(time.array)
[31.]
>>> print(time.datetime_array)
[cftime.DatetimeGregorian(2019-01-01 00:00:00)]
Time duration¶A period of time may stored in a Define a duration of one calendar month which, if
applicable, starts at 12:00 on the 16th of the month.
>>> cm = cf.TimeDuration(1, 'calendar_month', day=16, hour=12)
>>> cm
<CF TimeDuration: P1M (Y-M-16 12:00:00)>
Add a calendar month to a date-time object, and a
date-time data.
>>> cf.dt(2000, 2, 1) + cm
cftime.datetime(2000-03-01 00:00:00)
>>> cf.Data([1, 2, 3], 'days since 2000-02-01') + cm
<CF Data(3): [2000-03-02 00:00:00, 2000-03-03 00:00:00, 2000-03-04 00:00:00] gregorian>
Date-time ranges that span the time duration can also be created: Create an interval starting from date-time; and an
interval that contains a date-time, taking into account
the offset.
>>> cm.interval(cf.dt(2000, 2, 1))
(cftime.DatetimeGregorian(2000-02-01 00:00:000),
 cftime.DatetimeGregorian(2000-03-01 00:00:000))
>>> cm.bounds(cf.dt(2000, 2, 1))
(cftime.DatetimeGregorian(2000-01-16 12:00:00),
 cftime.DatetimeGregorian(2000-02-16 12:00:00))
Time duration constructors¶For convenience,
Some examples of ‘cf.TimeDuration’ objects returned by
constructors.
>>> cf.D() <CF TimeDuration: P1D (Y-M-D 00:00:00)> >>> cf.Y(10, month=12) <CF TimeDuration: P10Y (Y-12-01 00:00:00)> ---- Domain¶The domain of the CF data model is defined
collectively by various other metadata constructs. It is represented
by the Get the domain, and inspect it.
>>> domain = t.domain
>>> domain
<CF Domain: {1, 1, 9, 10}>
>>> print(domain)
Dimension coords: atmosphere_hybrid_height_coordinate(1) = [1.5]
                : grid_latitude(10) = [2.2, ..., -1.76] degrees
                : grid_longitude(9) = [-4.7, ..., -1.18] degrees
                : time(1) = [2019-01-01 00:00:00]
Auxiliary coords: latitude(grid_latitude(10), grid_longitude(9)) = [[53.941, ..., 50.225]] degrees_N
                : longitude(grid_longitude(9), grid_latitude(10)) = [[2.004, ..., 8.156]] degrees_E
                : long_name=Grid latitude name(grid_latitude(10)) = [--, ..., 'kappa']
Cell measures   : measure:area(grid_longitude(9), grid_latitude(10)) = [[2391.9657, ..., 2392.6009]] km2
Coord references: grid_mapping_name:rotated_latitude_longitude
                : standard_name:atmosphere_hybrid_height_coordinate
Domain ancils   : ncvar%a(atmosphere_hybrid_height_coordinate(1)) = [10.0] m
                : ncvar%b(atmosphere_hybrid_height_coordinate(1)) = [20.0]
                : surface_altitude(grid_latitude(10), grid_longitude(9)) = [[0.0, ..., 270.0]] m
>>> description = domain.dump(display=False)
Changes to domain instance are seen by the field construct, and vice versa. This is because the domain instance is merely a “view” of the relevant metadata constructs contained in the field construct. Change a property of a metadata construct of the domain
and show that this change appears in the same metadata
data construct of the parent field, and vice versa.
>>> domain_latitude = t.domain.constructs('latitude').value()
>>> field_latitude = t.constructs('latitude').value()
>>> domain_latitude.set_property('test', 'set by domain')
>>> print(field_latitude.get_property('test'))
set by domain
>>> field_latitude.set_property('test', 'set by field')
>>> print(domain_latitude.get_property('test'))
set by field
>>> domain_latitude.del_property('test')
'set by field'
>>> field_latitude.has_property('test')
False
All of the methods and attributes related to the domain are listed here. Metadata construct types¶Domain axes¶A domain axis metadata construct specifies the number of points along
an independent axis of the field construct’s domain and is stored in a
Get the size of a domain axis construct.
>>> print(q.domain_axes) Constructs: {'domainaxis0': <CF DomainAxis: size(5)>, 'domainaxis1': <CF DomainAxis: size(8)>, 'domainaxis2': <CF DomainAxis: size(1)>} >>> d = q.domain_axes().get('domainaxis1') >>> d <CF DomainAxis: size(8)> >>> d.get_size() 8 Coordinates¶There are two types of coordinate construct, dimension and auxiliary
coordinate constructs, which can be retrieved together with the
Retrieve both types of coordinate constructs.
>>> print(t.coordinates) Constructs: {'auxiliarycoordinate0': <CF AuxiliaryCoordinate: latitude(10, 9) degrees_N>, 'auxiliarycoordinate1': <CF AuxiliaryCoordinate: longitude(9, 10) degrees_E>, 'auxiliarycoordinate2': <CF AuxiliaryCoordinate: long_name=Grid latitude name(10) >, 'dimensioncoordinate0': <CF DimensionCoordinate: atmosphere_hybrid_height_coordinate(1) >, 'dimensioncoordinate1': <CF DimensionCoordinate: grid_latitude(10) degrees>, 'dimensioncoordinate2': <CF DimensionCoordinate: grid_longitude(9) degrees>, 'dimensioncoordinate3': <CF DimensionCoordinate: time(1) days since 2018-12-01 >} Bounds¶A coordinate construct may contain an array of cell bounds that
provides the extent of each cell by defining the locations of the cell
vertices. This is in addition to the main data array that contains a
grid point location for each cell. The cell bounds are stored in a
A Get the Bounds instance of a coordinate construct and
inspect its data.
>>> lon = t.constructs('grid_longitude').value()
>>> bounds = lon.bounds
>>> bounds
<CF Bounds: grid_longitude(9, 2) degrees>
>>> bounds.data
<CF Data(9, 2): [[-4.92, ..., -0.96]] degrees>
>>> print(bounds.array)
[[-4.92 -4.48]
 [-4.48 -4.04]
 [-4.04 -3.6 ]
 [-3.6  -3.16]
 [-3.16 -2.72]
 [-2.72 -2.28]
 [-2.28 -1.84]
 [-1.84 -1.4 ]
 [-1.4  -0.96]]
The Inspect the inherited and bespoke properties of a Bounds
instance.
>>> bounds.inherited_properties()
{'standard_name': 'grid_longitude',
 'units': 'degrees'}
>>> bounds.properties()
{'units': 'degrees'}
Geometry cells¶For many geospatial applications, cell bounds can not be represented by a simple line or polygon, and different cells may have different numbers of nodes describing their bounds. For example, if each cell describes the areal extent of a watershed, then it is likely that some watersheds will require more nodes than others. Such cells are called geometries. If a coordinate construct represents geometries then it will have a
“geometry” attribute (not a CF property) with one of the values This is illustrated with the file Read and inspect a dataset containing geometry cell
bounds.
>>> f = cf.read('geometry.nc')[0]
>>> print(f)
Field: preciptitation_amount (ncvar%pr)
---------------------------------------
Data            : preciptitation_amount(cf_role=timeseries_id(2), time(4))
Dimension coords: time(4) = [2000-01-02 00:00:00, ..., 2000-01-05 00:00:00]
Auxiliary coords: latitude(cf_role=timeseries_id(2)) = [25.0, 7.0] degrees_north
                : longitude(cf_role=timeseries_id(2)) = [10.0, 40.0] degrees_east
                : altitude(cf_role=timeseries_id(2)) = [5000.0, 20.0] m
                : cf_role=timeseries_id(cf_role=timeseries_id(2)) = [b'x1', b'y2']
Coord references: grid_mapping_name:latitude_longitude
>>> lon = f.auxiliary_coordinate('X')
>>> lon.dump()
Auxiliary coordinate: longitude
   standard_name = 'longitude'
   units = 'degrees_east'
   Data(2) = [10.0, 40.0] degrees_east
   Geometry: polygon
   Bounds:axis = 'X'
   Bounds:standard_name = 'longitude'
   Bounds:units = 'degrees_east'
   Bounds:Data(2, 3, 4) = [[[20.0, ..., --]]] degrees_east
   Interior Ring:Data(2, 3) = [[0, ..., --]]
>>> lon.get_geometry()
'polygon'
Bounds for geometry cells are also stored in a Inspect the geometry nodes.
>>> print(lon.bounds.data.array)
[[20.0 10.0  0.0   --]
 [ 5.0 10.0 15.0 10.0]
 [20.0 10.0  0.0   --]]

[[50.0 40.0 30.0   --]
 [  --   --   --   --]
 [  --   --   --   --]]]
If a cell is composed of multiple polygon parts, an individual polygon
may define an “interior ring”, i.e. a region that is to be omitted
from, as opposed to included in, the cell extent. Such cells also have
an interior ring array that spans the same domain axes as the
coordinate cells, with the addition of one extra dimension that
indexes the parts for each cell. This array records whether each
polygon is to be included or excluded from the cell, with values of
Inspect the interior ring information.
>>> print(lon.get_interior_ring().data.array)
[[0  1  0]
 [0 -- --]]
Note it is preferable to access the data type, number of dimensions,
dimension sizes and number of elements of the coordinate construct via
the construct’s attributes, rather than the attributes of the
When a field construct containing geometries is written to disk, a CF-netCDF geometry container variable is automatically created, and the cells encoded with the compression techniques defined in the CF conventions. UGRID mesh topologies¶A Inspect a dataset containing a UGRID mesh topology.
>>> f = cf.example_field(8)
>>> print(f)
Field: air_temperature (ncvar%ta)
---------------------------------
Data            : air_temperature(time(2), ncdim%nMesh2_face(3)) K
Cell methods    : time(2): point (interval: 3600 s)
Dimension coords: time(2) = [2016-01-02 01:00:00, 2016-01-02 11:00:00] gregorian
Auxiliary coords: longitude(ncdim%nMesh2_face(3)) = [-44.0, -44.0, -42.0] degrees_east
                : latitude(ncdim%nMesh2_face(3)) = [34.0, 32.0, 34.0] degrees_north
Domain Topology : cell:face(ncdim%nMesh2_face(3), 4) = [[2, ..., --]]
Cell connects   : connectivity:edge(ncdim%nMesh2_face(3), 5) = [[0, ..., --]]
Domain ancillaries¶A domain ancillary construct provides information which is needed for computing the location of cells in an alternative coordinate system. If a domain ancillary construct provides extra coordinates then it may contain cell bounds in addition to its main data array. Get the data and bounds data of a domain ancillary
construct.
>>> a = t.constructs.get('domainancillary0')
>>> print(a.array)
[10.]
>>> bounds = a.bounds
>>> bounds
<Bounds: ncvar%a_bounds(1, 2) m>
>>> print(bounds.array)
[[  5.  15.]]
Coordinate systems¶A field construct may contain various coordinate systems. Each
coordinate system is either defined by a coordinate reference
construct that relates dimension coordinate, auxiliary coordinate and
domain ancillary constructs (as is the case for the field construct
A coordinate reference construct contains
Select the vertical coordinate system construct and
inspect its coordinate constructs.
>>> crs = t.constructs('standard_name:atmosphere_hybrid_height_coordinate').value()
>>> crs
<CF CoordinateReference: standard_name:atmosphere_hybrid_height_coordinate>
>>> crs.dump()
Coordinate Reference: atmosphere_hybrid_height_coordinate
    Coordinate conversion:computed_standard_name = altitude
    Coordinate conversion:standard_name = atmosphere_hybrid_height_coordinate
    Coordinate conversion:a = domainancillary0
    Coordinate conversion:b = domainancillary1
    Coordinate conversion:orog = domainancillary2
    Datum:earth_radius = 6371007
    Coordinate: dimensioncoordinate0
>>> crs.coordinates()
{'dimensioncoordinate0'}
Get the datum and inspect its parameters.
>>> crs.datum
<CF Datum: Parameters: earth_radius>
>>> crs.datum.parameters()
{'earth_radius': 6371007}
Get the coordinate conversion and inspect its parameters
and referenced domain ancillary constructs.
>>> crs.coordinate_conversion
<CF CoordinateConversion: Parameters: computed_standard_name, standard_name; Ancillaries: a, b, orog>
>>> crs.coordinate_conversion.parameters()
{'computed_standard_name': 'altitude',
 'standard_name': 'atmosphere_hybrid_height_coordinate'}
>>> crs.coordinate_conversion.domain_ancillaries()
{'a': 'domainancillary0',
 'b': 'domainancillary1',
 'orog': 'domainancillary2'}
Computing non-parametric vertical coordinates¶When vertical coordinates are a function of horizontal location as well as parameters which depend on vertical location, they cannot be stored in a vertical dimension coordinate construct. In such cases a parametric vertical dimension coordinate construct is stored and a coordinate reference construct contains the formula for computing the required non-parametric vertical coordinates. For example, multi-dimensional non-parametric ocean altitude coordinates can be computed from one-dimensional parametric ocean sigma coordinates [3]. The Create a field construct with computed height
coordinates, from one with parametric
atmosphere_hybrid_height_coordinate coordinates.
>>> f = cf.example_field(1)
>>> print(f)
Field: air_temperature (ncvar%ta
---------------------------------
Data            : air_temperature(atmosphere_hybrid_height_coordinate(1), grid_latitude(10), grid_longitude(9)) K
Cell methods    : grid_latitude(10): grid_longitude(9): mean where land (interval: 0.1 degrees) time(1): maximum
Field ancils    : air_temperature standard_error(grid_latitude(10), grid_longitude(9)) = [[0.76, ..., 0.32]] K
Dimension coords: atmosphere_hybrid_height_coordinate(1) = [1.5]
                : grid_latitude(10) = [2.2, ..., -1.76] degrees
                : grid_longitude(9) = [-4.7, ..., -1.18] degrees
                : time(1) = [2019-01-01 00:00:00]
Auxiliary coords: latitude(grid_latitude(10), grid_longitude(9)) = [[53.941, ..., 50.225]] degrees_N
                : longitude(grid_longitude(9), grid_latitude(10)) = [[2.004, ..., 8.156]] degrees_E
                : long_name=Grid latitude name(grid_latitude(10)) = [--, ..., b'kappa']
Cell measures   : measure:area(grid_longitude(9), grid_latitude(10)) = [[2391.9657, ..., 2392.6009]] km2
Coord references: grid_mapping_name:rotated_latitude_longitude
                : standard_name:atmosphere_hybrid_height_coordinate
Domain ancils   : ncvar%a(atmosphere_hybrid_height_coordinate(1)) = [10.0] m
                : ncvar%b(atmosphere_hybrid_height_coordinate(1)) = [20.0]
                : surface_altitude(grid_latitude(10), grid_longitude(9)) = [[0.0, ..., 270.0]] m
>>> print(f.auxiliary_coordinate('altitude', default=None))
None
>>> g = f.compute_vertical_coordinates()
>>> g.auxiliary_coordinate('altitude').dump()
Auxiliary coordinate: altitude
    long_name = 'Computed from parametric atmosphere_hybrid_height_coordinate
                 vertical coordinates'
    standard_name = 'altitude'
    units = 'm'
    Data(1, 10, 9) = [[[10.0, ..., 5410.0]]] m
    Bounds:units = 'm'
    Bounds:Data(1, 10, 9, 2) = [[[[5.0, ..., 5415.0]]]] m
Cell methods¶A cell method construct describes how the data represent the variation
of the physical quantity within the cells of the domain and is stored
in a Inspect the cell methods. The description follows the CF
conventions for cell_method attribute strings, apart from
the use of construct keys instead of netCDF variable
names for cell method axes identification.
>>> print(t.cell_methods())
Constructs:
{'cellmethod0': <CF CellMethod: domainaxis1: domainaxis2: mean where land (interval: 0.1 degrees)>,
 'cellmethod1': <CF CellMethod: domainaxis3: maximum>}
The application of cell methods is not commutative (e.g. a mean of variances is generally not the same as a variance of means), and the cell methods are assumed to have been applied in the order in which they were added to the field construct during field construct creation. Retrieve the cell method constructs in the same order
that they were applied.
>>> t.cell_methods()
{'cellmethod0', <CF CellMethod: domainaxis1: domainaxis2: mean where land (interval: 0.1 degrees)>),
 'cellmethod1', <CF CellMethod: domainaxis3: maximum>)}
The axes to which the method applies, the method itself, and any
qualifying properties are accessed with the Get the domain axes constructs to which the cell method
construct applies, and the method and other properties.
>>> cm = t.constructs('method:mean').value()
>>> cm
<CF CellMethod: domainaxis1: domainaxis2: mean where land (interval: 0.1 degrees)>
>>> cm.get_axes()
('domainaxis1', 'domainaxis2')
>>> cm.get_method()
'mean'
>>> cm.qualifiers()
{'where': 'land', 'interval': [<CF Data(): 0.1 degrees>]}
>>> cm.get_qualifier('where')
'land'
Field ancillaries¶A field ancillary construct provides metadata which are distributed over the same domain as the field construct itself. For example, if a field construct holds a data retrieved from a satellite instrument, a field ancillary construct might provide the uncertainty estimates for those retrievals (varying over the same spatiotemporal domain). Get the properties and data of a field ancillary
construct.
>>> a = t.get_construct('fieldancillary0')
>>> a
<CF FieldAncillary: air_temperature standard_error(10, 9) K>
>>> a.properties()
{'standard_name': 'air_temperature standard_error',
 'units': 'K'}
>>> a.data
<CF Data(10, 9): [[0.76, ..., 0.32]] K>
Cyclic domain axes¶A domain axis is cyclic if cells at both of its ends are actually geographically adjacent. For example, a longitude cell spanning 359 to 360 degrees east is adjacent to the cell spanning 0 to 1 degrees east. When a dimension coordinate construct is set on a field construct, the
cyclicity of its dimension is automatically determined, using the
To find out whether a dimension is cyclic use the Cyclicity is used by subspacing and mathematical operations to “wrap” cyclic dimensions to give appropriate results. Rolling a cyclic axis¶The field construct may be “rolled” along a cyclic axis with the
Roll the data along the ‘X’ axis one element to the
right, and also three elements to the left.
>>> print(q.array[0])
[0.007 0.034 0.003 0.014 0.018 0.037 0.024 0.029]
>>> print(q.roll('X', shift=1).array[0])
[0.029 0.007 0.034 0.003 0.014 0.018 0.037 0.024]
>>> qr = q.roll('X', shift=-3)
>>> print(qr.array[0])
[0.014 0.018 0.037 0.024 0.029 0.007 0.034 0.003]
Inspect the ‘X’ dimension coordinates of the original
and rolled field constructs, showing that monotonicity
has been preserved.
>>> print(q.dimension_coordinate('X').array)
[ 22.5  67.5 112.5 157.5 202.5 247.5 292.5 337.5]
>>> print(qr.dimension_coordinate('X').array)
[-202.5 -157.5 -112.5  -67.5  -22.5   22.5   67.5  112.5]
Anchoring a cyclic axis¶The field construct may be rolled by specifying a dimension coordinate
value that should be contained in the first element of the data for
the corresponding axis, by specifying the coordinate value via the
Roll the data along the ‘X’ axis so that the first
element of the axis contains -150 degrees east, and
also -750 degrees east.
>>> print(q.anchor('X', -150))
Field: specific_humidity (ncvar%q)
----------------------------------
Data            : specific_humidity(latitude(5), longitude(8)) 1
Cell methods    : area: mean
Dimension coords: latitude(5) = [-75.0, ..., 75.0] degrees_north
                : longitude(8) = [-112.5, ..., 202.5] degrees_east
                : time(1) = [2019-01-01 00:00:00]
>>> print(q.anchor('X', -750))
Field: specific_humidity (ncvar%q)
----------------------------------
Data            : specific_humidity(latitude(5), longitude(8)) 1
Cell methods    : area: mean
Dimension coords: latitude(5) = [-75.0, ..., 75.0] degrees_north
                : longitude(8) = [-742.5, ..., -427.5] degrees_east
                : time(1) = [2019-01-01 00:00:00]
Subspacing by metadata¶Creation of a new field construct which spans a subspace of the domain of an existing field construct is achieved either by indexing the field construct directly (see Subspacing by index) or by identifying indices based on the metadata constructs (as described in this section). The subspacing operation, in either case, also subspaces any metadata constructs of the field construct (e.g. coordinate metadata constructs) which span any of the domain axis constructs that are affected. The new field construct is created with the same properties as the original field construct. Subspacing by metadata uses the Metadata constructs and the conditions on their data are defined by
keyword parameters to the Create a new field construct whose ‘X’ coordinate spans
only 112.5 degrees east, with the other domain axes
remaining unchanged.
>>> print(q)
Field: specific_humidity (ncvar%q)
----------------------------------
Data            : specific_humidity(latitude(5), longitude(8)) 1
Cell methods    : area: mean
Dimension coords: latitude(5) = [-75.0, ..., 75.0] degrees_north
                : longitude(8) = [22.5, ..., 337.5] degrees_east
                : time(1) = [2019-01-01T00:00:00Z]
>>> print(q.construct('X').array)
[ 22.5  67.5 112.5 157.5 202.5 247.5 292.5 337.5]
>>> q2 = q.subspace(X=112.5)
>>> print(q2)
Field: specific_humidity (ncvar%q)
----------------------------------
Data            : specific_humidity(latitude(5), longitude(1)) 1
Cell methods    : area: mean
Dimension coords: latitude(5) = [-75.0, ..., 75.0] degrees_north
                : longitude(1) = [112.5] degrees_east
                : time(1) = [2019-01-01T00:00:00Z]
Any domain axes that have not been identified remain unchanged. Multiple domain axes may be subspaced simultaneously, and it doesn’t
matter which order they are specified in the Create a new field construct whose domain spans only
112.5 degrees east and has latitude greater than -60
degrees north, with the other domain axes remaining
unchanged.
>>> print(q.construct('latitude').array)
[-75. -45.   0.  45.  75.]
>>> print(q.subspace(X=112.5, latitude=cf.gt(-60)))
Field: specific_humidity (ncvar%q)
----------------------------------
Data            : specific_humidity(latitude(4), longitude(1)) 1
Cell methods    : area: mean
Dimension coords: latitude(4) = [-45.0, ..., 75.0] degrees_north
                : longitude(1) = [112.5] degrees_east
                : time(1) = [2019-01-01T00:00:00Z]
In the above example, Create a new field construct whose domain spans only 45
degrees south and latitudes greater than 20 degrees
north.
>>> c = cf.eq(-45) | cf.ge(20)
>>> c
<CF Query: [(eq -45) | (ge 20)]>
>>> print(q.subspace(latitude=c))
Field: specific_humidity (ncvar%q)
----------------------------------
Data            : specific_humidity(latitude(3), longitude(8)) 1
Cell methods    : area: mean
Dimension coords: latitude(3) = [-45.0, 45.0, 75.0] degrees_north
                : longitude(8) = [22.5, ..., 337.5] degrees_east
                : time(1) = [2019-01-01T00:00:00Z]
In the above example, two Subspace criteria may be provided for size 1 domain axes that are not spanned by the field construct’s data. Explicit indices may also be assigned to a domain axis identified by a
metadata construct, with either a Python Create a new field construct whose domain spans the 2nd,
3rd and 5th elements of the ‘X’ axis, and reverses the
‘Y’ axis.
>>> print(q.subspace(X=[1, 2, 4], Y=slice(None, None, -1)))
Field: specific_humidity (ncvar%q)
----------------------------------
Data            : specific_humidity(latitude(5), longitude(3)) 1
Cell methods    : area: mean
Dimension coords: latitude(5) = [75.0, ..., -75.0] degrees_north
                : longitude(3) = [67.5, 112.5, 202.5] degrees_east
                : time(1) = [2019-01-01T00:00:00Z]
For a dimension that is cyclic, a subspace
defined by a slice or by a Create subspaces that wrap around a cyclic dimension.
>>> print(q.subspace(X=cf.wi(-100, 200)))
Field: specific_humidity (ncvar%q)
----------------------------------
Data            : specific_humidity(latitude(5), longitude(6)) 1
Cell methods    : area: mean
Dimension coords: latitude(5) = [-75.0, ..., 75.0] degrees_north
                : longitude(6) = [-67.5, ..., 157.5] degrees_east
                : time(1) = [2019-01-01 00:00:00]
>>> print (q.subspace(X=slice(-2, 4)))
Field: specific_humidity (ncvar%q)
----------------------------------
Data            : specific_humidity(latitude(5), longitude(6)) 1
Cell methods    : area: mean
Dimension coords: latitude(5) = [-75.0, ..., 75.0] degrees_north
                : longitude(6) = [-67.5, ..., 157.5] degrees_east
                : time(1) = [2019-01-01 00:00:00]
Subspaces in time¶Subspaces based on time dimensions may be defined with as elapsed times since the reference date, or with date-time objects. Create subspaces in different ways based on the time dimension by selecting a particular date and using date-time and date-time queries.
>>> a = cf.read('timeseries.nc')[0]
>>> print (a)
Field: air_potential_temperature (ncvar%air_potential_temperature)
------------------------------------------------------------------
Data            : air_potential_temperature(time(120), latitude(5), longitude(8)) K
Cell methods    : area: mean
Dimension coords: time(120) = [1959-12-16 12:00:00, ..., 1969-11-16 00:00:00]
                : latitude(5) = [-75.0, ..., 75.0] degrees_north
                : longitude(8) = [22.5, ..., 337.5] degrees_east
                : air_pressure(1) = [850.0] hPa
>>> print(a.coordinate('T').array[0:9])
[349.5 380.5 410.5 440.5 471.  501.5 532.  562.5 593.5]
>>> print(a.coordinate('T').datetime_array[0:9])
[cftime.DatetimeGregorian(1959-12-16 12:00:00)
 cftime.DatetimeGregorian(1960-01-16 12:00:00)
 cftime.DatetimeGregorian(1960-02-15 12:00:00)
 cftime.DatetimeGregorian(1960-03-16 12:00:00)
 cftime.DatetimeGregorian(1960-04-16 00:00:00)
 cftime.DatetimeGregorian(1960-05-16 12:00:00)
 cftime.DatetimeGregorian(1960-06-16 00:00:00)
 cftime.DatetimeGregorian(1960-07-16 12:00:00)
 cftime.DatetimeGregorian(1960-08-16 12:00:00)]
>>> print(a.subspace(T=410.5))
Field: air_potential_temperature (ncvar%air_potential_temperature)
------------------------------------------------------------------
Data            : air_potential_temperature(time(1), latitude(5), longitude(8)) K
Cell methods    : area: mean
Dimension coords: time(1) = [1960-02-15 12:00:00]
                : latitude(5) = [-75.0, ..., 75.0] degrees_north
                : longitude(8) = [22.5, ..., 337.5] degrees_east
                : air_pressure(1) = [850.0] hPa
>>> print(a.subspace(T=cf.dt('1960-04-16')))
Field: air_potential_temperature (ncvar%air_potential_temperature)
------------------------------------------------------------------
Data            : air_potential_temperature(time(1), latitude(5), longitude(8)) K
Cell methods    : area: mean
Dimension coords: time(1) = [1960-04-16 00:00:00]
                : latitude(5) = [-75.0, ..., 75.0] degrees_north
                : longitude(8) = [22.5, ..., 337.5] degrees_east
                : air_pressure(1) = [850.0] hPa
>>> print(a.subspace(T=cf.wi(cf.dt('1962-11-01'), cf.dt('1967-03-17 07:30'))))
Field: air_potential_temperature (ncvar%air_potential_temperature)
------------------------------------------------------------------
Data            : air_potential_temperature(time(53), latitude(5), longitude(8)) K
Cell methods    : area: mean
Dimension coords: time(53) = [1962-11-16 00:00:00, ..., 1967-03-16 12:00:00]
                : latitude(5) = [-75.0, ..., 75.0] degrees_north
                : longitude(8) = [22.5, ..., 337.5] degrees_east
                : air_pressure(1) = [850.0] hPa
Subspace mode¶There are three modes of operation, each of which provides a different type of subspace:
The Multiple dimensions¶Conditions may also be applied to multi-dimensional metadata constructs Create a subspace whose domain spans latitudes within the range of 51 to 53 degrees north, with the other domain axes remaining unchanged.
>>> print(t)
Field: air_temperature (ncvar%ta)
---------------------------------
Data            : air_temperature(atmosphere_hybrid_height_coordinate(1), grid_latitude(10), grid_longitude(9)) K
Cell methods    : grid_latitude(10): grid_longitude(9): mean where land (interval: 0.1 degrees) time(1): maximum
Field ancils    : air_temperature standard_error(grid_latitude(10), grid_longitude(9)) = [[0.81, ..., 0.78]] K
Dimension coords: time(1) = [2019-01-01 00:00:00]
                : atmosphere_hybrid_height_coordinate(1) = [1.5]
                : grid_latitude(10) = [2.2, ..., -1.76] degrees
                : grid_longitude(9) = [-4.7, ..., -1.18] degrees
Auxiliary coords: latitude(grid_latitude(10), grid_longitude(9)) = [[53.941, ..., 50.225]] degrees_N
                : longitude(grid_longitude(9), grid_latitude(10)) = [[2.004, ..., 8.156]] degrees_E
                : long_name=Grid latitude name(grid_latitude(10)) = [--, ..., 'kappa']
Cell measures   : measure:area(grid_longitude(9), grid_latitude(10)) = [[2391.9657, ..., 2392.6009]] km2
Coord references: grid_mapping_name:rotated_latitude_longitude
                : standard_name:atmosphere_hybrid_height_coordinate
Domain ancils   : ncvar%a(atmosphere_hybrid_height_coordinate(1)) = [10.0] m
                : ncvar%b(atmosphere_hybrid_height_coordinate(1)) = [20.0]
                : surface_altitude(grid_latitude(10), grid_longitude(9)) = [[0.0, ..., 270.0]] m
>>> print(t.construct('latitude').array)
[[53.941 53.987 54.029 54.066 54.099 54.127 54.15  54.169 54.184]
 [53.504 53.55  53.591 53.627 53.66  53.687 53.711 53.729 53.744]
 [53.067 53.112 53.152 53.189 53.221 53.248 53.271 53.29  53.304]
 [52.629 52.674 52.714 52.75  52.782 52.809 52.832 52.85  52.864]
 [52.192 52.236 52.276 52.311 52.343 52.37  52.392 52.41  52.424]
 [51.754 51.798 51.837 51.873 51.904 51.93  51.953 51.971 51.984]
 [51.316 51.36  51.399 51.434 51.465 51.491 51.513 51.531 51.545]
 [50.879 50.922 50.96  50.995 51.025 51.052 51.074 51.091 51.105]
 [50.441 50.484 50.522 50.556 50.586 50.612 50.634 50.652 50.665]
 [50.003 50.045 50.083 50.117 50.147 50.173 50.194 50.212 50.225]]
>>> t2 = t.subspace(latitude=cf.wi(51, 53))
>>> print(t2.construct('latitude').array)
[[52.629 52.674 52.714 52.75  52.782 52.809 52.832 52.85  52.864]
 [52.192 52.236 52.276 52.311 52.343 52.37  52.392 52.41  52.424]
 [51.754 51.798 51.837 51.873 51.904 51.93  51.953 51.971 51.984]
 [51.316 51.36  51.399 51.434 51.465 51.491 51.513 51.531 51.545]
 [50.879 50.922 50.96  50.995 51.025 51.052 51.074 51.091 51.105]]
>>> print(t2.array)
[[[261.7 260.6 270.8 260.3 265.6 279.4 276.9 267.6 260.6]
  [264.2 275.9 262.5 264.9 264.7 270.2 270.4 268.6 275.3]
  [263.9 263.8 272.1 263.7 272.2 264.2 260.0 263.5 270.2]
  [273.8 273.1 268.5 272.3 264.3 278.7 270.6 273.0 270.6]
  [   --    --    --    -- 261.2 275.3 271.2 260.8 268.9]]]
The “compress” mode is still the default mode, but because the indices may not be acting along orthogonal dimensions, some missing data may still need to be inserted into the field construct’s data, as is the case in this example. Assignment by metadata¶See also Data elements can be changed by assigning to elements selected by indices of the data (see Assignment by index); by conditions based on the data values of the field construct or one if its metadata constructs (see Assignment by condition); or by identifying indices based on arbitrary metadata constructs (as described in this section). Assignment by metadata makes use of the The Assign air temperature values to the indices within certain longitude and latitude ranges.
>>> q, t = cf.read('file.nc')
>>> print(t)
Field: air_temperature (ncvar%ta)
---------------------------------
Data            : air_temperature(atmosphere_hybrid_height_coordinate(1), grid_latitude(10), grid_longitude(9)) K
Cell methods    : grid_latitude(10): grid_longitude(9): mean where land (interval: 0.1 degrees) time(1): maximum
Field ancils    : air_temperature standard_error(grid_latitude(10), grid_longitude(9)) = [[0.76, ..., 0.32]] K
Dimension coords: atmosphere_hybrid_height_coordinate(1) = [1.5]
                : grid_latitude(10) = [2.2, ..., -1.76] degrees
                : grid_longitude(9) = [-4.7, ..., -1.18] degrees
                : time(1) = [2019-01-01 00:00:00]
Auxiliary coords: latitude(grid_latitude(10), grid_longitude(9)) = [[53.941, ..., 50.225]] degrees_N
                : longitude(grid_longitude(9), grid_latitude(10)) = [[2.004, ..., 8.156]] degrees_E
                : long_name=Grid latitude name(grid_latitude(10)) = [--, ..., b'kappa']
Cell measures   : measure:area(grid_longitude(9), grid_latitude(10)) = [[2391.9657, ..., 2392.6009]] km2
Coord references: grid_mapping_name:rotated_latitude_longitude
                : standard_name:atmosphere_hybrid_height_coordinate
Domain ancils   : ncvar%a(atmosphere_hybrid_height_coordinate(1)) = [10.0] m
                : ncvar%b(atmosphere_hybrid_height_coordinate(1)) = [20.0]
                : surface_altitude(grid_latitude(10), grid_longitude(9)) = [[0.0, ..., 270.0]] m
>>> indices = t.indices(grid_longitude=cf.wi(-4, -2))
>>> indices
(slice(0, 1, 1), slice(0, 10, 1), slice(2, 7, 1))
>>> t[indices] = -11
>>> print(t.array)
[[[262.8 270.5 -11.  -11.  -11.  -11.  -11.  278.9 269.2]
  [272.7 268.4 -11.  -11.  -11.  -11.  -11.  265.7 279.5]
  [269.7 279.1 -11.  -11.  -11.  -11.  -11.  272.5 263.7]
  [261.7 260.6 -11.  -11.  -11.  -11.  -11.  267.6 260.6]
  [264.2 275.9 -11.  -11.  -11.  -11.  -11.  268.6 275.3]
  [263.9 263.8 -11.  -11.  -11.  -11.  -11.  263.5 270.2]
  [273.8 273.1 -11.  -11.  -11.  -11.  -11.  273.  270.6]
  [267.9 273.5 -11.  -11.  -11.  -11.  -11.  260.8 268.9]
  [270.9 278.7 -11.  -11.  -11.  -11.  -11.  278.5 266.4]
  [276.4 264.2 -11.  -11.  -11.  -11.  -11.  273.4 269.7]]]
>>> t[t.indices(latitude=cf.wi(51, 53))] = -99
>>> print(t.array)
[[[262.8 270.5 -11.  -11.  -11.  -11.  -11.  278.9 269.2]
  [272.7 268.4 -11.  -11.  -11.  -11.  -11.  265.7 279.5]
  [269.7 279.1 -11.  -11.  -11.  -11.  -11.  272.5 263.7]
  [-99.  -99.  -99.  -99.  -99.  -99.  -99.  -99.  -99. ]
  [-99.  -99.  -99.  -99.  -99.  -99.  -99.  -99.  -99. ]
  [-99.  -99.  -99.  -99.  -99.  -99.  -99.  -99.  -99. ]
  [-99.  -99.  -99.  -99.  -99.  -99.  -99.  -99.  -99. ]
  [267.9 273.5 -11.  -11.  -99.  -99.  -99.  -99.  -99. ]
  [270.9 278.7 -11.  -11.  -11.  -11.  -11.  278.5 266.4]
  [276.4 264.2 -11.  -11.  -11.  -11.  -11.  273.4 269.7]]]
Sorting and selecting from field lists¶A field list may be sorted in-place using the
same syntax as a Python Sort a field list by the field construct identities, and
by field construct units.
>>> fl = cf.read('file.nc')
>>> fl
[<CF Field: specific_humidity(latitude(5), longitude(8)) 1>,
 <CF Field: air_temperature(atmosphere_hybrid_height_coordinate(1), grid_latitude(10), grid_longitude(9)) K>]
>>> fl.sort()
>>> fl
[<CF Field: air_temperature(atmosphere_hybrid_height_coordinate(1), grid_latitude(10), grid_longitude(9)) K>,
 <CF Field: specific_humidity(latitude(5), longitude(8)) 1>]
>>> fl.sort(key=lambda f: f.units)
>>> fl
[<CF Field: specific_humidity(latitude(5), longitude(8)) 1>,
 <CF Field: air_temperature(atmosphere_hybrid_height_coordinate(1), grid_latitude(10), grid_longitude(9)) K>]
A field list has methods for selecting field constructs that meet various criteria:
Each of these methods returns a new (possibly empty) field list that contains the selected field constructs. Get field constructs by their identity.
>>> fl = cf.read('*.nc')
>>> fl
[<CF Field: specific_humidity(cf_role=timeseries_id(4), ncdim%timeseries(9))>,
 <CF Field: eastward_wind(latitude(10), longitude(9)) m s-1>,
 <CF Field: cell_area(ncdim%longitude(9), ncdim%latitude(10)) m2>,
 <CF Field: specific_humidity(latitude(5), longitude(8)) 1>,
 <CF Field: air_temperature(atmosphere_hybrid_height_coordinate(1), grid_latitude(10), grid_longitude(9)) K>,
 <CF Field: air_temperature(time(2), latitude(73), longitude(96)) K>,
 <CF Field: air_potential_temperature(time(120), latitude(5), longitude(8)) K>,
 <CF Field: precipitation_flux(time(2), latitude(4), longitude(5)) kg m2 s-1>,
 <CF Field: precipitation_flux(time(1), latitude(64), longitude(128)) kg m-2 day-1>]
>>> fl.select_by_identity('precipitation_flux')
[<CF Field: precipitation_flux(time(2), latitude(4), longitude(5)) kg m2 s-1>,
 <CF Field: precipitation_flux(time(1), latitude(64), longitude(128)) kg m-2 day-1>]
>>> import re
>>> fl.select_by_identity(re.compile('.*potential.*'))
[<CF Field: air_potential_temperature(time(120), latitude(5), longitude(8)) K>]
>>> fl.select_by_identity('relative_humidity')
[]
As a convenience, selection by field construct identity is also
possible by providing identities to a call of a field list itself, or
to its Get field constructs by their identity by calling the
instance directly, or with the ‘select’ method.
>>> fl('air_temperature')
[<CF Field: air_temperature(atmosphere_hybrid_height_coordinate(1), grid_latitude(10), grid_longitude(9)) K>,
 <CF Field: air_temperature(time(2), latitude(73), longitude(96)) K>]
>>> fl.select('air_temperature')
[<CF Field: air_temperature(atmosphere_hybrid_height_coordinate(1), grid_latitude(10), grid_longitude(9)) K>,
 <CF Field: air_temperature(time(2), latitude(73), longitude(96)) K>]
Testing criteria on a field construct¶A field construct has methods for ascertaining whether or not it meets various criteria:
Each of these methods returns Match a field construct to its properties and metadata.
>>> print(t)
Field: air_temperature (ncvar%ta)
---------------------------------
Data            : air_temperature(atmosphere_hybrid_height_coordinate(1), grid_latitude(10), grid_longitude(9)) K
Cell methods    : grid_latitude(10): grid_longitude(9): mean where land (interval: 0.1 degrees) time(1): maximum
Field ancils    : air_temperature standard_error(grid_latitude(10), grid_longitude(9)) = [[0.76, ..., 0.32]] K
Dimension coords: atmosphere_hybrid_height_coordinate(1) = [1.5]
                : grid_latitude(10) = [2.2, ..., -1.76] degrees
                : grid_longitude(9) = [-4.7, ..., -1.18] degrees
                : time(1) = [2019-01-01 00:00:00]
Auxiliary coords: latitude(grid_latitude(10), grid_longitude(9)) = [[53.941, ..., 50.225]] degrees_N
                : longitude(grid_longitude(9), grid_latitude(10)) = [[2.004, ..., 8.156]] degrees_E
                : long_name=Grid latitude name(grid_latitude(10)) = [--, ..., 'kappa']
Cell measures   : measure:area(grid_longitude(9), grid_latitude(10)) = [[2391.9657, ..., 2392.6009]] km2
Coord references: grid_mapping_name:rotated_latitude_longitude
                : standard_name:atmosphere_hybrid_height_coordinate
Domain ancils   : ncvar%a(atmosphere_hybrid_height_coordinate(1)) = [10.0] m
                : ncvar%b(atmosphere_hybrid_height_coordinate(1)) = [20.0]
                : surface_altitude(grid_latitude(10), grid_longitude(9)) = [[0.0, ..., 270.0]] m
>>> t.match_by_identity('air_temperature')
True
>>> t.match_by_rank(4)
True
>>> t.match_by_units('degC', exact=False)
True
>>> t.match_by_construct(longitude=cf.wi(-10, 10))
True
As a convenience, matching a field construct by identity is also
possible with the Match a field construct to its identity.
>>> t.match('specific_humidity')
False
>>> t.match('specific_humidity', 'air_temperature')
True
Encapsulating conditions¶A condition that may be applied to any construct (or, indeed, any
object) may be stored in a An example evaluating a strictly less than 3 query condition.
>>> c = cf.Query('lt', 3)
>>> c
<CF Query: (lt 3)>
>>> c.evaluate(2)
True
>>> c == 2
True
>>> c != 2
False
>>> c.evaluate(3)
False
>>> c == cf.Data([1, 2, 3])
<CF Data(3): [True, True, False]>
>>> print(c == numpy.array([1, 2, 3]))
[ True  True False]
The following operators are supported when constructing
Compound conditions¶Multiple conditions may be combined with the Python bitwise “and”
( An example evaluating a compound query operation involving a greater than or equal to 3 condition and a strictly less than 5 condition.
>>> ge3 = cf.Query('ge', 3)
>>> lt5 = cf.Query('lt', 5)
>>> c = ge3 & lt5
>>> c
<CF Query: [(ge 3) & (lt 5)]>
>>> c == 2
False
>>> c != 2
True
>>> c = ge3 | lt5
>>> c
<CF Query: [(ge 3) | (lt 5)]>
>>> c == 2
True
>>> c &= cf.Query('set', [1, 3, 5])
>>> c
<CF Query: [[(ge 3) | (lt 5)] & (set [1, 3, 5])]>
>>> c == 2
False
>>> c == 3
True
A condition can also be applied to an attribute (as well as attributes of attributes) of an object. Define and apply a condition that is applied to the
upper bounds of a coordinate construct’s cells.
>>> upper_bounds_ge_minus4 = cf.Query('ge', -4, attr='upper_bounds')
>>> X = t.dimension_coordinate('X')
>>> X
<CF DimensionCoordinate: grid_longitude(9) degrees>
>>> print(X.bounds.array)
[[-4.92 -4.48]
 [-4.48 -4.04]
 [-4.04 -3.6 ]
 [-3.6  -3.16]
 [-3.16 -2.72]
 [-2.72 -2.28]
 [-2.28 -1.84]
 [-1.84 -1.4 ]
 [-1.4  -0.96]]
>>> print((upper_bounds_ge_minus4 == X).array)
[False False  True  True  True  True  True  True  True]
Condition constructors¶For convenience, many commonly used conditions can be created with
An example of a constructor (for a cell containing a
value) and its equivalent construction from constructor
cf.Query instances.
>>> cf.contains(4)
<CF Query: [lower_bounds(le 4) & upper_bounds(ge 4)]>
>>> cf.Query('lt', 4, attr='lower_bounds') &  cf.Query('ge', 4, attr='upper_bounds')
<CF Query: [lower_bounds(lt 4) & upper_bounds(ge 4)]>
The following
Some examples of ‘cf.Query’ objects returned by
constructors.
>>> cf.ge(3)
<CF Query: (ge 3)>
>>> cf.ge(cf.dt('2000-3-23'))
<CF Query: (ge 2000-03-23 00:00:00)>
>>> cf.year(1999)
<CF Query: year(eq 1999)>
>>> cf.month(cf.wi(6, 8))
<CF Query: month(wi [6, 8])>
>>> cf.jja()
<CF Query: month(wi (6, 8))>
>>> cf.contains(4)
<CF Query: [lower_bounds(le 4) & upper_bounds(ge 4)]>
>>> cf.cellsize(cf.lt(10, 'degrees'))
<CF Query: cellsize(lt 10 degrees)>
Assignment by condition¶See also Data elements can be changed by assigning to elements selected by indices of the data (see Assignment by index); by conditions based on the data values of the field construct or one of its metadata constructs (as described in this section); or by identifying indices based on arbitrary metadata constructs (see Assignment by metadata). Assignment by condition uses the Set all data elements that are less than 273.15 to
missing data.
>>> t = cf.read('file.nc')[1]
>>> print(t.array)
[[[262.8 270.5 279.8 269.5 260.9 265.  263.5 278.9 269.2]
  [272.7 268.4 279.5 278.9 263.8 263.3 274.2 265.7 279.5]
  [269.7 279.1 273.4 274.2 279.6 270.2 280.  272.5 263.7]
  [261.7 260.6 270.8 260.3 265.6 279.4 276.9 267.6 260.6]
  [264.2 275.9 262.5 264.9 264.7 270.2 270.4 268.6 275.3]
  [263.9 263.8 272.1 263.7 272.2 264.2 260.  263.5 270.2]
  [273.8 273.1 268.5 272.3 264.3 278.7 270.6 273.  270.6]
  [267.9 273.5 279.8 260.3 261.2 275.3 271.2 260.8 268.9]
  [270.9 278.7 273.2 261.7 271.6 265.8 273.  278.5 266.4]
  [276.4 264.2 276.3 266.1 276.1 268.1 277.  273.4 269.7]]]
>>> u = t.where(cf.lt(273.15), x=cf.masked)
>>> print(u.array)
[[[   --    -- 279.8    --    --    --    -- 278.9    --]
  [   --    -- 279.5 278.9    --    -- 274.2    -- 279.5]
  [   -- 279.1 273.4 274.2 279.6    -- 280.0    --    --]
  [   --    --    --    --    -- 279.4 276.9    --    --]
  [   -- 275.9    --    --    --    --    --    -- 275.3]
  [   --    --    --    --    --    --    --    --    --]
  [273.8    --    --    --    -- 278.7    --    --    --]
  [   -- 273.5 279.8    --    -- 275.3    --    --    --]
  [   -- 278.7 273.2    --    --    --    -- 278.5    --]
  [276.4    -- 276.3    -- 276.1    -- 277.0 273.4    --]]]
Set all data elements that are less than 273.15 to 0,
and all other elements to 1.
>>> u = t.where(cf.lt(273.15), x=0, y=1)
>>> print(u.array)
[[[0. 0. 1. 0. 0. 0. 0. 1. 0.]
  [0. 0. 1. 1. 0. 0. 1. 0. 1.]
  [0. 1. 1. 1. 1. 0. 1. 0. 0.]
  [0. 0. 0. 0. 0. 1. 1. 0. 0.]
  [0. 1. 0. 0. 0. 0. 0. 0. 1.]
  [0. 0. 0. 0. 0. 0. 0. 0. 0.]
  [1. 0. 0. 0. 0. 1. 0. 0. 0.]
  [0. 1. 1. 0. 0. 1. 0. 0. 0.]
  [0. 1. 1. 0. 0. 0. 0. 1. 0.]
  [1. 0. 1. 0. 1. 0. 1. 1. 0.]]]
Where the data of field ‘u’ is True, multiply all
elements of ‘t’ by -1, and at all other points set ‘t’ to
-99.
>>> print(t.where(u, x=-t, y=-99).array)
[[[ -99.   -99.  -279.8  -99.   -99.   -99.   -99.  -278.9  -99. ]
  [ -99.   -99.  -279.5 -278.9  -99.   -99.  -274.2  -99.  -279.5]
  [ -99.  -279.1 -273.4 -274.2 -279.6  -99.  -280.   -99.   -99. ]
  [ -99.   -99.   -99.   -99.   -99.  -279.4 -276.9  -99.   -99. ]
  [ -99.  -275.9  -99.   -99.   -99.   -99.   -99.   -99.  -275.3]
  [ -99.   -99.   -99.   -99.   -99.   -99.   -99.   -99.   -99. ]
  [-273.8  -99.   -99.   -99.   -99.  -278.7  -99.   -99.   -99. ]
  [ -99.  -273.5 -279.8  -99.   -99.  -275.3  -99.   -99.   -99. ]
  [ -99.  -278.7 -273.2  -99.   -99.   -99.   -99.  -278.5  -99. ]
  [-276.4  -99.  -276.3  -99.  -276.1  -99.  -277.  -273.4  -99. ]]]
The Where the ‘Y’ coordinates are greater than 0.5, set the
field construct data to missing data.
>>> v = t.where(cf.gt(0.5), x=cf.masked, construct='grid_latitude')
>>> print(v.array)
[[[   --    --    --    --    --    --    --    --    --]
  [   --    --    --    --    --    --    --    --    --]
  [   --    --    --    --    --    --    --    --    --]
  [   --    --    --    --    --    --    --    --    --]
  [264.2 275.9 262.5 264.9 264.7 270.2 270.4 268.6 275.3]
  [263.9 263.8 272.1 263.7 272.2 264.2 260.0 263.5 270.2]
  [273.8 273.1 268.5 272.3 264.3 278.7 270.6 273.0 270.6]
  [267.9 273.5 279.8 260.3 261.2 275.3 271.2 260.8 268.9]
  [270.9 278.7 273.2 261.7 271.6 265.8 273.0 278.5 266.4]
  [276.4 264.2 276.3 266.1 276.1 268.1 277.0 273.4 269.7]]]
The hardness of the mask is respected by the
There are many variants on how the condition and assignment values may
be specified. See the The Where the ‘Y’ coordinates are greater than 0.5, set the
field construct data to missing data.
>>> print(t.where(v.mask, x=cf.masked))
[[[   --    --    --    --    --    --    --    --    --]
  [   --    --    --    --    --    --    --    --    --]
  [   --    --    --    --    --    --    --    --    --]
  [   --    --    --    --    --    --    --    --    --]
  [264.2 275.9 262.5 264.9 264.7 270.2 270.4 268.6 275.3]
  [263.9 263.8 272.1 263.7 272.2 264.2 260.0 263.5 270.2]
  [273.8 273.1 268.5 272.3 264.3 278.7 270.6 273.0 270.6]
  [267.9 273.5 279.8 260.3 261.2 275.3 271.2 260.8 268.9]
  [270.9 278.7 273.2 261.7 271.6 265.8 273.0 278.5 266.4]
  [276.4 264.2 276.3 266.1 276.1 268.1 277.0 273.4 269.7]]]
The condition may also be any object that broadcasts to the field constructs data: Mask all points, and those in selected columns.
>>> print(t.where(True, x=cf.masked).array)
[[[-- -- -- -- -- -- -- -- --]
  [-- -- -- -- -- -- -- -- --]
  [-- -- -- -- -- -- -- -- --]
  [-- -- -- -- -- -- -- -- --]
  [-- -- -- -- -- -- -- -- --]
  [-- -- -- -- -- -- -- -- --]
  [-- -- -- -- -- -- -- -- --]
  [-- -- -- -- -- -- -- -- --]
  [-- -- -- -- -- -- -- -- --]
  [-- -- -- -- -- -- -- -- --]]]
>>> print(t.where([0, 0, 1, 0, 1, 1, 1, 0, 0], x=cf.masked).array)
[[[262.8 270.5 -- 269.5 -- -- -- 278.9 269.2]
  [272.7 268.4 -- 278.9 -- -- -- 265.7 279.5]
  [269.7 279.1 -- 274.2 -- -- -- 272.5 263.7]
  [261.7 260.6 -- 260.3 -- -- -- 267.6 260.6]
  [264.2 275.9 -- 264.9 -- -- -- 268.6 275.3]
  [263.9 263.8 -- 263.7 -- -- -- 263.5 270.2]
  [273.8 273.1 -- 272.3 -- -- -- 273.0 270.6]
  [267.9 273.5 -- 260.3 -- -- -- 260.8 268.9]
  [270.9 278.7 -- 261.7 -- -- -- 278.5 266.4]
  [276.4 264.2 -- 266.1 -- -- -- 273.4 269.7]]]
This is particularly useful when the field construct does not have sufficient metadata to unambiguously identify its domain axes: Mask all points from “v”, using the data objects and
therefore bypassing the metadata checks.
>>> t.data.where(v.data.mask, x=cf.masked, inplace=True)
>>> print(t.array)
[[[   --    --    --    --    --    --    --    --    --]
  [   --    --    --    --    --    --    --    --    --]
  [   --    --    --    --    --    --    --    --    --]
  [   --    --    --    --    --    --    --    --    --]
  [264.2 275.9 262.5 264.9 264.7 270.2 270.4 268.6 275.3]
  [263.9 263.8 272.1 263.7 272.2 264.2 260.0 263.5 270.2]
  [273.8 273.1 268.5 272.3 264.3 278.7 270.6 273.0 270.6]
  [267.9 273.5 279.8 260.3 261.2 275.3 271.2 260.8 268.9]
  [270.9 278.7 273.2 261.7 271.6 265.8 273.0 278.5 266.4]
  [276.4 264.2 276.3 266.1 276.1 268.1 277.0 273.4 269.7]]]
Field creation¶There are various methods for creating a field construct in memory:
Note that the cf package enables the creation of field constructs, but
CF-compliance is the responsibility of the user. For example, a
Ab initio creation¶Ab initio creation of a field construct has three stages: Stage 1: The field construct is created without metadata constructs. Stage 2: Metadata constructs are created independently. Stage 3: The metadata constructs are inserted into the field construct with cross-references to other, related metadata constructs if required. For example, an auxiliary coordinate construct is related to an ordered list of the domain axis constructs which correspond to its data array dimensions. There are two equivalent approaches to stages 1 and 2. Either as much of the content as possible is specified during object instantiation: Create a field construct with a “standard_name”
property. Create dimension coordinate and field ancillary
constructs, both with properties and data.
>>> p = cf.Field(properties={'standard_name': 'precipitation_flux'})
>>> p
<CF Field: precipitation_flux>
>>> dc = cf.DimensionCoordinate(properties={'long_name': 'Longitude'},
...                               data=cf.Data([0, 1, 2.]))
>>> dc
<CF DimensionCoordinate: long_name=Longitude(3) >
>>> fa = cf.FieldAncillary(
...        properties={'standard_name': 'precipitation_flux status_flag'},
...        data=cf.Data(numpy.array([0, 0, 2], dtype='int8')))
>>> fa
<CF FieldAncillary: precipitation_flux status_flag(3) >
or else some or all content is added after instantiation via object methods: Create empty constructs and provide them with properties
and data after instantiation.
>>> p = cf.Field()
>>> p
<CF Field: >
>>> p.set_property('standard_name', 'precipitation_flux')
>>> p
<CF Field: precipitation_flux>
>>> dc = cf.DimensionCoordinate()
>>> dc
<CF DimensionCoordinate:  > # TODO
>>> dc.set_property('long_name', 'Longitude')
>>> dc.set_data(cf.Data([1, 2, 3.]))
>>> dc
<CF DimensionCoordinate: long_name=Longitude(3) >
>>> fa = cf.FieldAncillary(
...             data=cf.Data(numpy.array([0, 0, 2], dtype='int8')))
>>> fa
<CF FieldAncillary: (3) >
>>> fa.set_property('standard_name', 'precipitation_flux status_flag')
>>> fa
<CF FieldAncillary: precipitation_flux status_flag(3) >
For stage 3, the Set a domain axis construct and use its construct key
when setting the dimension coordinate construct. Also
create a cell method construct that applies to the domain
axis construct.
>>> longitude_axis = p.set_construct(cf.DomainAxis(3))
>>> longitude_axis
'domainaxis0'
>>> key = p.set_construct(dc, axes=longitude_axis)
>>> key
'dimensioncoordinate0'
>>> cm = cf.CellMethod(axes=longitude_axis, method='minimum')
>>> p.set_construct(cm)
'cellmethod0'
In general, the order in which metadata constructs are added to the field does not matter, except when one metadata construct is required by another, in which case the former must be added to the field first so that its construct key is available to the latter. Cell method constructs must, however, be set in the relative order in which their methods were applied to the data. The domain axis constructs spanned by a metadata construct’s data may
be changed after insertion with the Create a field construct with properties; data; and domain axis, cell method and dimension coordinate metadata constructs (data arrays have been generated with dummy values using numpy.arange).
import numpy
import cf

# Initialise the field construct with properties
Q = cf.Field(properties={'project': 'research',
                           'standard_name': 'specific_humidity',
                           'units': '1'})

# Create the domain axis constructs
domain_axisT = cf.DomainAxis(1)
domain_axisY = cf.DomainAxis(5)
domain_axisX = cf.DomainAxis(8)

# Insert the domain axis constructs into the field. The
# set_construct method returns the domain axis construct key that
# will be used later to specify which domain axis corresponds to
# which dimension coordinate construct.
axisT = Q.set_construct(domain_axisT)
axisY = Q.set_construct(domain_axisY)
axisX = Q.set_construct(domain_axisX)

# Create and insert the field construct data
data = cf.Data(numpy.arange(40.).reshape(5, 8))
Q.set_data(data)

# Create the cell method constructs
cell_method1 = cf.CellMethod(axes='area', method='mean')

cell_method2 = cf.CellMethod()
cell_method2.set_axes(axisT)
cell_method2.set_method('maximum')

# Insert the cell method constructs into the field in the same
# order that their methods were applied to the data
Q.set_construct(cell_method1)
Q.set_construct(cell_method2)

# Create a "time" dimension coordinate construct, with coordinate
# bounds
dimT = cf.DimensionCoordinate(
                            properties={'standard_name': 'time',
                                        'units': 'days since 2018-12-01'},
                            data=cf.Data([15.5]),
                            bounds=cf.Bounds(data=cf.Data([[0,31.]])))

# Create a "longitude" dimension coordinate construct, without
# coordinate bounds
dimX = cf.DimensionCoordinate(data=cf.Data(numpy.arange(8.)))
dimX.set_properties({'standard_name': 'longitude',
                     'units': 'degrees_east'})

# Create a "longitude" dimension coordinate construct
dimY = cf.DimensionCoordinate(properties={'standard_name': 'latitude',
                                          'units'        : 'degrees_north'})
array = numpy.arange(5.)
dimY.set_data(cf.Data(array))

# Create and insert the latitude coordinate bounds
bounds_array = numpy.empty((5, 2))
bounds_array[:, 0] = array - 0.5
bounds_array[:, 1] = array + 0.5
bounds = cf.Bounds(data=cf.Data(bounds_array))
dimY.set_bounds(bounds)

# Insert the dimension coordinate constructs into the field,
# specifying to which domain axis each one corresponds
Q.set_construct(dimT)
Q.set_construct(dimY)
Q.set_construct(dimX)
Inspect the new field construct.
>>> Q.dump()
------------------------
Field: specific_humidity
------------------------
project = 'research'
standard_name = 'specific_humidity'
units = '1'

Data(latitude(5), longitude(8)) = [[0.0, ..., 39.0]] 1

Cell Method: area: mean
Cell Method: time(1): maximum

Domain Axis: latitude(5)
Domain Axis: longitude(8)
Domain Axis: time(1)

Dimension coordinate: time
    standard_name = 'time'
    units = 'days since 2018-12-01'
    Data(time(1)) = [2018-12-16 12:00:00]
    Bounds:Data(time(1), 2) = [[2018-12-01 00:00:00, 2019-01-01 00:00:00]]

Dimension coordinate: latitude
    standard_name = 'latitude'
    units = 'degrees_north'
    Data(latitude(5)) = [0.0, ..., 4.0] degrees_north
    Bounds:Data(latitude(5), 2) = [[-0.5, ..., 4.5]] degrees_north

Dimension coordinate: longitude
    standard_name = 'longitude'
    units = 'degrees_east'
    Data(longitude(8)) = [0.0, ..., 7.0] degrees_east
The If this field were to be written to a netCDF dataset then, in the absence of predefined names, default netCDF variable and dimension names would be automatically generated (based on standard names where they exist). The setting of bespoke netCDF names is, however, possible with the netCDF interface. Set netCDF variable and dimension names for the field
and metadata constructs.
Q.nc_set_variable('q')

domain_axisT.nc_set_dimension('time')
domain_axisY.nc_set_dimension('lat')
domain_axisX.nc_set_dimension('lon')

dimT.nc_set_variable('time')
dimY.nc_set_variable('lat')
dimX.nc_set_variable('lon')
Here is a more complete example which creates a field construct that
contains every type of metadata construct (again, data arrays have
been generated with dummy values using Create a field construct that contains at least one
instance of each type of metadata construct.
import numpy
import cf

# Initialise the field construct
tas = cf.Field(
    properties={'project': 'research',
                'standard_name': 'air_temperature',
                'units': 'K'})

# Create and set domain axis constructs
axis_T = tas.set_construct(cf.DomainAxis(1))
axis_Z = tas.set_construct(cf.DomainAxis(1))
axis_Y = tas.set_construct(cf.DomainAxis(10))
axis_X = tas.set_construct(cf.DomainAxis(9))

# Set the field construct data
tas.set_data(cf.Data(numpy.arange(90.).reshape(10, 9)))

# Create and set the cell method constructs
cell_method1 = cf.CellMethod(
          axes=[axis_Y, axis_X],
          method='mean',
          qualifiers={'where': 'land',
                      'interval': [cf.Data(0.1, units='degrees')]})

cell_method2 = cf.CellMethod(axes=axis_T, method='maximum')

tas.set_construct(cell_method1)
tas.set_construct(cell_method2)

# Create and set the field ancillary constructs
field_ancillary = cf.FieldAncillary(
             properties={'standard_name': 'air_temperature standard_error',
                          'units': 'K'},
             data=cf.Data(numpy.arange(90.).reshape(10, 9)))

tas.set_construct(field_ancillary)

# Create and set the dimension coordinate constructs
dimension_coordinate_T = cf.DimensionCoordinate(
                           properties={'standard_name': 'time',
                                       'units': 'days since 2018-12-01'},
                           data=cf.Data([15.5]),
                           bounds=cf.Bounds(data=cf.Data([[0., 31]])))

dimension_coordinate_Z = cf.DimensionCoordinate(
        properties={'computed_standard_name': 'altitude',
                    'standard_name': 'atmosphere_hybrid_height_coordinate'},
        data = cf.Data([1.5]),
        bounds=cf.Bounds(data=cf.Data([[1.0, 2.0]])))

dimension_coordinate_Y = cf.DimensionCoordinate(
        properties={'standard_name': 'grid_latitude',
                    'units': 'degrees'},
        data=cf.Data(numpy.arange(10.)),
        bounds=cf.Bounds(data=cf.Data(numpy.arange(20).reshape(10, 2))))

dimension_coordinate_X = cf.DimensionCoordinate(
        properties={'standard_name': 'grid_longitude',
                    'units': 'degrees'},
    data=cf.Data(numpy.arange(9.)),
    bounds=cf.Bounds(data=cf.Data(numpy.arange(18).reshape(9, 2))))

dim_T = tas.set_construct(dimension_coordinate_T, axes=axis_T)
dim_Z = tas.set_construct(dimension_coordinate_Z, axes=axis_Z)
dim_Y = tas.set_construct(dimension_coordinate_Y)
dim_X = tas.set_construct(dimension_coordinate_X)

# Create and set the auxiliary coordinate constructs
auxiliary_coordinate_lat = cf.AuxiliaryCoordinate(
                      properties={'standard_name': 'latitude',
                                  'units': 'degrees_north'},
                      data=cf.Data(numpy.arange(90.).reshape(10, 9)))

auxiliary_coordinate_lon = cf.AuxiliaryCoordinate(
                  properties={'standard_name': 'longitude',
                              'units': 'degrees_east'},
                  data=cf.Data(numpy.arange(90.).reshape(9, 10)))

array = numpy.ma.array(list('abcdefghij'))
array[0] = numpy.ma.masked
auxiliary_coordinate_name = cf.AuxiliaryCoordinate(
                       properties={'long_name': 'Grid latitude name'},
                       data=cf.Data(array))

aux_LAT  = tas.set_construct(auxiliary_coordinate_lat)
aux_LON  = tas.set_construct(auxiliary_coordinate_lon)
aux_NAME = tas.set_construct(auxiliary_coordinate_name)

# Create and set domain ancillary constructs
domain_ancillary_a = cf.DomainAncillary(
                   properties={'units': 'm'},
                   data=cf.Data([10.]),
                   bounds=cf.Bounds(data=cf.Data([[5., 15.]])))

domain_ancillary_b = cf.DomainAncillary(
                       properties={'units': '1'},
                       data=cf.Data([20.]),
                       bounds=cf.Bounds(data=cf.Data([[14, 26.]])))

domain_ancillary_orog = cf.DomainAncillary(
                          properties={'standard_name': 'surface_altitude',
                                      'units': 'm'},
                          data=cf.Data(numpy.arange(90.).reshape(10, 9)))

domain_anc_A    = tas.set_construct(domain_ancillary_a, axes=axis_Z)
domain_anc_B    = tas.set_construct(domain_ancillary_b, axes=axis_Z)
domain_anc_OROG = tas.set_construct(domain_ancillary_orog)

# Create the datum for the coordinate reference constructs
datum = cf.Datum(parameters={'earth_radius': 6371007.})

# Create the coordinate conversion for the horizontal coordinate
# reference construct
coordinate_conversion_h = cf.CoordinateConversion(
              parameters={'grid_mapping_name': 'rotated_latitude_longitude',
                          'grid_north_pole_latitude': 38.0,
                          'grid_north_pole_longitude': 190.0})

# Create the coordinate conversion for the vertical coordinate
# reference construct
coordinate_conversion_v = cf.CoordinateConversion(
         parameters={'standard_name': 'atmosphere_hybrid_height_coordinate',
                     'computed_standard_name': 'altitude'},
         domain_ancillaries={'a': domain_anc_A,
                             'b': domain_anc_B,
                             'orog': domain_anc_OROG})

# Create the vertical coordinate reference construct
horizontal_crs = cf.CoordinateReference(
                   datum=datum,
                   coordinate_conversion=coordinate_conversion_h,
                   coordinates=[dim_X,
                                dim_Y,
                                aux_LAT,
                                aux_LON])

# Create the vertical coordinate reference construct
vertical_crs = cf.CoordinateReference(
                 datum=datum,
                 coordinate_conversion=coordinate_conversion_v,
                 coordinates=[dim_Z])

# Set the coordinate reference constructs
tas.set_construct(horizontal_crs)
tas.set_construct(vertical_crs)

# Create and set the cell measure constructs
cell_measure = cf.CellMeasure(measure='area',
                 properties={'units': 'km2'},
                 data=cf.Data(numpy.arange(90.).reshape(9, 10)))

tas.set_construct(cell_measure)
The new field construct may now be inspected: Inspect the new field construct.
>>> print(tas)
Field: air_temperature
----------------------
Data            : air_temperature(grid_latitude(10), grid_longitude(9)) K
Cell methods    : grid_latitude(10): grid_longitude(9): mean where land (interval: 0.1 degrees) time(1): maximum
Field ancils    : air_temperature standard_error(grid_latitude(10), grid_longitude(9)) = [[0.0, ..., 89.0]] K
Dimension coords: time(1) = [2018-12-16 12:00:00]
                : atmosphere_hybrid_height_coordinate(1) = [1.5]
                : grid_latitude(10) = [0.0, ..., 9.0] degrees
                : grid_longitude(9) = [0.0, ..., 8.0] degrees
Auxiliary coords: latitude(grid_latitude(10), grid_longitude(9)) = [[0.0, ..., 89.0]] degrees_north
                : longitude(grid_longitude(9), grid_latitude(10)) = [[0.0, ..., 89.0]] degrees_east
                : long_name=Grid latitude name(grid_latitude(10)) = [--, ..., j]
Cell measures   : measure:area(grid_longitude(9), grid_latitude(10)) = [[0.0, ..., 89.0]] km2
Coord references: atmosphere_hybrid_height_coordinate
                : rotated_latitude_longitude
Domain ancils   : key%domainancillary0(atmosphere_hybrid_height_coordinate(1)) = [10.0] m
                : key%domainancillary1(atmosphere_hybrid_height_coordinate(1)) = [20.0] 1
                : surface_altitude(grid_latitude(10), grid_longitude(9)) = [[0.0, ..., 89.0]] m
Command modification¶It is sometimes convenient to produce the commands that would create
an already existing field construct, and then modify them to create
the desired field construct. The commands are produced by the
Produce the commands that would create an existing field
construct.
>>> q, t = cf.read('file.nc')
>>> print(q.creation_commands())
# field: specific_humidity
f = cf.Field()
f.set_properties({'Conventions': 'CF-1.11', 'project': 'research', 'standard_name': 'specific_humidity', 'units': '1'})
d = cf.Data([[0.007, 0.034, 0.003, 0.014, 0.018, 0.037, 0.024, 0.029], [0.023, 0.036, 0.045, 0.062, 0.046, 0.073, 0.006, 0.066], [0.11, 0.131, 0.124, 0.146, 0.087, 0.103, 0.057, 0.011], [0.029, 0.059, 0.039, 0.07, 0.058, 0.072, 0.009, 0.017], [0.006, 0.036, 0.019, 0.035, 0.018, 0.037, 0.034, 0.013]], units='1', dtype='f8')
f.set_data(d)
f.nc_set_variable('q')

# netCDF global attributes
f.nc_set_global_attributes({'Conventions': None, 'project': None})

# domain_axis: ncdim%lat
c = cf.DomainAxis()
c.set_size(5)
c.nc_set_dimension('lat')
f.set_construct(c, key='domainaxis0', copy=False)

# domain_axis: ncdim%lon
c = cf.DomainAxis()
c.set_size(8)
c.nc_set_dimension('lon')
f.set_construct(c, key='domainaxis1', copy=False)

# domain_axis:
c = cf.DomainAxis()
c.set_size(1)
f.set_construct(c, key='domainaxis2', copy=False)

# field data axes
f.set_data_axes(('domainaxis0', 'domainaxis1'))

# dimension_coordinate: latitude
c = cf.DimensionCoordinate()
c.set_properties({'units': 'degrees_north', 'standard_name': 'latitude'})
d = cf.Data([-75.0, -45.0, 0.0, 45.0, 75.0], units='degrees_north', dtype='f8')
c.set_data(d)
c.nc_set_variable('lat')
b = cf.Bounds()
b.set_properties({})
d = cf.Data([[-90.0, -60.0], [-60.0, -30.0], [-30.0, 30.0], [30.0, 60.0], [60.0, 90.0]], units='degrees_north', dtype='f8')
b.set_data(d)
b.nc_set_variable('lat_bnds')
c.set_bounds(b)
f.set_construct(c, axes=('domainaxis0',), key='dimensioncoordinate0', copy=False)

# dimension_coordinate: longitude
c = cf.DimensionCoordinate()
c.set_properties({'units': 'degrees_east', 'standard_name': 'longitude'})
d = cf.Data([22.5, 67.5, 112.5, 157.5, 202.5, 247.5, 292.5, 337.5], units='degrees_east', dtype='f8')
c.set_data(d)
c.nc_set_variable('lon')
b = cf.Bounds()
b.set_properties({})
d = cf.Data([[0.0, 45.0], [45.0, 90.0], [90.0, 135.0], [135.0, 180.0], [180.0, 225.0], [225.0, 270.0], [270.0, 315.0], [315.0, 360.0]], units='degrees_east', dtype='f8')
b.set_data(d)
b.nc_set_variable('lon_bnds')
c.set_bounds(b)
f.set_construct(c, axes=('domainaxis1',), key='dimensioncoordinate1', copy=False)

# dimension_coordinate: time
c = cf.DimensionCoordinate()
c.set_properties({'units': 'days since 2018-12-01', 'standard_name': 'time'})
d = cf.Data([31.0], units='days since 2018-12-01', dtype='f8')
c.set_data(d)
c.nc_set_variable('time')
f.set_construct(c, axes=('domainaxis2',), key='dimensioncoordinate2', copy=False)

# cell_method
c = cf.CellMethod()
c.set_method('mean')
c.set_axes(('area',))
f.set_construct(c)
Some example fields are always available from the Creating data from an array on disk¶All the of above examples use arrays in memory to construct the data
instances for the field and metadata constructs. It is, however,
possible to create data from arrays that reside on disk. The Define a variable from a dataset with the netCDF package
and use it to create a XnetcdfArray instance with which
to initialise a Data instance.
>>> import netCDF4
>>> nc = netCDF4.Dataset('file.nc', 'r')
>>> v = nc.variables['ta']
>>> netcdf_array = cf.XnetcdfArray(filename='file.nc', address='ta',
...                                dtype=v.dtype, shape=v.shape)
>>> data_disk = cf.Data(netcdf_array)
Read the netCDF variable’s data into memory and
initialise another Data instance with it. Compare the
values of the two data instances.
>>> numpy_array = v[...]
>>> data_memory = cf.Data(numpy_array)
>>> data_disk.equals(data_memory)
True
Note that data type, number of dimensions, dimension sizes and number
of elements of the array on disk that are used to initialise the
Creation by conversion¶An independent field construct may be created from an existing
metadata construct using Create an independent field construct from the “surface
altitude” metadata construct.
>>> key = tas.construct_key('surface_altitude')
>>> orog = tas.convert(key)
>>> print(orog)
Field: surface_altitude
-----------------------
Data            : surface_altitude(grid_latitude(10), grid_longitude(9)) m
Dimension coords: grid_latitude(10) = [0.0, ..., 9.0] degrees
                : grid_longitude(9) = [0.0, ..., 8.0] degrees
Auxiliary coords: latitude(grid_latitude(10), grid_longitude(9)) = [[0.0, ..., 89.0]] degrees_north
                : longitude(grid_longitude(9), grid_latitude(10)) = [[0.0, ..., 89.0]] degrees_east
                : long_name=Grid latitude name(grid_latitude(10)) = [--, ..., j]
Cell measures   : measure:area(grid_longitude(9), grid_latitude(10)) = [[0.0, ..., 89.0]] km2
Coord references: rotated_latitude_longitude
The Create an independent field construct from the “surface
altitude” metadata construct, but without a complete
domain.
>>> orog1 = tas.convert(key, full_domain=False)
>>> print(orog1)
Field: surface_altitude
-----------------------
Data            : surface_altitude(key%domainaxis2(10), key%domainaxis3(9)) m
Creation by reading¶The Write the field construct that was created manually to
disk, and then read it back into a new field construct.
>>> cf.write(tas, 'tas.nc')
>>> f = cf.read('tas.nc')
>>> f
[<CF Field: air_temperature(atmosphere_hybrid_height_coordinate(1), grid_latitude(10), grid_longitude(9)) K>]
The Read the file, treating formula terms netCDF variables
(which map to domain ancillary constructs) as additional
CF-netCDF data variables.
>>> fields = cf.read('tas.nc', extra='domain_ancillary')
>>> fields
[<CF Field: ncvar%a(atmosphere_hybrid_height_coordinate(1)) m>,
 <CF Field: air_temperature(atmosphere_hybrid_height_coordinate(1), grid_latitude(10), grid_longitude(9)) K>,
 <CF Field: ncvar%b(atmosphere_hybrid_height_coordinate(1)) 1>,
 <CF Field: surface_altitude(grid_latitude(10), grid_longitude(9)) m>]
>>> orog_from_file = fields[3]
>>> print(orog_from_file)
Field: surface_altitude (ncvar%surface_altitude)
------------------------------------------------
Data            : surface_altitude(grid_latitude(10), grid_longitude(9)) m
Dimension coords: grid_latitude(10) = [0.0, ..., 9.0] degrees
                : grid_longitude(9) = [0.0, ..., 8.0] degrees
Comparing the field constructs Creation with cfa¶The Use cfa to create new, single dataset that combines the
field constructs from two files.
$ cfa file.nc CF Field: specific_humidity(latitude(5), longitude(8)) 1 CF Field: air_temperature(atmosphere_hybrid_height_coordinate(1), grid_latitude(10), grid_longitude(9)) K $ cfa air_temperature.nc CF Field: air_temperature(time(2), latitude(73), longitude(96)) K $ cfa -o new_dataset.nc file.nc air_temperature.nc $ cfa new_dataset.nc CF Field: specific_humidity(latitude(5), longitude(8)) 1 CF Field: air_temperature(atmosphere_hybrid_height_coordinate(1), grid_latitude(10), grid_longitude(9)) K CF Field: air_temperature(time(2), latitude(73), longitude(96)) K Copying¶A field construct may be copied with its Copy a field construct and change elements of the copy,
showing that the original field construct has not been
altered.
>>> u = t.copy()
>>> u.data[0, 0, 0] = -1e30
>>> u.data[0, 0, 0]
<CF Data(1, 1, 1): [[[-1e+30]]] K>
>>> t.data[0, 0, 0]
<CF Data(1, 1, 1): [[[-1.0]]] K>
>>> u.del_construct('grid_latitude')
<CF DimensionCoordinate: grid_latitude(10) degrees>
>>> u.constructs('grid_latitude')
{}
>>> t.constructs('grid_latitude')
{'dimensioncoordinate1': <CF DimensionCoordinate: grid_latitude(10) degrees>}
Equivalently, the Copy a field construct with the built-in copy module.
>>> import copy
>>> u = copy.deepcopy(t)
Metadata constructs may be copied individually in the same manner: Copy a metadata construct.
>>> orog = t.constructs('surface_altitude').value().copy() Arrays within Field list copying¶A field list also has a Equality¶Whether or not two field constructs are the same is tested with either
field construct’s A field construct is always equal to itself, a copy of
itself and a complete subspace of itself. The “verbose”
keyword will give some (but not necessarily all) of the
reasons why two field constructs are not the same.
>>> t.equals(t)
True
>>> t.equals(t.copy())
True
>>> t.equals(t[...])
True
>>> t.equals(q)
False
>>> t.equals(q, verbose=2)
Field: Different Units: <Units: K> != <Units: 1>
False
Tip To return specific detail about the differences between two
constructs, should they not be equal, increase the verbosity
of the Otherwise, for default verbosity, only a Equality is strict by default. This means that for two field constructs to be considered equal they must have corresponding metadata constructs and for each pair of constructs:
Two real numbers \(x\) and \(y\) are considered equal if
\(|x - y| \le a_{tol} + r_{tol}|y|\), where \(a_{tol}\) (the
tolerance on absolute differences) and \(r_{tol}\) (the tolerance
on relative differences) are positive, typically very small
numbers. By default both are set to the system epsilon (the difference
between 1 and the least value greater than 1 that is representable as
a float). Their values may be inspected and changed with the
Note that the above equation is not symmetric in \(x\) and
\(y\), so that for two fields The atol and rtol functions allow the numerical equality
tolerances to be inspected and changed.
>>> print(cf.atol())
2.220446049250313e-16
>>> print(cf.rtol())
2.220446049250313e-16
>>> original = cf.rtol(0.00001)
>>> print(cf.rtol())
1e-05
>>> print(cf.rtol(original))
1e-05
>>> print(cf.rtol())
2.220446049250313e-16
The \(a_{tol}\) and \(r_{tol}\) constants may be set for a
runtime context established when executing a Evaluate equality in a runtime contenxt with a different
value of ‘atol’.
>>> t2 = t - 0.00001
>>> t.equals(t2)
False
>>> with cf.atol(1e-5):
...     print(t.equals(t2))
...
True
>>> t.equals(t2)
False
NetCDF elements, such as netCDF variable and dimension names, do not constitute part of the CF data model and so are not checked on any construct. The
Metadata constructs may also be tested for equality: Metadata constructs also have an equals method, that
behaves in a similar manner.
>>> orog = t.constructs('surface_altitude').value()
>>> orog.equals(orog.copy())
True
Field list equality¶A field list also has an NetCDF interface¶The logical CF data model is independent of netCDF, but the CF conventions are designed to enable the processing and sharing of datasets stored in netCDF files. Therefore, the cf package includes methods for recording and editing netCDF elements that are not part of the CF model, but are nonetheless often required to interpret and create CF-netCDF datasets. See the section on philosophy for a further discussion. When a netCDF dataset is read, netCDF elements (such as dimension and
variable names, and some attribute values) that do not have a place in
the CF data model are, nevertheless, stored within the appropriate
cf constructs. This allows them to be used when writing field
constructs to a new netCDF dataset, and also makes them accessible as
filters to a Retrieve metadata constructs based on their netCDF
names.
>>> print(t.constructs.filter_by_ncvar('b'))
Constructs:
{'domainancillary1': <CF DomainAncillary: ncvar%b(1) >}
>>> t.constructs('ncvar%x').value()
<CF DimensionCoordinate: grid_longitude(9) degrees>
>>> t.constructs('ncdim%x')
<CF Constructs: domain_axis(1)>
Each construct has methods to access the netCDF elements which it requires. For example, the field construct has the following methods:
Access netCDF elements associated with the field and
metadata constructs.
>>> q.nc_get_variable()
'q'
>>> q.nc_global_attributes()
{'Conventions': None, 'project': None}
>>> q.nc_set_variable('humidity')
>>> q.nc_get_variable()
'humidity'
>>> q.constructs('latitude').value().nc_get_variable()
'lat'
The complete collection of netCDF interface methods is:
Writing to a netCDF dataset¶Writing to disk¶The Write a field construct to a netCDF dataset on disk.
>>> print(q)
Field: specific_humidity (ncvar%humidity)
-----------------------------------------
Data            : specific_humidity(latitude(5), longitude(8)) 1
Cell methods    : area: mean
Dimension coords: latitude(5) = [-75.0, ..., 75.0] degrees_north
                : longitude(8) = [22.5, ..., 337.5] degrees_east
                : time(1) = [2019-01-01 00:00:00]
>>> cf.write(q, 'q_file.nc')
The new dataset is structured as follows: Inspect the new dataset with the ncdump command line
tool.
$ ncdump -h q_file.nc
netcdf q_file {
dimensions:
     lat = 5 ;
     bounds2 = 2 ;
     lon = 8 ;
variables:
     double lat_bnds(lat, bounds2) ;
     double lat(lat) ;
             lat:units = "degrees_north" ;
             lat:standard_name = "latitude" ;
             lat:bounds = "lat_bnds" ;
     double lon_bnds(lon, bounds2) ;
     double lon(lon) ;
             lon:units = "degrees_east" ;
             lon:standard_name = "longitude" ;
             lon:bounds = "lon_bnds" ;
     double time ;
             time:units = "days since 2018-12-01" ;
             time:standard_name = "time" ;
     double humidity(lat, lon) ;
             humidity:standard_name = "specific_humidity" ;
             humidity:cell_methods = "area: mean" ;
             humidity:units = "1" ;
             humidity:coordinates = "time" ;

// global attributes:
             :Conventions = "CF-1.11" ;
             :project = "research" ;
}
Note that netCDF is the only available output file format. A sequence of field constructs is written in exactly the same way: Write multiple field constructs to a netCDF dataset on
disk.
>>> x
[<CF Field: specific_humidity(latitude(5), longitude(8)) 1>,
 <CF Field: air_temperature(atmosphere_hybrid_height_coordinate(1), grid_latitude(10), grid_longitude(9)) K>]
>>> cf.write(x, 'new_file.nc')
By default the output file will be for CF-1.13. The
For example, to use the Append field constructs to a netCDF dataset on
disk.
>>> g = cf.example_field(2)
>>> cf.write(g, 'append-example-file.nc')
>>> cf.read('append-example-file.nc')
[<CF Field: air_potential_temperature(time(36), latitude(5), longitude(8)) K>]
>>> h = cf.example_field(0)
>>> h
<CF Field: specific_humidity(latitude(5), longitude(8)) 1>
>>> cf.write(h, 'append-example-file.nc', mode='a', backend='netCDF4')
>>> cf.read('append-example-file.nc')
[<CF Field: air_potential_temperature(time(36), latitude(5), longitude(8)) K>,
 <CF Field: specific_humidity(latitude(5), longitude(8)) 1>]
Output netCDF variable and dimension names read from a netCDF dataset
are stored in the resulting field constructs, and may also be set
manually with the It is possible to create netCDF unlimited dimensions using the
A field construct is not transformed through being written to a file on disk and subsequently read back from that file. Read a file that has been created by writing a field
construct, and compare the result with the original field
construct in memory.
>>> f = cf.read('q_file.nc')[0]
>>> q.equals(f)
True
Global attributes¶The field construct properties that correspond to the standardised
description-of-file-contents attributes are automatically written as
netCDF global attributes. Other attributes may also be written as
netCDF global attributes if they have been identified as such with the
global_attributes keyword, or via the
Request that the “model” property is written as a netCDF
global attribute, using the “global_attributes” keyword.
>>> f.set_property('model', 'model_A')
>>> cf.write(f, 'f_file.nc', global_attributes='model')
Request that the “model” property is written as a netCDF
global attribute, using the “nc_set_global_attribute”
method.
>>> f.nc_global_attributes()
{'Conventions': None, 'project': None}
>>> f.nc_set_global_attribute('model')
>>> f.nc_global_attributes()
{'Conventions': None, 'project': None, 'model': None}
>>> cf.write(f, 'f_file.nc')
It is possible to create both a netCDF global attribute and a netCDF
data variable attribute with the same name, but with different
values. This may be done by assigning the global value to the property
name with the Request that the “information” property is written as
netCDF global and data variable attributes, with
different values, using the “nc_set_global_attribute”
method.
>>> f.set_property('information', 'variable information')
>>> f.properties()
{'Conventions': 'CF-1.11',
 'information': 'variable information',
 'project': 'research',
 'standard_name': 'specific_humidity',
 'units': '1'}
>>> f.nc_set_global_attribute('information', 'global information')
>>> f.nc_global_attributes()
{'Conventions': None,
'information': 'global information',
 'model': None,
 'project': None}
>>> cf.write(f, 'f_file.nc')
NetCDF global attributes defined with the file_descriptors keyword
of the Insist that the “history” property is written as netCDF
a global attribute, with the “file_descriptors” keyword.
>>> cf.write(f, 'f_file.nc', file_descriptors={'history': 'created in 2019'}) >>> f_file = cf.read('f_file.nc')[0] >>> f_file.nc_global_attributes() >>> f_file.properties() {'Conventions': 'CF-1.11', 'history': 'created in 2019', 'information': 'variable information', 'model': 'model_A', 'project': 'research', 'standard_name': 'specific_humidity', 'units': '1'} >>> f_file.nc_global_attributes() {'Conventions': None, 'history': None, 'information': 'global information', 'project': None} Conventions¶The Two ways to add additional conventions to the
“Conventions” netCDF global attribute.
>>> f_file.set_property('Conventions', 'UGRID1.0')
>>> cf.write(f, 'f_file.nc', Conventions='UGRID1.0')
Scalar coordinate variables¶A CF-netCDF scalar (i.e. zero-dimensional) coordinate variable is
created from a size one dimension coordinate construct that spans a
domain axis construct which is not spanned by the field construct’s
data, nor the data of any other metadata construct. This occurs for
the field construct To change this so that the “time” dimension coordinate construct is
written as a CF-netCDF size one coordinate variable, the field
construct’s data must be expanded to span the corresponding size one
domain axis construct, by using the Write the “time” dimension coordinate construct to a
(non-scalar) CF-netCDF coordinate variable by inserting
the corresponding dimension into the field construct’s
data.
>>> print(q)
Field: specific_humidity (ncvar%humidity)
-----------------------------------------
Data            : specific_humidity(latitude(5), longitude(8)) 1
Cell methods    : area: mean
Dimension coords: latitude(5) = [-75.0, ..., 75.0] degrees_north
                : longitude(8) = [22.5, ..., 337.5] degrees_east
                : time(1) = [2019-01-01 00:00:00]
<CF Field: specific_humidity(latitude(5), longitude(8)) 1>
>>> key = q.construct_key('time')
>>> axes = q.get_data_axes(key)
>>> axes
('domainaxis2',)
>>> q2 = q.insert_dimension(axis=axes[0])
>>> q2
<CF Field: specific_humidity(time(1), latitude(5), longitude(8)) 1>
>>> cf.write(q2, 'q2_file.nc')
The new dataset is structured as follows (note, relative to file
Inspect the new dataset with the ncdump command line
tool.
$ ncdump -h q2_file.nc netcdf q2_file { dimensions: lat = 5 ; bounds2 = 2 ; lon = 8 ; time = 1 ; variables: double lat_bnds(lat, bounds2) ; double lat(lat) ; lat:units = "degrees_north" ; lat:standard_name = "latitude" ; lat:bounds = "lat_bnds" ; double lon_bnds(lon, bounds2) ; double lon(lon) ; lon:units = "degrees_east" ; lon:standard_name = "longitude" ; lon:bounds = "lon_bnds" ; double time(time) ; time:units = "days since 2018-12-01" ; time:standard_name = "time" ; double humidity(time, lat, lon) ; humidity:units = "1" ; humidity:standard_name = "specific_humidity" ; humidity:cell_methods = "area: mean" ; // global attributes: :Conventions = "CF-1.11" ; :project = "research" ; } Strings¶String-valued data may be written to netCDF files either as netCDF character arrays with a trailing dimension large enough to contain the longest value, or as netCDF4 string arrays. The former is allowed for all formats of netCDF3 and netCDF4 format files; but string arrays may only be written to netCDF4 format files (note that string arrays can not be written to netCDF4 classic format files). By default, netCDF string arrays will be created whenever possible,
and in all other cases netCDF character arrays will be
used. Alternatively, netCDF character arrays can be used in all cases
by setting the string keyword of the Groups¶NetCDF4 files with hierarchical groups may be created if a group structure is defined by the netCDF variable and dimension names, accessed via the netCDF interface. See the section on hierarchical groups for details. Hierarchical groups¶Hierarchical groups provide a mechanism to structure variables within netCDF4 datasets, with well defined rules for resolving references to out-of-group netCDF variables and dimensions. A group structure that may be applied when writing to disk can be created ab initio with the netCDF interface. For example, the data variable and a coordinate construct may be moved to a sub-group that has its own group attribute, and a coordinate construct may be moved to a different sub-group: Create a group structure and write it to disk.
>>> q, t = cf.read('file.nc')
>>> print(q)
Field: specific_humidity (ncvar%/forecast/model/q)
--------------------------------------------------
Data            : specific_humidity(latitude(5), longitude(8)) 1
Cell methods    : area: mean
Dimension coords: latitude(5) = [-75.0, ..., 75.0] degrees_north
                : longitude(8) = [22.5, ..., 337.5] degrees_east
                : time(1) = [2019-01-01 00:00:00]
>>> q.set_property('comment', 'comment')
>>> q.nc_set_group_attribute('comment', 'group comment')
>>> q.nc_set_variable_groups(['forecast', 'model'])
()
>>> q.construct('time').nc_set_variable_groups(['forecast'])
()
>>> cf.write(q, 'grouped.nc')
Inspect the new grouped dataset with the ncdump command
line tool.
$ ncdump -h grouped.nc netcdf grouped { dimensions: lat = 5 ; bounds2 = 2 ; lon = 8 ; variables: double lat_bnds(lat, bounds2) ; double lat(lat) ; lat:units = "degrees_north" ; lat:standard_name = "latitude" ; lat:bounds = "lat_bnds" ; double lon_bnds(lon, bounds2) ; double lon(lon) ; lon:units = "degrees_east" ; lon:standard_name = "lo | |||||||||||||||||||||||||||||||||||||||||||||||||||||||||||||||||||||||||||||||||||||||||||||||||||||||||||||||||||||||||||||||||||||||||||||||||||||||||||||||||||||||||||||||||||||||||||||||||||||||||||||||||||||||||||||||||||||||||||||||||||||||||||||||||||||||||||||||||||||||||||||||||||||||||||||||||||||||||||||||||||||||||||||||||||||||||||||||||||||||||||||||||||||||||||||||||||||||||||||||||||||||||||||||||||||||||||||||||||||||||||||||||||||||||||||
| You are visitor 01402503 — GeezerVison does not store the pages you look up. Best viewed with Netscape Navigator 4.7 or Internet Explorer 6 at 800×600. No cookies required. | |||||||||||||||||||||||||||||||||||||||||||||||||||||||||||||||||||||||||||||||||||||||||||||||||||||||||||||||||||||||||||||||||||||||||||||||||||||||||||||||||||||||||||||||||||||||||||||||||||||||||||||||||||||||||||||||||||||||||||||||||||||||||||||||||||||||||||||||||||||||||||||||||||||||||||||||||||||||||||||||||||||||||||||||||||||||||||||||||||||||||||||||||||||||||||||||||||||||||||||||||||||||||||||||||||||||||||||||||||||||||||||||||||||||||||||