GeezerVisonThe World Wide Web, restored to 800 pixels of glory. |
| Home|About|Gaming cabinet|Archives|How it works|Starter sites |
GeezerVison is showing zetcode.com — Python openpyxl - read, write Excel xlsx files in Python Python openpyxllast modified January 29, 2024 In this article we show how to work with Excel files in Python using openpyxl library. OpenpyxlThe openpyxl is a Python library to read and write Excel 2010 xlsx/xlsm/xltx/xltm files. Excel xlsxIn this article we work with xlsx files. The xlsx is a file extension for an open XML spreadsheet file format used by Microsoft Excel. The xlsm files support macros. The xls format is a proprietary binary format while xlsx is based on Office Open XML format. $ pip install openpyxl
We install Openpyxl create new file
In the first example, we create a new xlsx file with write_xlsx.py
#!/usr/bin/python

from openpyxl import Workbook
import time

book = Workbook()
sheet = book.active

sheet['A1'] = 56
sheet['A2'] = 43

now = time.strftime("%x")
sheet['A3'] = now

book.save("sample.xlsx")
In the example, we create a new xlsx file. We write data into three cells. from openpyxl import Workbook
We import the book = Workbook() A new workbook is created. A workbook is always created with at least one worksheet. sheet = book.active
We get the reference to the active sheet with sheet['A1'] = 56 sheet['A2'] = 43 We write numerical data to cells A1 and A2. now = time.strftime("%x")
sheet['A3'] = now
We write current date to the cell A3. book.save("sample.xlsx")
We write the contents to the 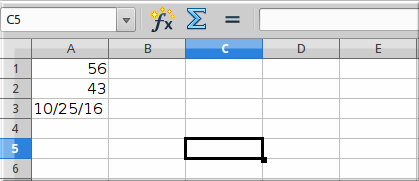
Openpyxl write to a cell
There are two basic ways to write to a cell: using a key of a worksheet such as
A1 or D3, or using a row and column notation with the write2cell.py
#!/usr/bin/python

from openpyxl import Workbook

book = Workbook()
sheet = book.active

sheet['A1'] = 1
sheet.cell(row=2, column=2).value = 2

book.save('write2cell.xlsx')
In the example, we write two values to two cells. sheet['A1'] = 1 Here, we assign a numerical value to the A1 cell. sheet.cell(row=2, column=2).value = 2 In this line, we write to cell B2 with the row and column notation. Openpyxl append values
With the appending_values.py
#!/usr/bin/python

from openpyxl import Workbook

book = Workbook()
sheet = book.active

rows = (
    (88, 46, 57),
    (89, 38, 12),
    (23, 59, 78),
    (56, 21, 98),
    (24, 18, 43),
    (34, 15, 67)
)

for row in rows:
    sheet.append(row)

book.save('appending.xlsx')
In the example, we append three columns of data into the current sheet. rows = (
(88, 46, 57),
(89, 38, 12),
(23, 59, 78),
(56, 21, 98),
(24, 18, 43),
(34, 15, 67)
)
The data is stored in a tuple of tuples. for row in rows:
sheet.append(row)
We go through the container row by row and insert the data row with the
Openpyxl read cell
In the following example, we read the previously written data from the
read_cells.py
#!/usr/bin/python
import openpyxl
book = openpyxl.load_workbook('sample.xlsx')
sheet = book.active
a1 = sheet['A1']
a2 = sheet['A2']
a3 = sheet.cell(row=3, column=1)
print(a1.value)
print(a2.value)
print(a3.value)
The example loads an existing xlsx file and reads three cells. book = openpyxl.load_workbook('sample.xlsx')
The file is opened with the a1 = sheet['A1'] a2 = sheet['A2'] a3 = sheet.cell(row=3, column=1)
We read the contents of the A1, A2, and A3 cells. In the third line, we use the
$ ./read_cells.py 56 43 10/26/16 Openpyxl read multiple cellsWe have the following data sheet: 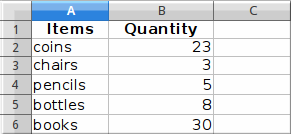
We read the data using a range operator. read_cells2.py
#!/usr/bin/python
import openpyxl
book = openpyxl.load_workbook('items.xlsx')
sheet = book.active
cells = sheet['A1': 'B6']
for c1, c2 in cells:
print("{0:8} {1:8}".format(c1.value, c2.value))
In the example, we read data from two columns using a range operation. cells = sheet['A1': 'B6'] In this line, we read data from cells A1 - B6. for c1, c2 in cells:
print("{0:8} {1:8}".format(c1.value, c2.value))
The $ ./read_cells2.py Items Quantity coins 23 chairs 3 pencils 5 bottles 8 books 30 Openpyxl iterate by rows
The iterating_by_rows.py
#!/usr/bin/python
from openpyxl import Workbook
book = Workbook()
sheet = book.active
rows = (
    (88, 46, 57),
    (89, 38, 12),
    (23, 59, 78),
    (56, 21, 98),
    (24, 18, 43),
    (34, 15, 67)
)
for row in rows:
    sheet.append(row)
for row in sheet.iter_rows(min_row=1, min_col=1, max_row=6, max_col=3):
for cell in row:
print(cell.value, end=" ")
print()
book.save('iterbyrows.xlsx')
The example iterates over data row by row. for row in sheet.iter_rows(min_row=1, min_col=1, max_row=6, max_col=3): We provide the boundaries for the iteration. $ ./iterating_by_rows.py 88 46 57 89 38 12 23 59 78 56 21 98 24 18 43 34 15 67 Openpyxl iterate by columns
The iterating_by_columns.py
#!/usr/bin/python

from openpyxl import Workbook

book = Workbook()
sheet = book.active

rows = (
    (88, 46, 57),
    (89, 38, 12),
    (23, 59, 78),
    (56, 21, 98),
    (24, 18, 43),
    (34, 15, 67)
)

for row in rows:
    sheet.append(row)

for row in sheet.iter_cols(min_row=1, min_col=1, max_row=6, max_col=3):
    for cell in row:
        print(cell.value, end=" ")
    print()

book.save('iterbycols.xlsx')
The example iterates over data column by column. $ ./iterating_by_columns.py 88 89 23 56 24 34 46 38 59 21 18 15 57 12 78 98 43 67 Statistics
For the next example, we need to create a xlsx file containing numbers. For
instance, we have created 25 rows of numbers in 10 columns with the
mystats.py
#!/usr/bin/python

import openpyxl
import statistics as stats

book = openpyxl.load_workbook('numbers.xlsx', data_only=True)

sheet = book.active

rows = sheet.rows

values = []

for row in rows:
    for cell in row:
        values.append(cell.value)

print("Number of values: {0}".format(len(values)))
print("Sum of values: {0}".format(sum(values)))
print("Minimum value: {0}".format(min(values)))
print("Maximum value: {0}".format(max(values)))
print("Mean: {0}".format(stats.mean(values)))
print("Median: {0}".format(stats.median(values)))
print("Standard deviation: {0}".format(stats.stdev(values)))
print("Variance: {0}".format(stats.variance(values)))
In the example, we read all values from the sheet and compute some basic statistics. import statistics as stats
The book = openpyxl.load_workbook('numbers.xlsx', data_only=True)
Using the rows = sheet.rows We get all the rows of cells that are not empty. for row in rows:
for cell in row:
values.append(cell.value)
In two for loops, we form a list of integer values from the cells. print("Number of values: {0}".format(len(values)))
print("Sum of values: {0}".format(sum(values)))
print("Minimum value: {0}".format(min(values)))
print("Maximum value: {0}".format(max(values)))
print("Mean: {0}".format(stats.mean(values)))
print("Median: {0}".format(stats.median(values)))
print("Standard deviation: {0}".format(stats.stdev(values)))
print("Variance: {0}".format(stats.variance(values)))
We compute and print mathematical statistics about the values. Some of the
functions are built-in, others are imported with the $ ./mystats.py Number of values: 312 Sum of values: 15877 Minimum value: 0 Maximum value: 100 Mean: 50.88782051282051 Median: 54.0 Standard deviation: 28.459203819700967 Variance: 809.9262820512821 Openpyxl filter & sort data
A sheet has an Note that Openpyxl sets the conditions but we must apply them inside the Spreadsheet application. filter_sort.py
#!/usr/bin/python

from openpyxl import Workbook

wb = Workbook()
sheet = wb.active

data = [
    ['Item', 'Colour'],
    ['pen', 'brown'],
    ['book', 'black'],
    ['plate', 'white'],
    ['chair', 'brown'],
    ['coin', 'gold'],
    ['bed', 'brown'],
    ['notebook', 'white'],
]

for r in data:
    sheet.append(r)

sheet.auto_filter.ref = 'A1:B8'
sheet.auto_filter.add_filter_column(1, ['brown', 'white'])
sheet.auto_filter.add_sort_condition('B2:B8')

wb.save('filtered.xlsx')
In the example, we create a sheet with items and their colours. We set a filter and a sort condition. Openpyxl dimensionsTo get those cells that actually contain data, we can use dimensions. dimensions.py
#!/usr/bin/python

from openpyxl import Workbook

book = Workbook()
sheet = book.active

sheet['A3'] = 39
sheet['B3'] = 19

rows = [
    (88, 46),
    (89, 38),
    (23, 59),
    (56, 21),
    (24, 18),
    (34, 15)
]

for row in rows:
    sheet.append(row)

print(sheet.dimensions)
print("Minimum row: {0}".format(sheet.min_row))
print("Maximum row: {0}".format(sheet.max_row))
print("Minimum column: {0}".format(sheet.min_column))
print("Maximum column: {0}".format(sheet.max_column))

for c1, c2 in sheet[sheet.dimensions]:
    print(c1.value, c2.value)

book.save('dimensions.xlsx')
The example calculates the dimensions of two columns of data. sheet['A3'] = 39
sheet['B3'] = 19
rows = [
(88, 46),
(89, 38),
(23, 59),
(56, 21),
(24, 18),
(34, 15)
]
for row in rows:
sheet.append(row)
We add data to the worksheet. Note that we start adding from the third row. print(sheet.dimensions)
The print("Minimum row: {0}".format(sheet.min_row))
print("Maximum row: {0}".format(sheet.max_row))
With the print("Minimum column: {0}".format(sheet.min_column))
print("Maximum column: {0}".format(sheet.max_column))
With the for c1, c2 in sheet[sheet.dimensions]:
print(c1.value, c2.value)
We iterate through the data and print it to the console. $ ./dimensions.py A3:B9 Minimum row: 3 Maximum row: 9 Minimum column: 1 Maximum column: 2 39 19 88 46 89 38 23 59 56 21 24 18 34 15 SheetsEach workbook can have multiple sheets. 
Let's have a workbook with these three sheets. sheets.py
#!/usr/bin/python

import openpyxl

book = openpyxl.load_workbook('sheets.xlsx')

print(book.get_sheet_names())

active_sheet = book.active
print(type(active_sheet))

sheet = book.get_sheet_by_name("March")
print(sheet.title)
The program works with Excel sheets. print(book.get_sheet_names())
The active_sheet = book.active print(type(active_sheet)) We get the active sheet and print its type to the terminal. sheet = book.get_sheet_by_name("March")
We get a reference to a sheet with the print(sheet.title) The title of the retrieved sheet is printed to the terminal. $ ./sheets.py ['January', 'February', 'March'] <class 'openpyxl.worksheet.worksheet.Worksheet'> March sheets2.py
#!/usr/bin/python

import openpyxl

book = openpyxl.load_workbook('sheets.xlsx')

book.create_sheet("April")

print(book.sheetnames)

sheet1 = book.get_sheet_by_name("January")
book.remove_sheet(sheet1)

print(book.sheetnames)

book.create_sheet("January", 0)
print(book.sheetnames)

book.save('sheets2.xlsx')
In this example, we create a new sheet. book.create_sheet("April")
A new sheet is created with the print(book.sheetnames)
The sheet names can be shown with the book.remove_sheet(sheet1)
A sheet can be removed with the book.create_sheet("January", 0)
A new sheet can be created at the specified position; in our case, we create a new sheet at position with index 0. $ ./sheets2.py ['January', 'February', 'March', 'April'] ['February', 'March', 'April'] ['January', 'February', 'March', 'April'] It is possible to change the background colour of a worksheet. sheets3.py
#!/usr/bin/python

import openpyxl

book = openpyxl.load_workbook('sheets.xlsx')

sheet = book.get_sheet_by_name("March")
sheet.sheet_properties.tabColor = "0072BA"

book.save('sheets3.xlsx')
The example modifies the background colour of the sheet titled "March". sheet.sheet_properties.tabColor = "0072BA"
We change the 
The background colour of the third worksheet has been changed to some blue colour. Merging cells
Cells can be merged with the merging_cells.py
#!/usr/bin/python

from openpyxl import Workbook
from openpyxl.styles import Alignment

book = Workbook()
sheet = book.active

sheet.merge_cells('A1:B2')

cell = sheet.cell(row=1, column=1)
cell.value = 'Sunny day'
cell.alignment = Alignment(horizontal='center', vertical='center')

book.save('merging.xlsx')
In the example, we merge four cells: A1, B1, A2, and B2. The text in the final cell is centered. from openpyxl.styles import Alignment
In order to center a text in the final cell, we use the sheet.merge_cells('A1:B2')
We merge four cells with the cell = sheet.cell(row=1, column=1) We get the final cell. cell.value = 'Sunny day' cell.alignment = Alignment(horizontal='center', vertical='center') We set text to the merged cell and update its alignment. 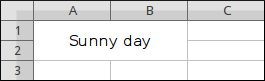
Openpyxl freeze panesWhen we freeze panes, we keep an area of a worksheet visible while scrolling to another area of the worksheet. freezing.py
#!/usr/bin/python

from openpyxl import Workbook
from openpyxl.styles import Alignment

book = Workbook()
sheet = book.active

sheet.freeze_panes = 'B2'

book.save('freezing.xlsx')
The example freezes panes by the cell B2. sheet.freeze_panes = 'B2'
To freeze panes, we use the Openpyxl formulas
The next example shows how to use formulas. The formulas.py
#!/usr/bin/python

from openpyxl import Workbook

book = Workbook()
sheet = book.active

rows = (
    (34, 26),
    (88, 36),
    (24, 29),
    (15, 22),
    (56, 13),
    (76, 18)
)

for row in rows:
    sheet.append(row)

cell = sheet.cell(row=7, column=2)
cell.value = "=SUM(A1:B6)"
cell.font = cell.font.copy(bold=True)

book.save('formulas.xlsx')
In the example, we calculate the sum of all values with the rows = (
(34, 26),
(88, 36),
(24, 29),
(15, 22),
(56, 13),
(76, 18)
)
for row in rows:
sheet.append(row)
We create two columns of data. cell = sheet.cell(row=7, column=2) We get the cell where we show the result of the calculation. cell.value = "=SUM(A1:B6)" We write a formula into the cell. cell.font = cell.font.copy(bold=True) We change the font style. 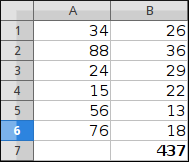
Openpyxl imagesIn the following example, we show how to insert an image into a sheet. write_image.py
#!/usr/bin/python

from openpyxl import Workbook
from openpyxl.drawing.image import Image

book = Workbook()
sheet = book.active

img = Image("icesid.png")
sheet['A1'] = 'This is Sid'

sheet.add_image(img, 'B2')

book.save("sheet_image.xlsx")
In the example, we write an image into a sheet. from openpyxl.drawing.image import Image
We work with the img = Image("icesid.png")
A new sheet.add_image(img, 'B2')
We add a new image with the Openpyxl Charts
The
According to the documentation, create_bar_chart.py
#!/usr/bin/python

from openpyxl import Workbook
from openpyxl.chart import (
    Reference,
    Series,
    BarChart
)

book = Workbook()
sheet = book.active

rows = [
    ("USA", 46),
    ("China", 38),
    ("UK", 29),
    ("Russia", 22),
    ("South Korea", 13),
    ("Germany", 11)
]

for row in rows:
    sheet.append(row)

data = Reference(sheet, min_col=2, min_row=1, max_col=2, max_row=6)
categs = Reference(sheet, min_col=1, min_row=1, max_row=6)

chart = BarChart()
chart.add_data(data=data)
chart.set_categories(categs)

chart.legend = None
chart.y_axis.majorGridlines = None
chart.varyColors = True
chart.title = "Olympic Gold medals in London"

sheet.add_chart(chart, "A8")

book.save("bar_chart.xlsx")
In the example, we create a bar chart to show the number of Olympic gold medals per country in London 2012. from openpyxl.chart import (
Reference,
Series,
BarChart
)
The book = Workbook() sheet = book.active A new workbook is created. rows = [
("USA", 46),
("China", 38),
("UK", 29),
("Russia", 22),
("South Korea", 13),
("Germany", 11)
]
for row in rows:
sheet.append(row)
We create some data and add it to the cells of the active sheet. data = Reference(sheet, min_col=2, min_row=1, max_col=2, max_row=6)
With the categs = Reference(sheet, min_col=1, min_row=1, max_row=6) We create a category axis. A category axis is an axis with the data treated as a sequence of non-numerical text labels. In our case, we have text labels representing names of countries. chart = BarChart() chart.add_data(data=data) chart.set_categories(categs) We create a bar chart and set it data and categories. chart.legend = None chart.y_axis.majorGridlines = None
Using chart.varyColors = True
Setting chart.title = "Olympic Gold medals in London" A title is set for the chart. sheet.add_chart(chart, "A8")
The created chart is added to the sheet with the 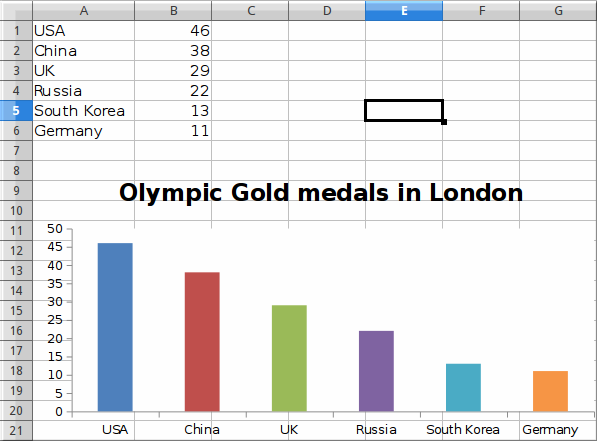
SourceIn this article we have worked with the openpyxl library. We have read data from an Excel file, written data to an Excel file. AuthorMy name is Jan Bodnar, and I am a passionate programmer with extensive programming experience. I have been writing programming articles since 2007. To date, I have authored over 1,400 articles and 8 e-books. I possess more than ten years of experience in teaching programming. List all Python tutorials. |
| You are visitor 01402520 — GeezerVison does not store the pages you look up. Best viewed with Netscape Navigator 4.7 or Internet Explorer 6 at 800×600. No cookies required. |