GeezerVisonThe World Wide Web, restored to 800 pixels of glory. | ||||||||||||||
| Home|About|Gaming cabinet|Archives|How it works|Starter sites | ||||||||||||||
GeezerVison is showing android.googlesource.com — platform/external/pytorch - Git at Google Bug: 372933149Clone this repo:
BranchesTags
PyTorch is a Python package that provides two high-level features:
You can reuse your favorite Python packages such as NumPy, SciPy, and Cython to extend PyTorch when needed. Our trunk health (Continuous Integration signals) can be found at hud.pytorch.org.
More About PyTorchAt a granular level, PyTorch is a library that consists of the following components:
Usually, PyTorch is used either as:
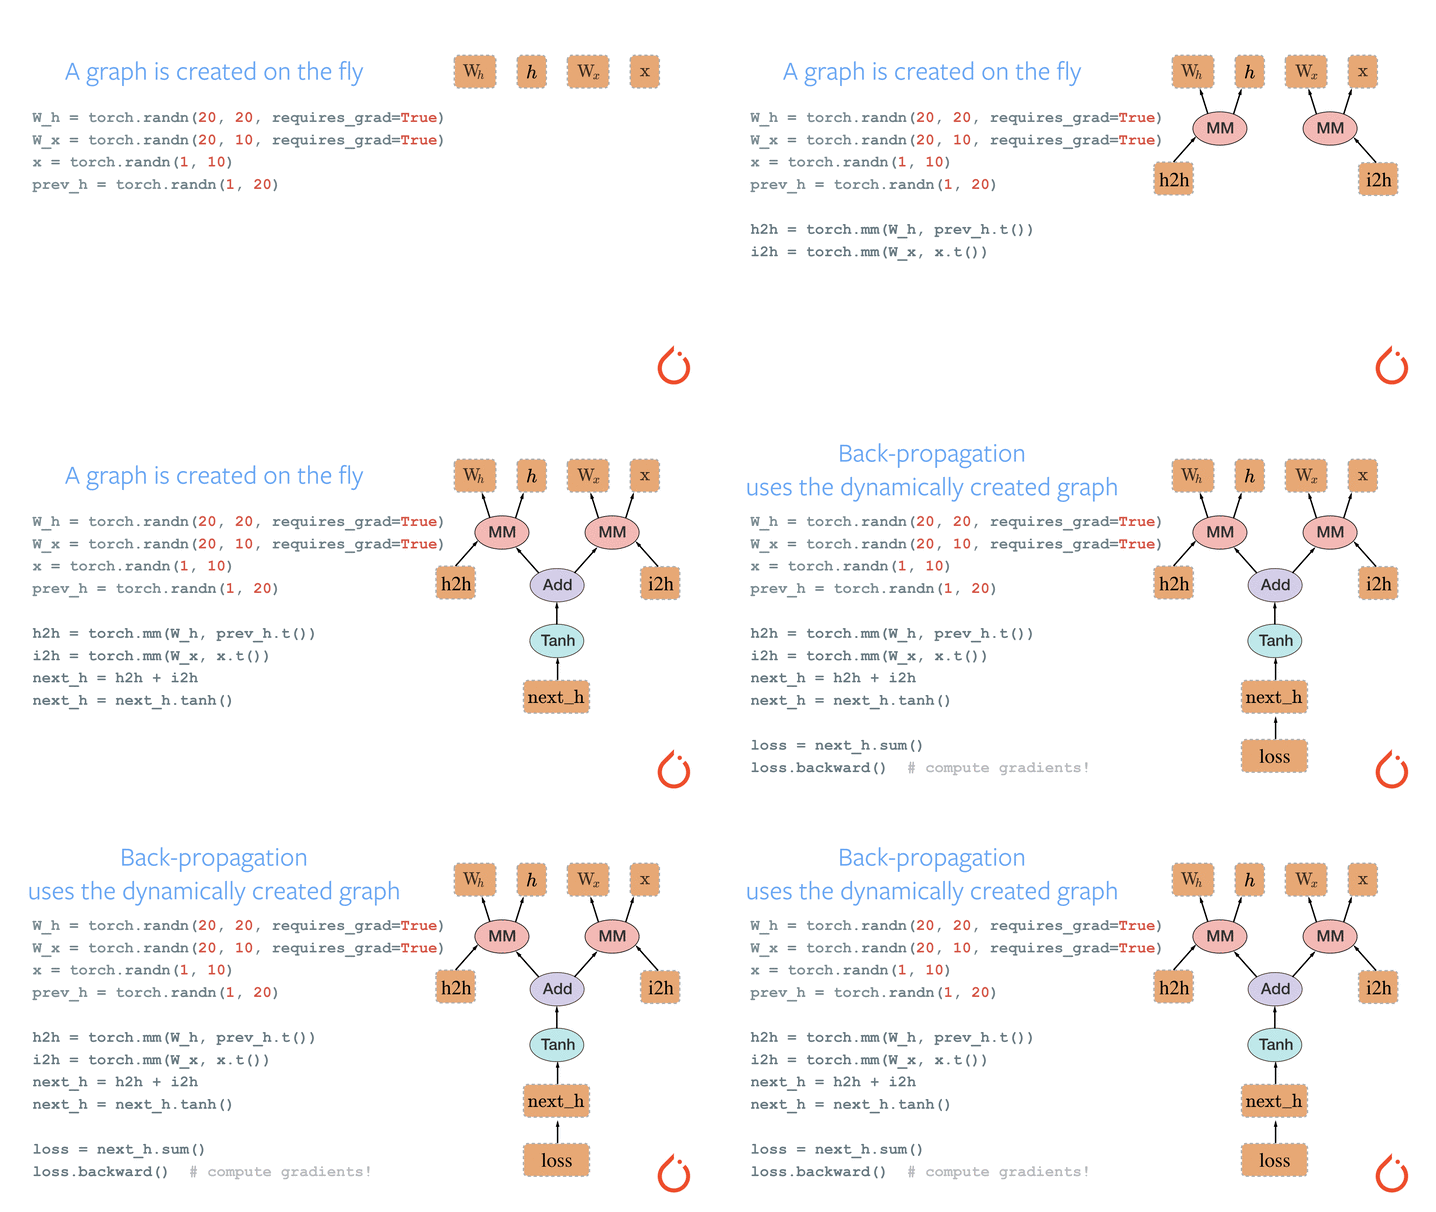
Elaborating Further: A GPU-Ready Tensor LibraryIf you use NumPy, then you have used Tensors (a.k.a. ndarray). PyTorch provides Tensors that can live either on the CPU or the GPU and accelerates the computation by a huge amount. We provide a wide variety of tensor routines to accelerate and fit your scientific computation needs such as slicing, indexing, mathematical operations, linear algebra, reductions. And they are fast! Dynamic Neural Networks: Tape-Based AutogradPyTorch has a unique way of building neural networks: using and replaying a tape recorder. Most frameworks such as TensorFlow, Theano, Caffe, and CNTK have a static view of the world. One has to build a neural network and reuse the same structure again and again. Changing the way the network behaves means that one has to start from scratch. With PyTorch, we use a technique called reverse-mode auto-differentiation, which allows you to change the way your network behaves arbitrarily with zero lag or overhead. Our inspiration comes from several research papers on this topic, as well as current and past work such as torch-autograd, autograd, Chainer, etc. While this technique is not unique to PyTorch, it's one of the fastest implementations of it to date. You get the best of speed and flexibility for your crazy research.
Python FirstPyTorch is not a Python binding into a monolithic C++ framework. It is built to be deeply integrated into Python. You can use it naturally like you would use NumPy / SciPy / scikit-learn etc. You can write your new neural network layers in Python itself, using your favorite libraries and use packages such as Cython and Numba. Our goal is to not reinvent the wheel where appropriate. Imperative ExperiencesPyTorch is designed to be intuitive, linear in thought, and easy to use. When you execute a line of code, it gets executed. There isn't an asynchronous view of the world. When you drop into a debugger or receive error messages and stack traces, understanding them is straightforward. The stack trace points to exactly where your code was defined. We hope you never spend hours debugging your code because of bad stack traces or asynchronous and opaque execution engines. Fast and LeanPyTorch has minimal framework overhead. We integrate acceleration libraries such as Intel MKL and NVIDIA (cuDNN, NCCL) to maximize speed. At the core, its CPU and GPU Tensor and neural network backends are mature and have been tested for years. Hence, PyTorch is quite fast — whether you run small or large neural networks. The memory usage in PyTorch is extremely efficient compared to Torch or some of the alternatives. We've written custom memory allocators for the GPU to make sure that your deep learning models are maximally memory efficient. This enables you to train bigger deep learning models than before. Extensions Without PainWriting new neural network modules, or interfacing with PyTorch's Tensor API was designed to be straightforward and with minimal abstractions. You can write new neural network layers in Python using the torch API or your favorite NumPy-based libraries such as SciPy. If you want to write your layers in C/C++, we provide a convenient extension API that is efficient and with minimal boilerplate. No wrapper code needs to be written. You can see a tutorial here and an example here. InstallationBinariesCommands to install binaries via Conda or pip wheels are on our website: https://pytorch.org/get-started/locally/ NVIDIA Jetson PlatformsPython wheels for NVIDIA's Jetson Nano, Jetson TX1/TX2, Jetson Xavier NX/AGX, and Jetson AGX Orin are provided here and the L4T container is published here They require JetPack 4.2 and above, and @dusty-nv and @ptrblck are maintaining them. From SourcePrerequisitesIf you are installing from source, you will need:
* PyTorch CI uses Visual C++ BuildTools, which come with Visual Studio Enterprise, Professional, or Community Editions. You can also install the build tools from https://visualstudio.microsoft.com/visual-cpp-build-tools/. The build tools do not come with Visual Studio Code by default. * We highly recommend installing an Anaconda environment. You will get a high-quality BLAS library (MKL) and you get controlled dependency versions regardless of your Linux distro. An example of environment setup is shown below:
$ source <CONDA_INSTALL_DIR>/bin/activate
$ conda create -y -n <CONDA_NAME>
$ conda activate <CONDA_NAME>
$ source <CONDA_INSTALL_DIR>\Scripts\activate.bat
$ conda create -y -n <CONDA_NAME>
$ conda activate <CONDA_NAME>
$ call "C:\Program Files\Microsoft Visual Studio\<VERSION>\Community\VC\Auxiliary\Build\vcvarsall.bat" x64
NVIDIA CUDA SupportIf you want to compile with CUDA support, select a supported version of CUDA from our support matrix, then install the following:
Note: You could refer to the cuDNN Support Matrix for cuDNN versions with the various supported CUDA, CUDA driver and NVIDIA hardware If you want to disable CUDA support, export the environment variable If you are building for NVIDIA's Jetson platforms (Jetson Nano, TX1, TX2, AGX Xavier), Instructions to install PyTorch for Jetson Nano are available here AMD ROCm SupportIf you want to compile with ROCm support, install
If you want to disable ROCm support, export the environment variable Intel GPU SupportIf you want to compile with Intel GPU support, follow these
If you want to disable Intel GPU support, export the environment variable Get the PyTorch Sourcegit clone --recursive https://github.com/pytorch/pytorch cd pytorch # if you are updating an existing checkout git submodule sync git submodule update --init --recursive Install DependenciesCommon conda install cmake ninja # Run this command on native Windows conda install rust # Run this command from the PyTorch directory after cloning the source code using the “Get the PyTorch Source“ section below pip install -r requirements.txt On Linux pip install mkl-static mkl-include # CUDA only: Add LAPACK support for the GPU if needed conda install -c pytorch magma-cuda121 # or the magma-cuda* that matches your CUDA version from https://anaconda.org/pytorch/repo # (optional) If using torch.compile with inductor/triton, install the matching version of triton # Run from the pytorch directory after cloning # For Intel GPU support, please explicitly `export USE_XPU=1` before running command. make triton On MacOS # Add this package on intel x86 processor machines only pip install mkl-static mkl-include # Add these packages if torch.distributed is needed conda install pkg-config libuv On Windows pip install mkl-static mkl-include # Add these packages if torch.distributed is needed. # Distributed package support on Windows is a prototype feature and is subject to changes. conda install -c conda-forge libuv=1.39 Install PyTorchOn Linux If you would like to compile PyTorch with new C++ ABI enabled, then first run this command: export _GLIBCXX_USE_CXX11_ABI=1 Please note that starting from PyTorch 2.5, the PyTorch build with XPU supports both new and old C++ ABIs. Previously, XPU only supported the new C++ ABI. If you want to compile with Intel GPU support, please follow Intel GPU Support. If you're compiling for AMD ROCm then first run this command: # Only run this if you're compiling for ROCm python tools/amd_build/build_amd.py Install PyTorch export CMAKE_PREFIX_PATH=${CONDA_PREFIX:-"$(dirname $(which conda))/../"} python setup.py develop
On macOS python3 setup.py develop On Windows If you want to build legacy python code, please refer to Building on legacy code and CUDA CPU-only builds In this mode PyTorch computations will run on your CPU, not your GPU python setup.py develop Note on OpenMP: The desired OpenMP implementation is Intel OpenMP (iomp). In order to link against iomp, you'll need to manually download the library and set up the building environment by tweaking CUDA based build In this mode PyTorch computations will leverage your GPU via CUDA for faster number crunching NVTX is needed to build Pytorch with CUDA. NVTX is a part of CUDA distributive, where it is called “Nsight Compute”. To install it onto an already installed CUDA run CUDA installation once again and check the corresponding checkbox. Make sure that CUDA with Nsight Compute is installed after Visual Studio. Currently, VS 2017 / 2019, and Ninja are supported as the generator of CMake. If Additional libraries such as Magma, oneDNN, a.k.a. MKLDNN or DNNL, and Sccache are often needed. Please refer to the installation-helper to install them. You can refer to the build_pytorch.bat script for some other environment variables configurations cmd :: Set the environment variables after you have downloaded and unzipped the mkl package, :: else CMake would throw an error as `Could NOT find OpenMP`. set CMAKE_INCLUDE_PATH={Your directory}\mkl\include set LIB={Your directory}\mkl\lib;%LIB% :: Read the content in the previous section carefully before you proceed. :: [Optional] If you want to override the underlying toolset used by Ninja and Visual Studio with CUDA, please run the following script block. :: "Visual Studio 2019 Developer Command Prompt" will be run automatically. :: Make sure you have CMake >= 3.12 before you do this when you use the Visual Studio generator. set CMAKE_GENERATOR_TOOLSET_VERSION=14.27 set DISTUTILS_USE_SDK=1 for /f "usebackq tokens=*" %i in (`"%ProgramFiles(x86)%\Microsoft Visual Studio\Installer\vswhere.exe" -version [15^,17^) -products * -latest -property installationPath`) do call "%i\VC\Auxiliary\Build\vcvarsall.bat" x64 -vcvars_ver=%CMAKE_GENERATOR_TOOLSET_VERSION% :: [Optional] If you want to override the CUDA host compiler set CUDAHOSTCXX=C:\Program Files (x86)\Microsoft Visual Studio\2019\Community\VC\Tools\MSVC\14.27.29110\bin\HostX64\x64\cl.exe python setup.py develop Adjust Build Options (Optional)You can adjust the configuration of cmake variables optionally (without building first), by doing the following. For example, adjusting the pre-detected directories for CuDNN or BLAS can be done with such a step. On Linux export CMAKE_PREFIX_PATH=${CONDA_PREFIX:-"$(dirname $(which conda))/../"} python setup.py build --cmake-only ccmake build # or cmake-gui build On macOS export CMAKE_PREFIX_PATH=${CONDA_PREFIX:-"$(dirname $(which conda))/../"} MACOSX_DEPLOYMENT_TARGET=10.9 CC=clang CXX=clang++ python setup.py build --cmake-only ccmake build # or cmake-gui build Docker ImageUsing pre-built imagesYou can also pull a pre-built docker image from Docker Hub and run with docker v19.03+ docker run --gpus all --rm -ti --ipc=host pytorch/pytorch:latest Please note that PyTorch uses shared memory to share data between processes, so if torch multiprocessing is used (e.g. for multithreaded data loaders) the default shared memory segment size that container runs with is not enough, and you should increase shared memory size either with Building the image yourselfNOTE: Must be built with a docker version > 18.06 The make -f docker.Makefile # images are tagged as docker.io/${your_docker_username}/pytorch You can also pass the make -f docker.Makefile Building the DocumentationTo build documentation in various formats, you will need Sphinx and the readthedocs theme. cd docs/ pip install -r requirements.txt You can then build the documentation by running If you get a katex error run
Previous VersionsInstallation instructions and binaries for previous PyTorch versions may be found on our website. Getting StartedThree-pointers to get you started:
Resources
Communication
Releases and ContributingTypically, PyTorch has three minor releases a year. Please let us know if you encounter a bug by filing an issue. We appreciate all contributions. If you are planning to contribute back bug-fixes, please do so without any further discussion. If you plan to contribute new features, utility functions, or extensions to the core, please first open an issue and discuss the feature with us. Sending a PR without discussion might end up resulting in a rejected PR because we might be taking the core in a different direction than you might be aware of. To learn more about making a contribution to Pytorch, please see our Contribution page. For more information about PyTorch releases, see Release page. The TeamPyTorch is a community-driven project with several skillful engineers and researchers contributing to it. PyTorch is currently maintained by Soumith Chintala, Gregory Chanan, Dmytro Dzhulgakov, Edward Yang, and Nikita Shulga with major contributions coming from hundreds of talented individuals in various forms and means. A non-exhaustive but growing list needs to mention: Trevor Killeen, Sasank Chilamkurthy, Sergey Zagoruyko, Adam Lerer, Francisco Massa, Alykhan Tejani, Luca Antiga, Alban Desmaison, Andreas Koepf, James Bradbury, Zeming Lin, Yuandong Tian, Guillaume Lample, Marat Dukhan, Natalia Gimelshein, Christian Sarofeen, Martin Raison, Edward Yang, Zachary Devito. Note: This project is unrelated to hughperkins/pytorch with the same name. Hugh is a valuable contributor to the Torch community and has helped with many things Torch and PyTorch. LicensePyTorch has a BSD-style license, as found in the LICENSE file. | ||||||||||||||
| You are visitor 01402503 — GeezerVison does not store the pages you look up. Best viewed with Netscape Navigator 4.7 or Internet Explorer 6 at 800×600. No cookies required. |