GeezerVisonThe World Wide Web, restored to 800 pixels of glory. |
| Home|About|Gaming cabinet|Archives|How it works|Starter sites |
GeezerVison is showing nbdev.fast.ai — End-To-End Walkthrough – nbdev The written tutorial below shows you how to create a Python package from scratch using nbdev. Alternatively, you can watch this video tutorial where Jeremy Howard and Hamel Husain guide you through a similar process step by step: InstallationYou’ll need the following software to complete the tutorial, read on for specific installation instructions:
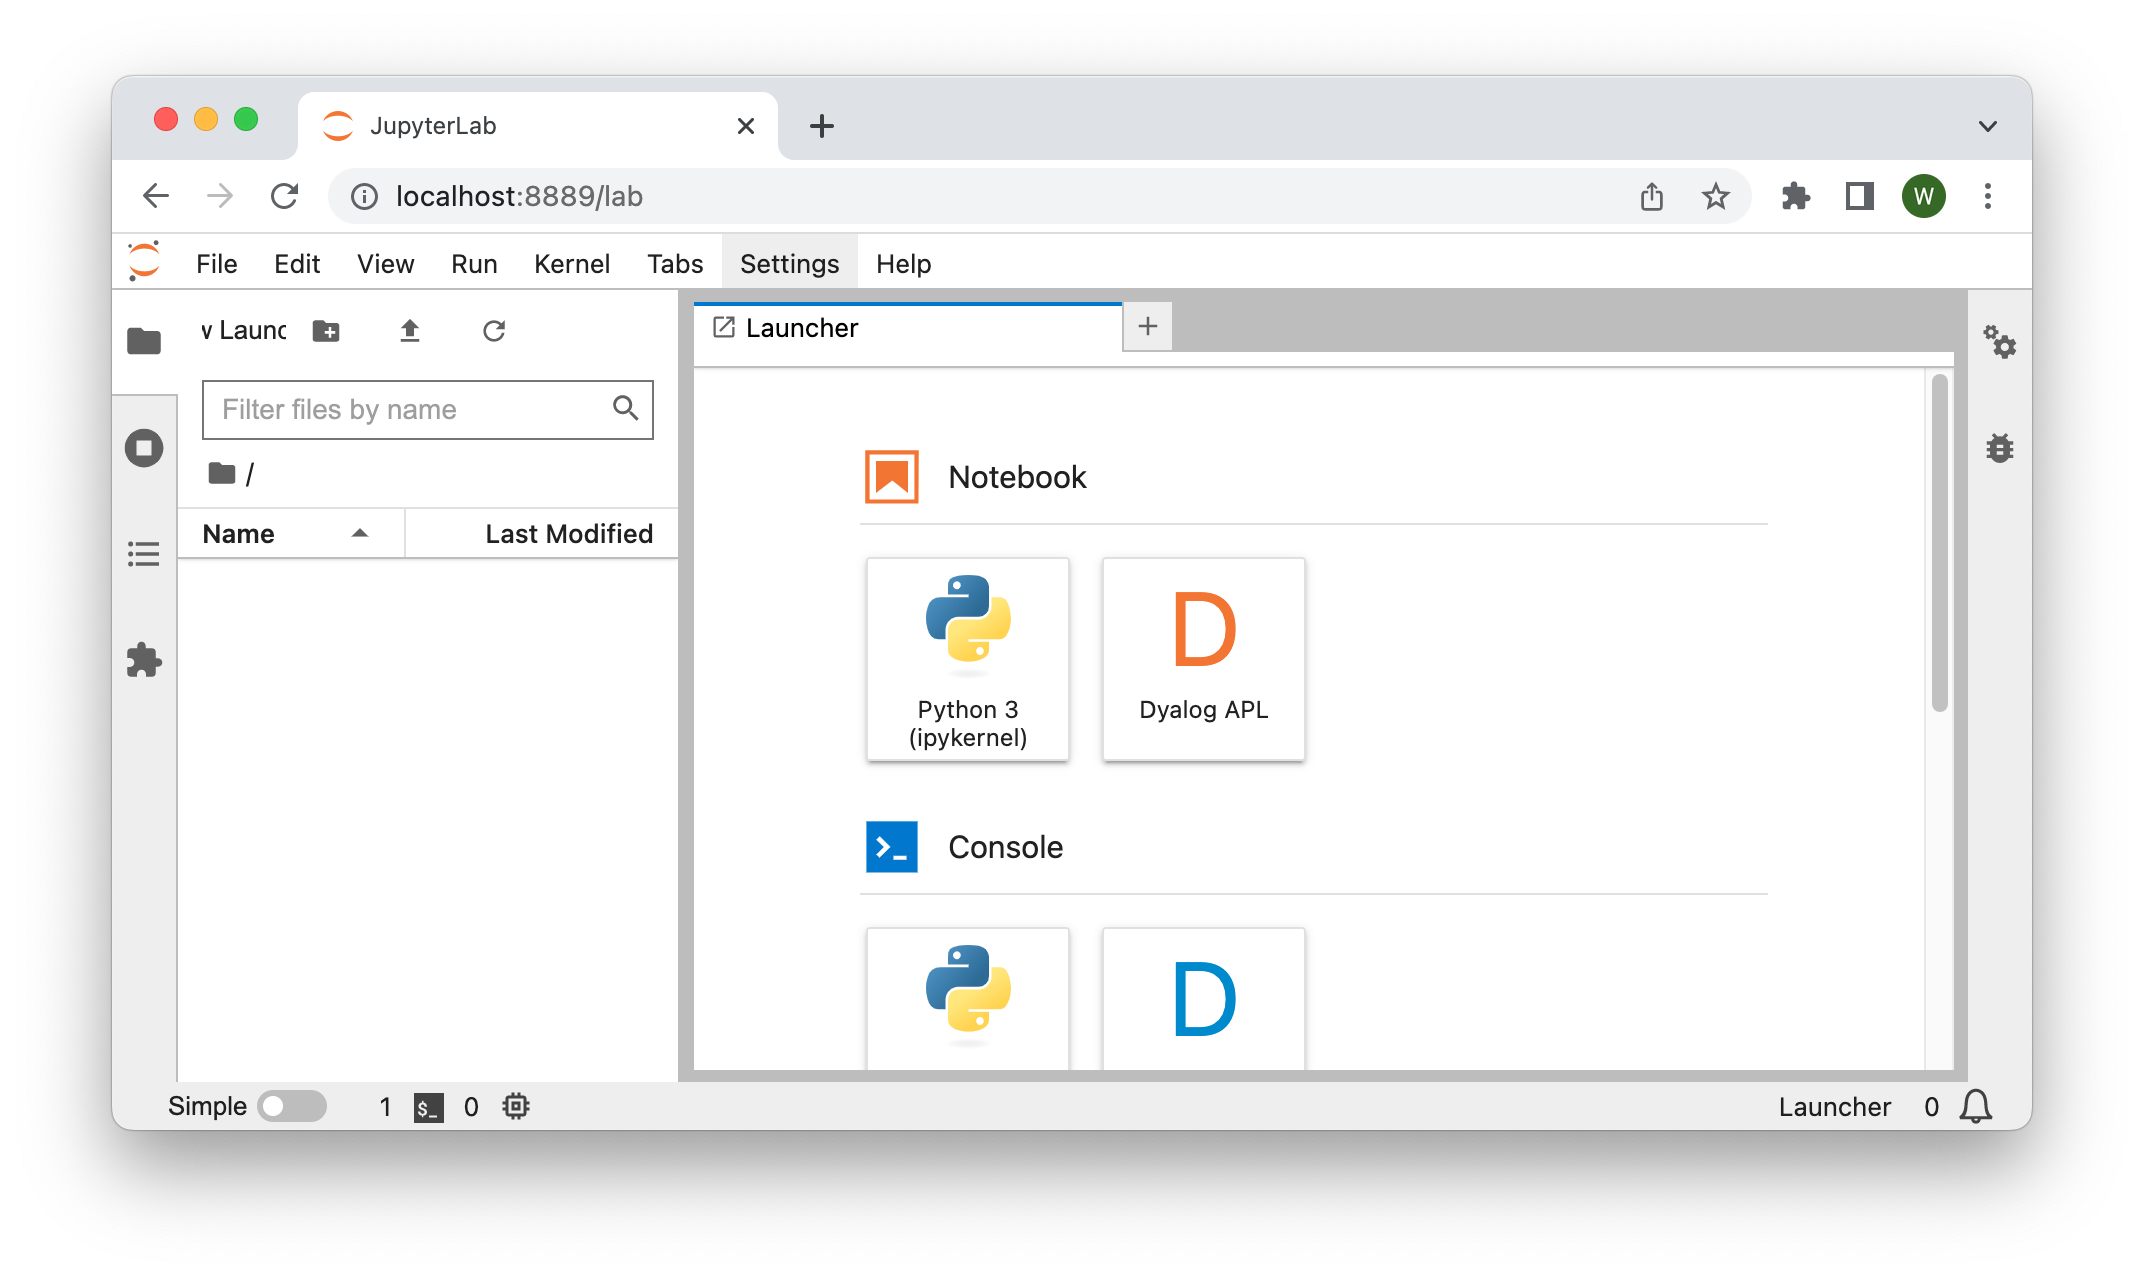
If you haven’t worked with Python before, we recommend getting started with the Anaconda Individual Edition and using the conda package manager. Note that you will only need to follow the steps in the installation section once per environment. If you create a new repo, you won’t need to redo these. Install JupyterLabLaunch a terminal and install JupyterLab by entering: …or …if you’re using the pip package manager. You can now launch Jupyter by entering: This should open JupyterLab in a new browser tab:
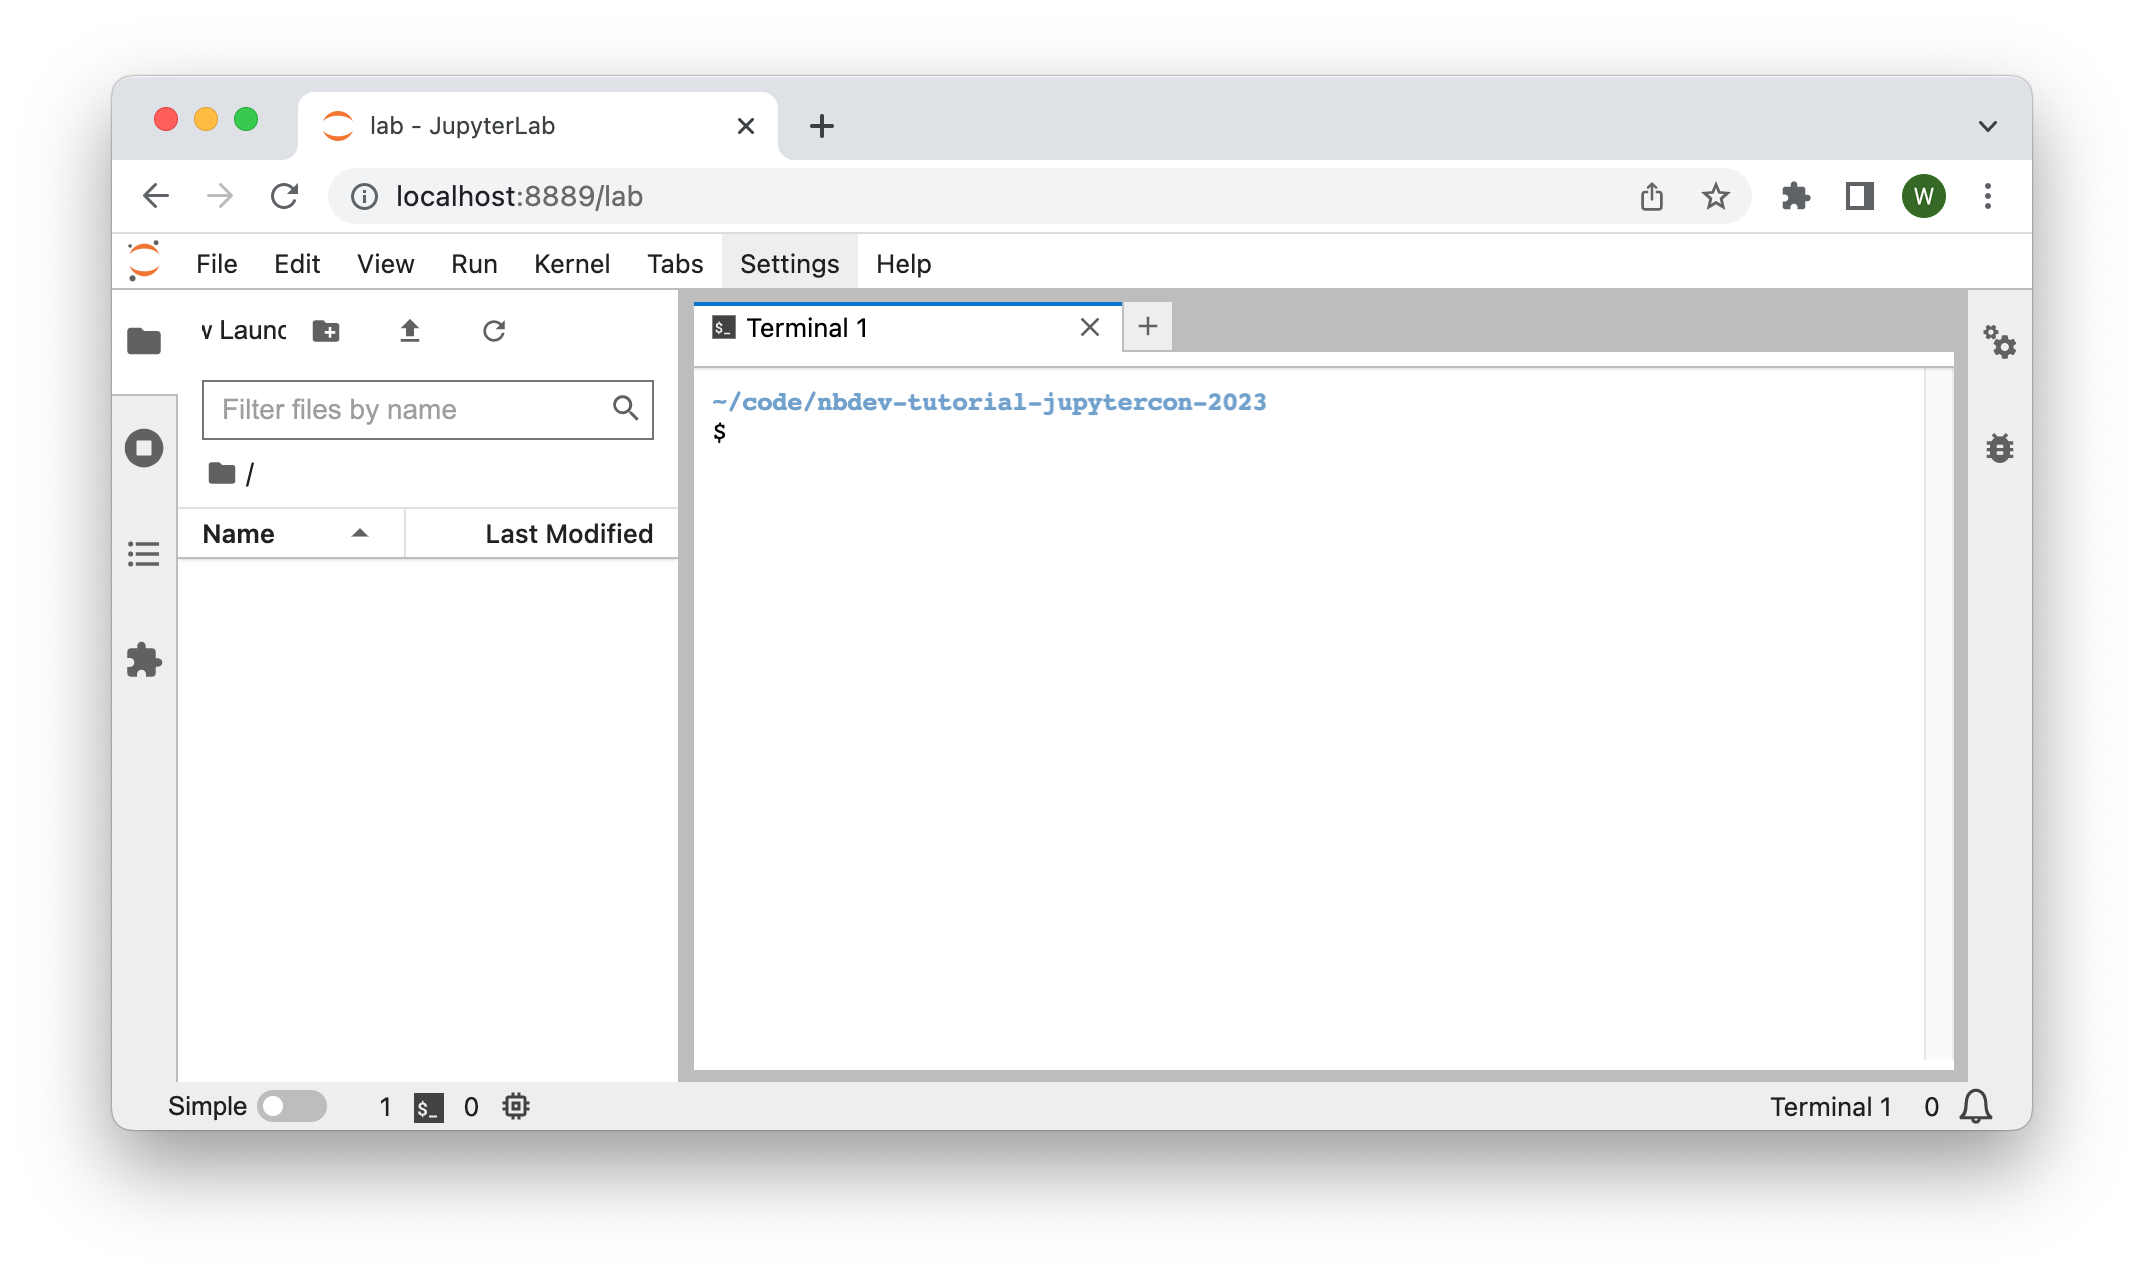
Install nbdevThe next step is to install nbdev itself. JupyterLab comes with its own terminal, so we’ll use that moving forward. In the Launcher, scroll down to the “Other” section, then click “Terminal”. If the Launcher isn’t opened, you can open it by clicking “File” → “New Launcher”. A new tab should open with a blank terminal – it might not look exactly the same, depending on how your shell is configured:
For Mac and Linux, enter: …or for Mac, Linux and Windows: …if you’re using pip. Install Quartonbdev provides a command to install the latest version of Quarto. In the terminal, enter: Your password may be requested at this point. Since nbdev is open source, you can read the source code of this command to verify that it isn’t doing anything malicious. Or, if you prefer, you may instead follow Quarto’s official installation instructions. Install Quarto JupyterLab extensionQuarto provides its own JupyterLab extension that allows it to render Quarto markdown content. For example, here is their notebook demonstrating some of its features:
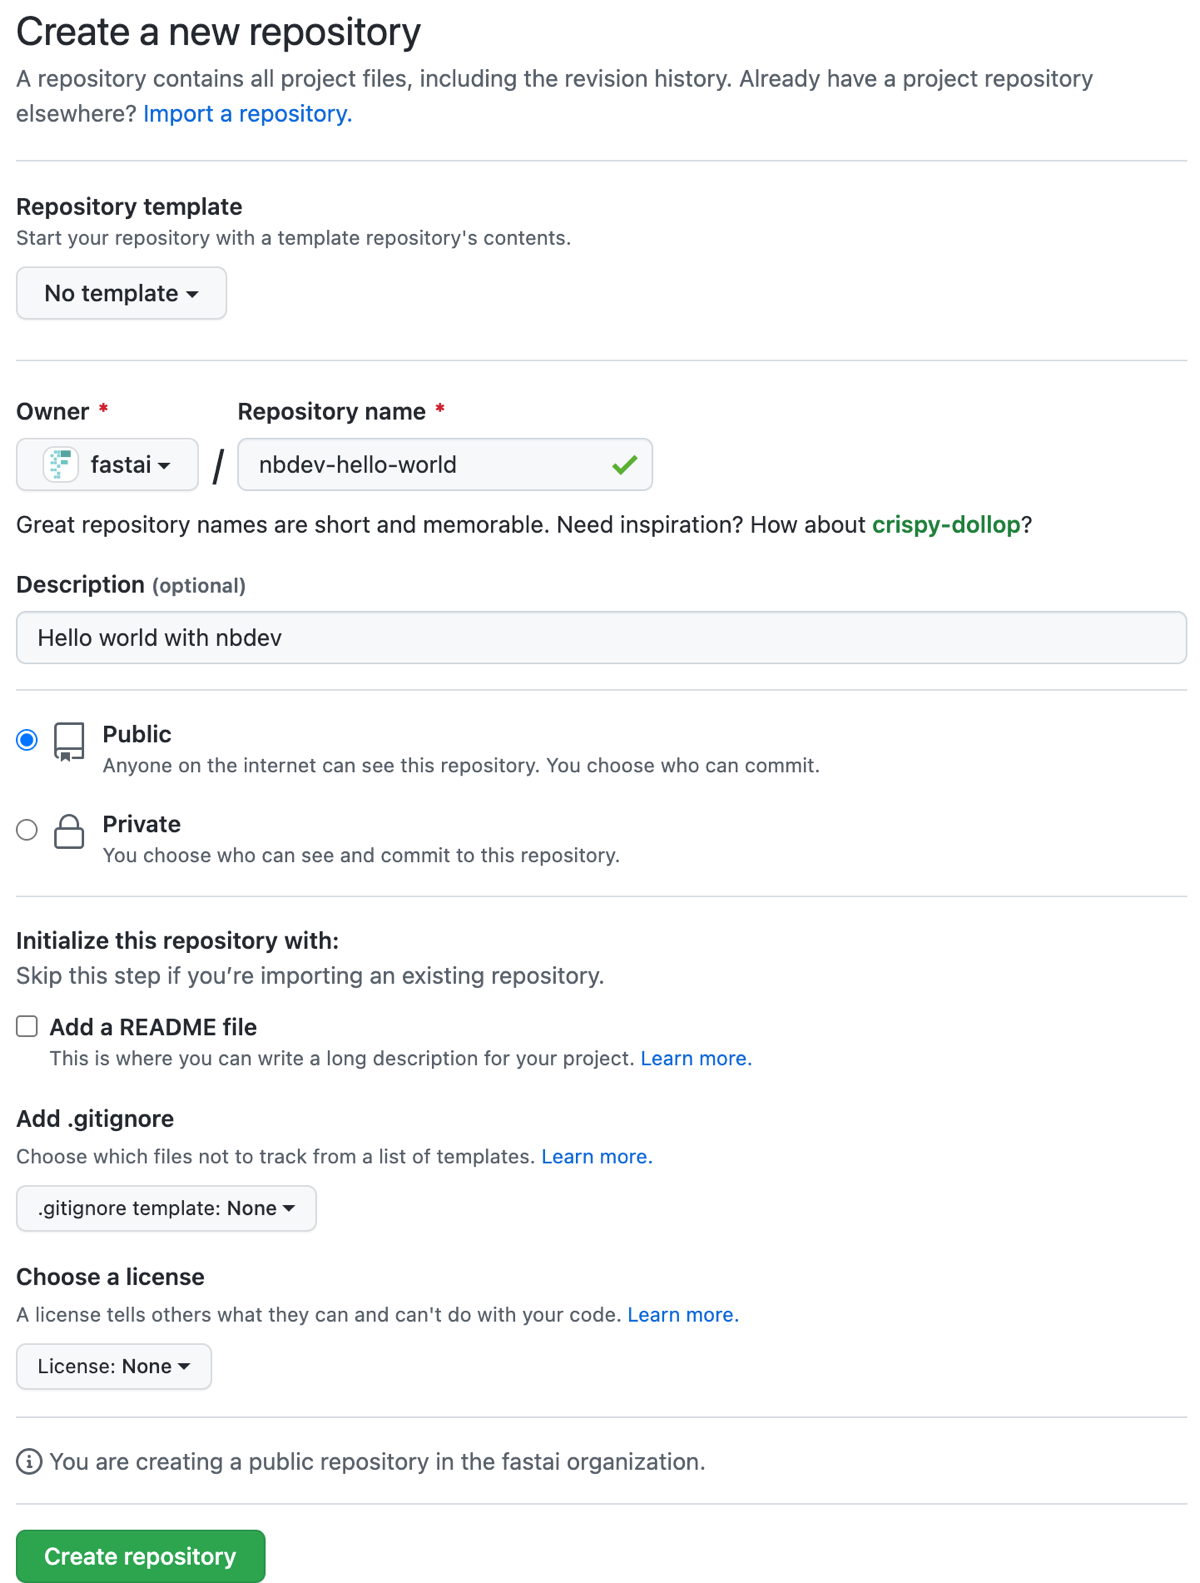
Install the extension by entering: Note that the You’re all setup and ready to go! Installing these tools may take some time, but you’ll only need to do it once. Next, we’ll setup an nbdev repo for your specific project. First stepsBy the end of this section you’ll have your own nbdev repo with tests, continuous integration, streamlined PyPI & conda packaging, and a documentation website. Create an empty GitHub repoCreate an empty GitHub repo using the convenient link github.com/new. If you get stuck, you might find GitHub’s Create a repo page helpful. Remember to add a description, since nbdev will use that later. Don’t add a README file, .gitignore, or license just yet. If you’re using the web interface, it should look something like this (with your own repository name and description) before you click “Create Repository”:
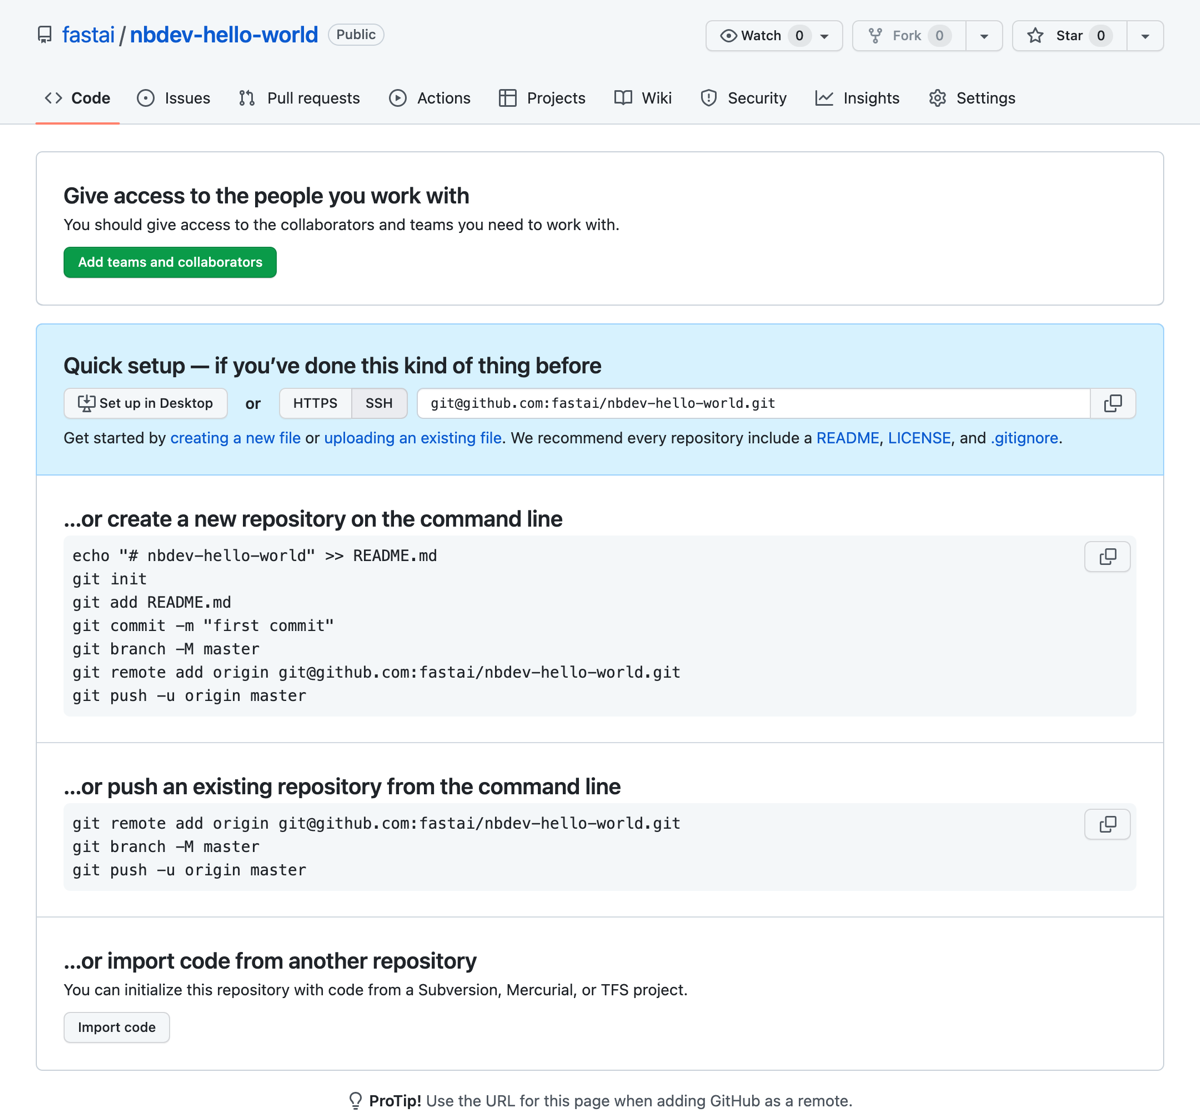
You should then be redirected to your new repo:
TipTry GitHub’s powerful CLI
GitHub’s web interface is a great way to get started. As you grow more experienced, you might want to explore the GitHub CLI (command line interface). We often prefer to use command line tools for repetitive tasks where we’re likely to make mistakes. Having those tasks written as small scripts in your terminal means that you can repeat them with little effort. Initialise your repo with nbdevNow clone your repo from the Jupyter terminal you started earlier (or create a new terminal following those instructions if needed). If you get stuck here, you might find GitHub’s Cloning a repository page helpful. Since we created a repo named Then You may have seen this message while cloning: …since the repo is completely empty. Let’s add some files! nbdev provides the
Initialise your nbdev repo by entering: It may ask you to enter information that it couldn’t infer from git or GitHub.
Note
Double-check your Enable GitHub Pagesnbdev hosts your docs on GitHub Pages—an excellent (and free!) way to host websites.
Note
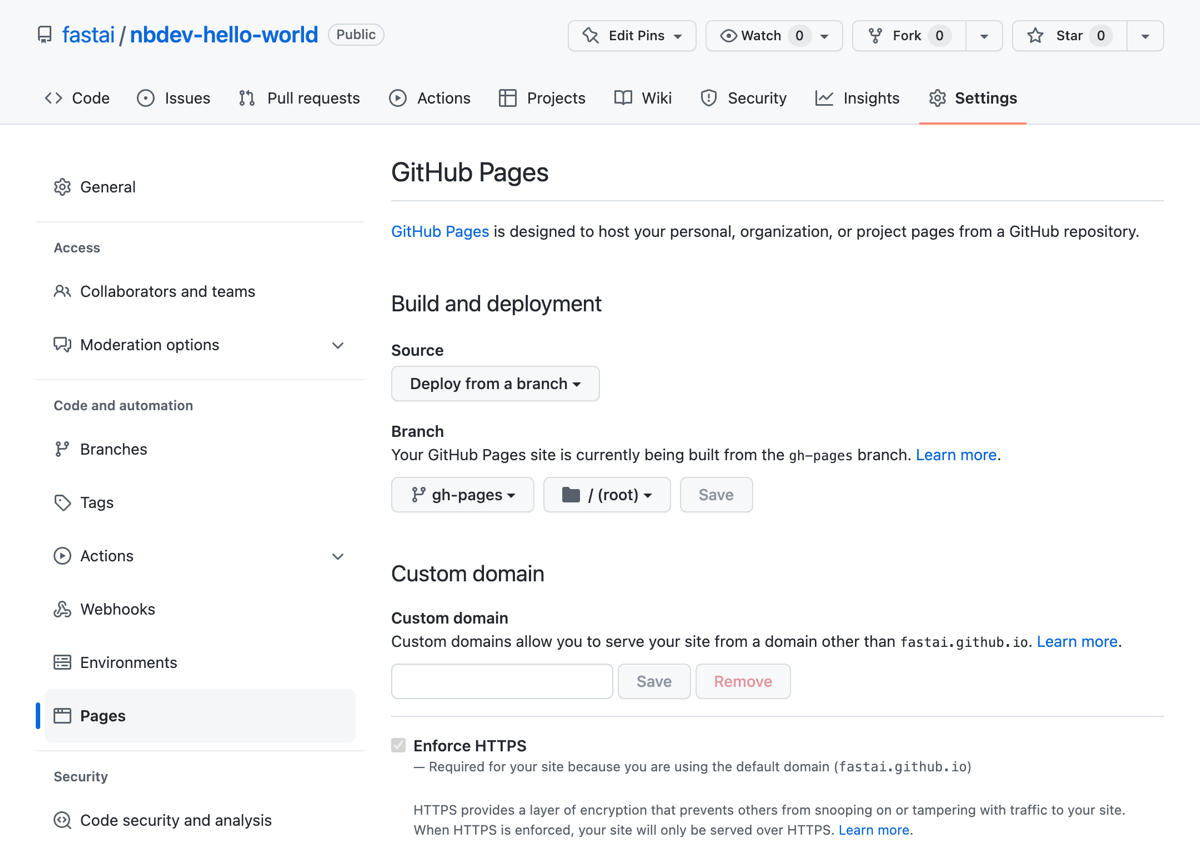
nbdev uses GitHub Pages by default because its easily accessible. However, you can use any host you like. See these docs for more information. You need to enable GitHub Pages for your repo by clicking on the “Settings” tab near the top-right of your repo page, then “Pages” on the left, then setting the “Branch” to “gh-pages”, and finally clicking “Save”. It should look similar to this after you click “Save”:
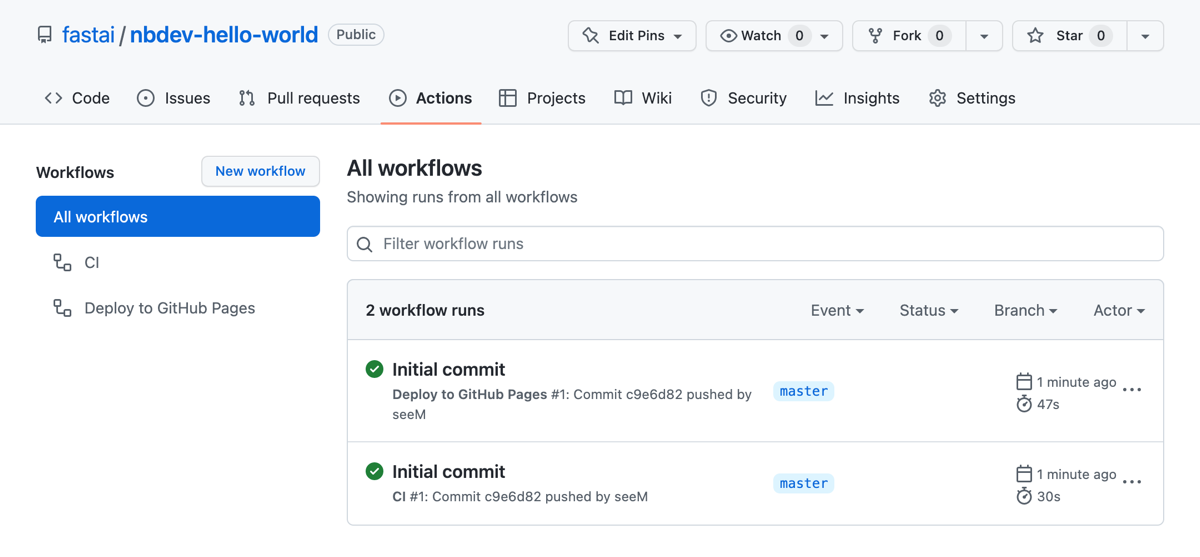
If you don’t see a “gh-pages” branch, wait a few minutes and reload the page. It should automatically be set up for you. Now it’s time to see all of the goodies nbdev gives you! Check out your workflowsOpen GitHub Actions by clicking the “Actions” tab near the top of your repo page. You should see two workflow runs:
If you opened this page shortly after pushing your initial commit, the runs may not have a green check (✅) because they’re still “In progress” or “Queued”. That’s no problem, they shouldn’t take much more than a minute to complete. If you see a red cross (❌), that means something failed. Click on the cross, then click “Details”, and you’ll be able to see what failed. If you can’t figure out what’s wrong, search the forum in case someone else resolved the same issue, otherwise create a new post describing your issue in as much detail as you can, and we’ll try our best to help you. Remember that including a link to an actual repo and/or GitHub Action is the best way for us to quickly identify what’s wrong. What do these workflows do?
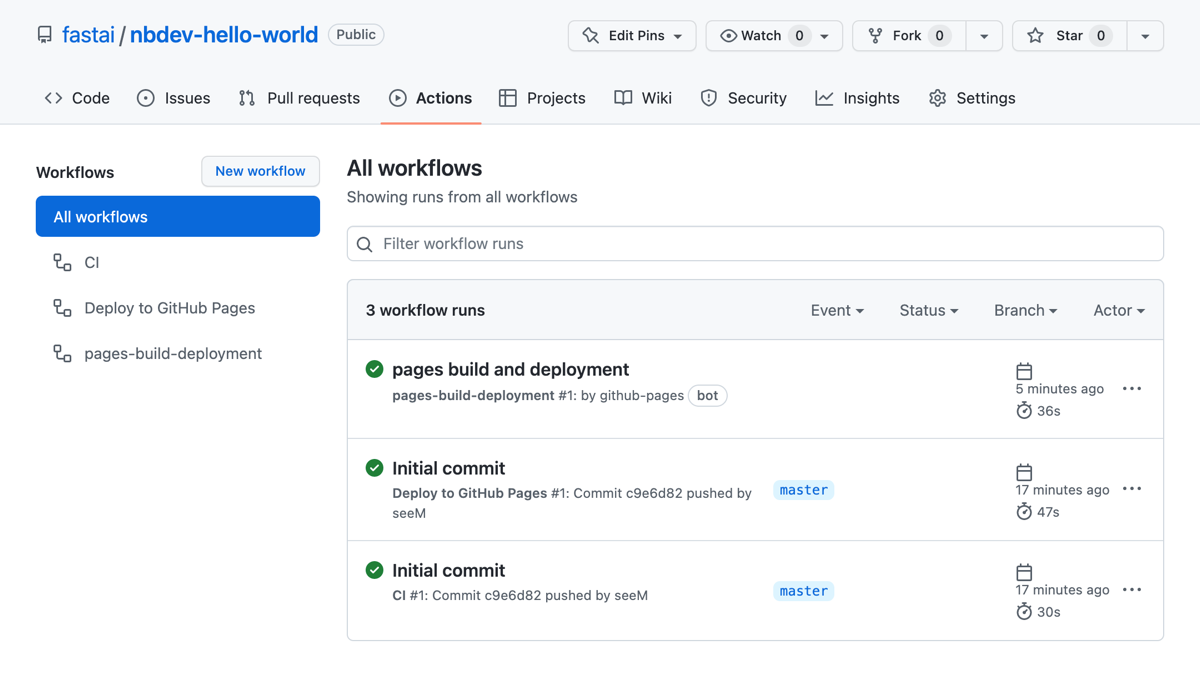
We provide these basic workflows out-of-the-box, however, you can edit their corresponding YAML files in the Check out your docsWhen you enable GitHub Pages you should see a new workflow run: “pages build and deployment”. As the name suggests, this workflow deploys your website contents to GitHub Pages.
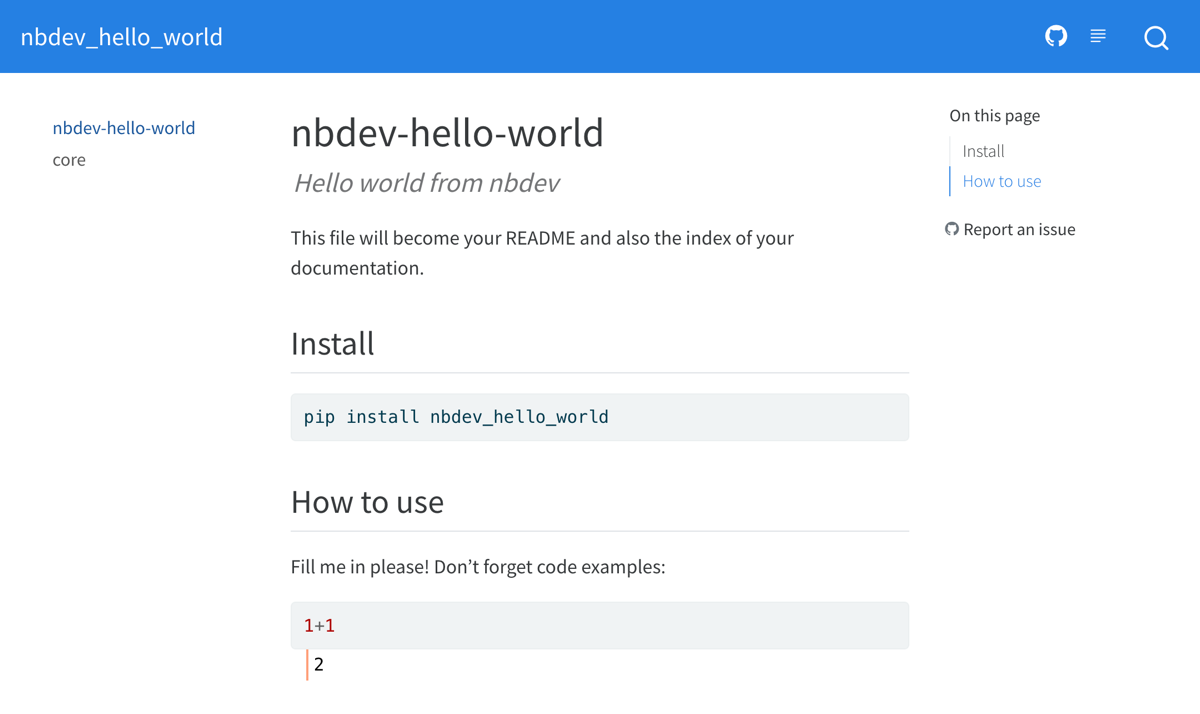
Wait for the workflow run to complete, then open your website. By default it should be available at:
RecapYou now have a base nbdev repo with continuous integration and hosted documentation! Here’s a recap of the steps you took:
Make your first editIn this section, you’ll make your first edit to the repo you created in First steps. Install hooks for git-friendly notebooksStep one when working with Jupyter notebooks in a new repo is to install nbdev’s hooks (you can think of “hooks” as plugins or extensions to an application). Install them by entering this command in your terminal:
Note
The clean hook currently only supports Jupyter Notebook and JupyterLab. If you’re using VSCode, you can try the experimental nbdev VSCode extension. Otherwise, you might also want to try nbdev’s pre-commit hooks. See Git-friendly Jupyter for more about how nbdev hooks work and how to customise them. Here’s a short summary:
Tip
nbdev’s git hooks work on any git repo, even if it doesn’t use the broader nbdev system. Build your libraryYou should now create your package from your notebook by running: This will create Python modules for your notebooks. These modules will make up the contents of your Python package. Install your packageYou might have noticed that The next step is to install your package by entering this into your terminal: This is the recommended way to make a Python package importable from anywhere in your current environment:
Preview your docsnbdev is an interactive programming environment that values fast feedback loops. The Start the preview by entering this into your terminal: It may say Click the link to open the preview in a new browser tab. It should look exactly like your online docs.
Tip
We often find it useful to keep a preview window open on the side while we’re editing our notebooks in Jupyter. Edit 00_core.ipynbNow, open the Add your own frontmatterYou’ll see something that looks a bit like this: Let’s explain what these special cells means:
Next, rename the notebook, replace the title and description, and change the default export module for your own project. Once you’re done, save the notebook. The live preview started in the previous section should update with your latest changes. Rerun all cells in your notebook to ensure that they work, and to export the updated modules.
Tip
We find the “restart kernel and run all cells” Jupyter command (the ⏩ button) so invaluable that we bind it to a keyboard shortcut. A common criticism of notebooks is that out-of-order execution leads to irreproducible notebooks. In our experience, making “restart and rerun” a habit solves this problem. Running the notebook exports Python modules because of the last cell which contains: What does this mean?
We recommend including a cell like this at the bottom of all of the notebooks you want to export.
Warning
Remember to delete any unused modules that aren’t exported by a notebook or otherwise needed by your package. This is likely to happen if you change the default export of a notebook – nbdev doesn’t remove the old module. This is intended, since nbdev is designed to work with hybrid packages that use .py modules (with no corresponding notebook) as well as those exported from notebooks. Add your own functionAdd a new code cell below the Notice how it includes The documentation should look like this: say_hello
Say hello to somebody Add your own examples, tests, and docsOne of the superpowers of notebook-driven development is that you can very easily add examples, tests, and documentation right below your code. Include regular code cells, and they’ll appear (with output) in your docs, for example: This is a test too! When you run For tests, it’s preferred to use more explicit …or functions from Another superpower of notebook-driven development is that your examples can include plots, images, and even JavaScript widgets. For example, here’s an SVG circle: Prepare your changesBefore commiting your changes to GitHub we recommend running
Edit index.ipynbNow you’re ready to personalize your documentation home page and We recommend including a longer description about what your package does, how to install it, and how to use it (with a few examples which import and use your package). Remember, examples can be code cells with real outputs rather than plain markdown text – they’ll double as tests too! Push to GithubYou can now commit and push your changes to GitHub. As we mentioned before, always remember to run This will kick-off your GitHub Actions. Wait a minute or two for those to complete, then check your updated repo and documentation. RecapCongratulations, you’ve used all of the basics needed to build delightful projects with nbdev! Here’s a recap of the steps you took:
Read on to learn about more advanced nbdev functionality. Also see our explanations for deep-dives on specific topics, as well as our other tutorials. Advanced functionalityAdd a classCreate a class in This will automatically appear in the docs like this: Document with show_docHowever, methods aren’t automatically documented. To add method docs, use And add some examples and/or tests: Add links with backticksNotice above there is a link from our new class documentation to our function. That’s because we used backticks in the docstring: These are automatically converted to hyperlinks wherever possible. For instance, here are hyperlinks to Set up autoreloadSince you’ll be often updating your modules from one notebook, and using them in another, it’s helpful if your notebook automatically reads in the new modules as soon as the Python file changes. To make this happen, just add these lines to the top of your notebook: Set up prerequisitesIf your module requires other modules as dependencies, you can add those prerequisites to For example if your module requires the You can also add optional dependencies using Set up console scriptsBehind the scenes, nbdev uses the standard package Upload to pypiIf you want people to be able to install your project by just typing Another thing you will need is To upload your project to pypi, just type Upload to condaSimilar to You need to register at anaconda (fill out the form to Before running the anaconda uploader, you need to login to conda using the CLI command (you will be prompted to enter your username and password) To upload to anaconda, just type Upload to pypi and condaThe command Install collapsible headings and toc2There are two jupyter notebook extensions that I highly recommend when working with projects like this. They are:
Math equation supportnbdev supports equations (using Quarto). You can include math in your notebook’s documentation using the following methods. Using Which is rendered as:
Using Which is rendered as:
For more information, see the Quarto Docs Look at nbdev “source” for more ideasDon’t forget that nbdev itself is written in nbdev! It’s a good place to look to see how fast.ai uses it in practice, and get a few tips. You’ll find the nbdev notebooks here in the nbs folder on Github. Quarto Featuresnbdev supports most Quarto features. We encourage you to read the Quarto documentation to discover all the features available to you. For example you can incorporate Graphviz. It is worth taking a look at the documentation for figures, callouts, markdown, widgets, layouts, conditional content and quarto extensions to name a few useful things we have encountered. |
| You are visitor 01402503 — GeezerVison does not store the pages you look up. Best viewed with Netscape Navigator 4.7 or Internet Explorer 6 at 800×600. No cookies required. |