GeezerVisonThe World Wide Web, restored to 800 pixels of glory. |
| Home|About|Gaming cabinet|Archives|How it works|Starter sites |
GeezerVison is showing tkdocs.com — TkDocs Tutorial - Tk Concepts Tk ConceptsWith your first example behind you, you now have a basic idea of what a Tk program looks like and the type of code you need to write to make it work. This chapter will step back and look at three broad concepts required to understand Tk: widgets, geometry management, and event handling. Tutorial
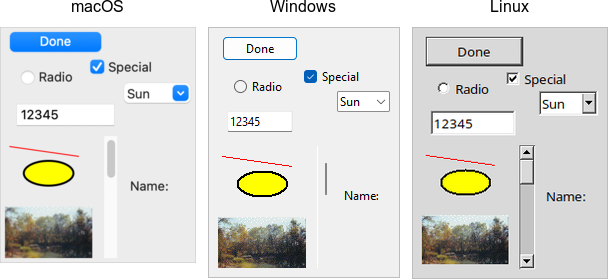
WidgetsWidgets are all the things that you see onscreen. Our example had a button, an entry, a few labels, and a frame. Checkboxes, tree views, scrollbars, and text areas are examples of other widgets. Widgets are often referred to as "controls." You'll also sometimes see them referred to as "windows," particularly in Tk's documentation. This is a holdover from its X11 roots (under that terminology, both your toplevel application window and a button would be called windows). Here are just a few of Tk's widgets, which we'll cover individually shortly.
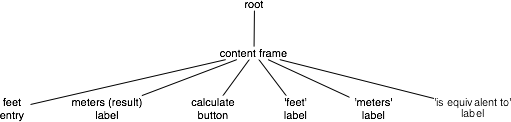
Widget classesIn Tk, individual widgets are objects, instances of classes that represent buttons, frames, and so on. To create a widget, you first need to identify the specific class of the widget you'd like to instantiate. We'll explore these in the coming chapters. Widget hierarchyBesides the widget class, you need one other piece of information before you can create a widget: its parent. Widgets don't float off in space. Instead, they're contained within something else, like a window. In Tk, all widgets are part of a widget (or window) hierarchy, with a single root at the top of the hierarchy. In our metric conversion example, we created a single frame as a child of the root window, and that frame contained all the other widgets as children. The root window was a container for the frame and was, therefore, the frame's parent. The complete hierarchy for the example looked like this:
Widget hierarchies can be arbitrarily deep. For example, you might have a button in a frame in another frame within the root window. Even a new window in your application (a special widget called a toplevel) is part of that same hierarchy. That window and all its contents form a subtree of the overall widget hierarchy.
Creating widgetsEach separate widget is a Python object. When instantiating a widget, you pass its parent as the first
parameter to the widget class. The only exception is the "root" window.
That toplevel window is automatically created when you instantiate Whether or not you save the widget object in a variable is entirely up to you, depending on whether you'll need to refer to it later. Because the widget object is inserted into the widget hierarchy, it won't be garbage collected even if you don't keep your own reference to it. Tkinter is a wrapper around the Tcl language interface to Tk. When you create a widget object in Tkinter, you're running a small bit of Tcl code. Sometimes when you're trying to figure out exactly how to make Tkinter do what you want, you may need to look at Tk's reference documentation, which is Tcl-based. In Tcl, rather than widget objects, every widget is uniquely identified with a hierarchical path name.
For example, In Tcl, each widget is given an explicit pathname, which both differentiates it from other
widgets, and also indicates its place in the window hierarchy. The root of the hierarchy, the
toplevel widget that Tk automatically creates, is named simply The frame, which was a child of the root, was named So to create a widget, we need to provide the widget class, and the pathname. The pathname is used to indicate the widget's parent (which must of course exist also), and hence its position in the window hierarchy. For example: This also creates a new object command with the same name as the widget's pathname, which will
let us communicate with the widget. So the above code would produce new Tcl commands named Speaking of which, Tcl uses a more shell-like syntax than the other languages covered in this tutorial,
with spaces separating parameters rather than commas or other delimeters.
Some procedure or method names that are written as multiple words in Tcl (e.g., Each separate widget is a Ruby object. When creating a widget, you must pass its parent as a
parameter to the widget class' Whether or not you save the widget object in a variable is entirely up to you, and depends of course whether you'll need to refer to it later. Because the object is inserted into the widget hierarchy, it won't be garbage collected even if you don't keep your own reference to it. If you sneak a peek at how Tcl manages widgets, you'll see each widget has a specific pathname;
you'll also see this pathname referred to in Tk reference documentation. Ruby/Tk chooses and
manages all these pathnames for you behind the scenes, so you should never have to worry about
them. If you do though, you can get the pathname from a widget with its In Perl, each widget is given an explicit pathname, which both differentiates it from other
widgets, and also indicates its place in the window hierarchy. The root of the hierarchy, the
toplevel widget that Tk automatically creates, is named simply The frame, which was a child of the root, was named So to create a widget, we need to provide the widget class, and the pathname. The pathname is used to indicate the widget's parent (which must of course exist also), and hence its position in the window hierarchy. For example: Widget ObjectsMany widgets have operations that you can call on them, such as to disable a widget, invoke a button's
command, and so on. If we were doing this in Tcl, we'd write something like Admittedly, that's pretty lame. Ideally, we'd want to have these widgets behave just like Perl objects. Luckily, Tkx lets us do exactly that. The first thing we need to do is get a reference to an object for these widgets. We can do that
like this, passing the widget pathname to Then we can invoke methods on these objects just how you'd expect: Creating each widget and then getting a reference to it as a separate step is a bit much. So there's another way to create widgets. If you have an object reference to the parent widget in the widget hierarchy, you can ask it to create a child. In this case, Tkx will choose the widget pathname for you (it'll look something like ".b", ".f.e", ".f.e2", etc.). You can get this path by calling the object's "_mpath" method (e.g. You also saw in our earlier example that some Tkx commands (like "grid") take the widget pathname as their first argument. There's a way to do that using the widget object instead. We invoke a method which is the name of the command, prefixed by "g_", e.g. "g_grid". So this: becomes this: Translation RulesWhat's somewhat scary about the Tkx module is that it implements all of this on a purely syntactic level. That is, it has no clue about buttons and entries and grid. It just knows that if it sees a method "new_something" it's creating a widget using the Tcl command "something", or if you call a method "g_otherthing", that it's going to invoke a Tcl command "otherthing", and pass the widget pathname associated with the object as a first parameter (followed by any other parameters passed to the method). It's this pure syntactic mapping which gives Tkx its power and amazing brevity (check out the code in Tkx.pm!). It also explains why it can automatically track any changes in Tk. Any new commands and options don't need to be explicitly implemented in Tkx code; they are automatically available just by using the right syntax. Now let's talk about those underscores in the Tkx commands and method names. If you've glanced at the Tcl version of the code in this tutorial, you know that they can take several forms, i.e.
No translations are needed for simple commands like "grid", but the others need to be tweaked. To translate these into Perl, Tkx uses underscores in the following way:
Given that this purely syntactic translation is all that Tkx does, let's state the obvious: whether or not you use the pure command form, which we used in the "feet to meters" example, or the object oriented form, they both do exactly the same thing (i.e. invoke the same underlying Tcl command). Because you can get an object's widget pathname, or get an object reference from a widget pathname, you can also freely intermix them. Most programs of any length will probably be a bit simpler if they predominately use the object oriented form, but this is almost entirely a stylistic issue. Feet to Meters, Object StyleHere's the earlier "feet to meters" example, this time rewritten in the object oriented style. The programs do exactly the same thing. Configuration optionsAll widgets have multiple configuration options that control how the widget is displayed or how it behaves. The available options for a widget depend upon the widget class, of course. There is a lot of consistency
between different widget classes, so options that do similar things tend to be named the same.
For example, both a button and a label have a While widgets may have many configuration options, they have sensible defaults. In practice, each widget has only a few configuration options that are commonly used. As we describe different widgets, we'll focus on those. While reference documentation will describe all the options, it can be difficult to find the few you actually need. Configuration options can be set when the widget is first created by specifying their names and values as optional parameters. Later, you can retrieve the current values of those options, and with a tiny number of exceptions, change them at any time. If you're unsure what configuration options a widget supports, you can ask the widget to describe them. This gives you a long list of all its options. This is all best illustrated with the following interactive dialog with the interpreter. % wish8.5
create a button, passing two options:
% grid [ttk::button .b -text "Hello" -command {button_pressed}]
check the current value of the text option:
% .b cget -text
Hello
check the current value of the command option:
% .b cget -command
button_pressed
change the value of the text option:
% .b configure -text Goodbye
check the current value of the text option:
% .b cget -text
Goodbye
get all information about the text option:
% .b configure -text
-text text Text {} Goodbye
get information on all options for this widget:
% .b configure
{-takefocus takeFocus TakeFocus ttk::takefocus ttk::takefocus}
{-command command Command {} button_pressed} {-default default Default normal normal}
{-text text Text {} Goodbye} {-textvariable textVariable Variable {} {}}
{-underline underline Underline -1 -1} {-width width Width {} {}} {-image image Image {} {}}
{-compound compound Compound none none} {-padding padding Pad {} {}}
{-state state State normal normal} {-takefocus takeFocus TakeFocus {} ttk::takefocus}
{-cursor cursor Cursor {} {}} {-style style Style {} {}} {-class {} {} {} {}}
% irb
irb(main):001:0> require 'tk'
=> true
irb(main):002:0> require 'tkextlib/tile'
=> true
create a button, passing two options:
irb(main):003:0> root = TkRoot.new
=> #<TkRoot:0xb7c8c9d8 @path=".">
irb(main):004:0> button = Tk::Tile::Button.new(root) {text "Hello"; command "button_pressed"}.grid
=> #<Tk::Tile::TButton:0xb7c86ab0 @cmdtbl=["c00001"], @path=".w00000">
check the current value of the text option:
irb(main):005:0> button['text']
=> "Hello"
check the current value of the command option:
irb(main):006:0> button['command']
=> #<cb_entry:fdbe42342>
change the value of the text option:
irb(main):007:0> button['text'] = 'goodbye'
=> "goodbye"
check the current value of the text option:
irb(main):008:0> button['text']
=> "goodbye"
get all information about the text option:
irb(main):009:0> button.configinfo 'text'
=> ["text", "text", "Text", "", "goodbye"]
get information on all options for this widget:
irb(main):010:0> button.configinfo
=> [["takefocus", "takeFocus", "TakeFocus", true, true], ["command", "command", "Command", "", #<cb_entry:fdbe42342>],
["default", "default", "Default", "normal", "normal"], ["text", "text", "Text", "", "goodbye"],
 ["textvariable", "textVariable", "Variable", nil, nil],
["underline", "underline", "Underline", -1, -1], ["width", "width", "Width", "", ""],
["image", "image", "Image", "", ""], ["compound", "compound", "Compound", "none", "none"],
["padding", "padding", "Pad", "", ""], ["state", "state", "State", "normal", "normal"],
["takefocus", "takeFocus", "TakeFocus", nil, true], ["cursor", "cursor", "Cursor", "", ""],
["style", "style", "Style", [], []], ["class", "", "", "", ""]]
run Perl interactively using the program "psh":
% psh
Perl> use Tkx
Perl> $mw = Tkx::widget->new(".")
.
create a button, passing two options:
Perl> ($b = $mw->new_ttk__button(-text => "Hello", -command => sub {button_pressed();}))->g_grid
.b
check the current value of the text option:
  (note that "m_<foo>" is another one of those magic Tkx translations
   like "g_<foo>"; in this case it means call the <foo> method on the object)
Perl> $b->m_cget(-text)
Hello
conveniently, the "m_" part is almost always optional:
Perl> $b->cget(-text)
Hello
check the current value of the command option:
Perl> $b->cget(-command)
::perl::CODE(0x839020)
change the value of the text option:
Perl> $b->configure(-text => "Goodbye")

check the current value of the text option:
Perl> $b->cget(-text)
Goodbye
get all information about the text option:
Perl> $b->configure(-text)
-text text Text {} Goodbye
convert the Tcl list this returns into a Perl list:
Perl> Tkx::SplitList($b->configure(-text))
-text, text, Text, , Goodbye
get information on all options for this widget:
Perl> $b->configure
{-takefocus takeFocus TakeFocus ttk::takefocus ttk::takefocus}
{-command command Command {} ::perl::CODE(0x839020)} {-default default Default normal normal}
{-text text Text {} Goodbye} {-textvariable textVariable Variable {} {}}
{-underline underline Underline -1 -1} {-width width Width {} {}} {-image image Image {} {}}
{-compound compound Compound none none} {-padding padding Pad {} {}}
{-state state State normal normal} {-takefocus takeFocus TakeFocus {} ttk::takefocus}
{-cursor cursor Cursor {} {}} {-style style Style {} {}} {-class {} {} {} {}}
As you can see, for each option, Tk will show you the name of the option and its current value (along with three other attributes which you can usually ignore). Ok, if you really want to know, here are the details on the five pieces of data provided for each configuration option. The most useful are the first, the option's name, and the fifth, which is the option's current value. The fourth is the default value of the option, or in other words, the value it would have if you didn't change it. The other two relate to something called the option database. We'll briefly touch on it when we discuss menus, but it's not used in modern applications. The second item is the option's name in the database, and the third is its class. Styles and themesTk's "classic" widgets each have a very large number of configuration options, providing for very precise control over numerous details of each individual widget's appearance. The need to customize each individual widget often resulted in a great deal of repetitive code and inconsistencies. Tk's "themed" widgets move most of these details into theme and style objects, separate from the widget itself. This makes it far easier to create consistent user interfaces while using much less code to do it. Styles and themes are covered in detail towards the end of the book. It explains the benefits.
Changing themes allows for radical customization of your application's appearance. For most mainstream desktop applications, it's unlikely you will need to do so. However, you'll see in the next chapter how individual styles can be applied to widgets in lieu of making fine-grained changes to individual widgets. These very different approaches to customization between classic and themed widgets are the main reason both sets of widgets exist today. It would not have been feasible to add support for themes while still maintaining backward compatibility. Widget introspectionTk exposes a treasure trove of information about each and every widget that your application can take advantage of.
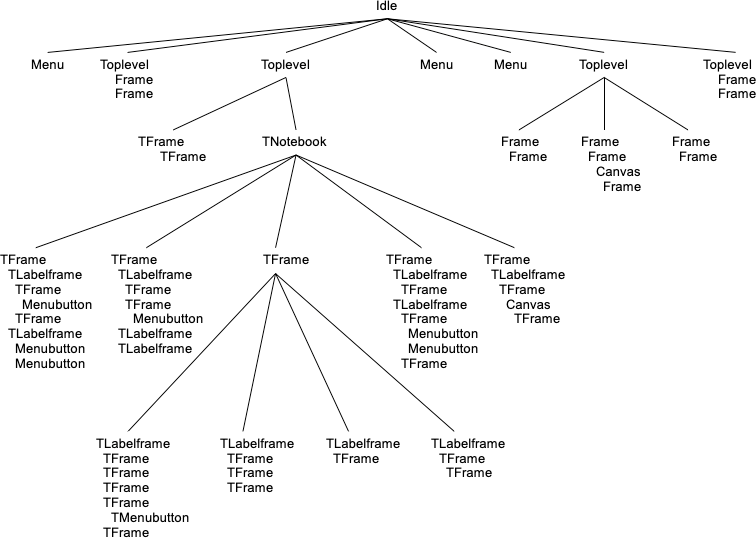
Much of it is available via the This short example traverses the widget hierarchy, using each widget's The following are some of the most useful methods:
Geometry managementAs you've seen, widgets don't appear on the screen just by creating them. Placing widgets on the screen (and precisely where they are placed) is a separate step called geometry management. In our feet to meters example, positioning each widget was accomplished by the A geometry manager's job is to figure out exactly where those widgets are going to be put. This turns out to be a complex
optimization problem, and a good geometry manager relies on quite sophisticated algorithms. A good geometry
manager provides the flexibility, power, and ease of use that makes programmers happy. It also makes it easy to create appealing user interface layouts without needing to jump through hoops. Tk's
We'll go into more detail in a later chapter, but The problemThe problem for a geometry manager is to take all the different widgets the program creates, plus the program's instructions for where in the window each should go (explicitly, or more often, relative to other widgets), and then actually position them in the window. In doing so, the geometry manager has to balance multiple constraints. Consider these situations:
How it worksGeometry management in Tk relies on the concept of master and slave widgets. A master is a widget, typically a toplevel application window or a frame. It contains other widgets, called slaves. You can think of a geometry manager taking control of the master widget and deciding how all the slave widgets will be displayed within. The computing community has embraced the more general societal trend towards more diversity, sensitivity, and awareness about the impacts of language. As a result, the Tk core will slowly adopt a more inclusive set of terminology. For example, where it makes sense, "parent" and "child" will be preferred over "master" and "slave." The current terminology will not disappear to preserve backward compatibility. This is something to be aware of for the future. For more details, see TIP #581. Your program tells the geometry manager what slaves to manage within the master, i.e., via calling The geometry manager collects information about the slaves in the master and the total size of the master.
It asks each slave widget for its natural size, i.e., how large it would ideally be displayed. The geometry manager's internal algorithm calculates the rectangular area each slave will be allocated (if any!). The slave is then
responsible for rendering itself within that particular rectangle. And of course, we repeat the whole process whenever the size of the master changes
(e.g., because the toplevel window was resized), the natural size of a slave changes (e.g., because we've changed the
text in a label), or any geometry manager parameters change (e.g., like This all works recursively as well. In our example, we had a content frame inside the toplevel application window and then several other widgets inside the content frame. We, therefore, had to manage the geometry for two different masters. At the outer level, the toplevel window was the master, and the content frame was its slave. At the inner level, the content frame was the master, with each of the other widgets being slaves. Notice that the same widget, e.g., the content frame, can be both a master and a slave! As we saw previously, this widget hierarchy can be nested much more deeply. While each master can be managed by only one geometry manager (e.g., Finally, we've been assuming that slave widgets are the immediate children of their master in the widget hierarchy. While this is usually the case, and mostly there's no good reason to do it any other way, it's also possible (with some restrictions) to get around this. Event handlingAs with most user interface toolkits, Tk runs an event loop that receives events from the operating system. These are things like button presses, keystrokes, mouse movement, window resizing, and so on. Generally, Tk takes care of managing this event loop for you. It will figure out what widget the event applies to (did a user click on this button? if a key was pressed, which textbox had the focus?), and dispatch the event accordingly. Individual widgets know how to respond to events; for example, a button might change color when the mouse moves over it and revert back when the mouse leaves. It's critical in event-driven applications that the event loop not be blocked. The event loop runs continuously, normally executing dozens of steps per second. At every step, it processes an event. If your program is performing a long operation, it can potentially block the event loop. In that case, no events would be processed, no drawing would be done, and it would appear as if your application is frozen. There are many ways to prevent this from happening. We'll discuss this in more detail in a later chapter. Command callbacksYou often want your program to handle some event in a particular way, e.g., do something when a button is
pushed. For those events that are most frequently customized (what good is a button without something
happening when you press it?), the widget lets you specify a callback via a widget configuration option.
We saw this in the example with the Callbacks in Tk tend to be simpler than in user interface toolkits used with compiled languages (where a callback must be a procedure with a certain set of parameters or an object method with a certain signature). Instead, the callback is just an ordinary bit of code that the interpreter evaluates. While it can be as complicated as you want to make it, most of the time, you'll just want your callback to call some other function or method. Binding to eventsFor events that don't have a widget-specific callback configuration option associated with them, you can use Tk's Here's a (silly) example showing a label responding to different events. When an event occurs, a description of the event is displayed in the label. Note that the The first two bindings are pretty straightforward, just watching for simple events.
An The next binding looks for a mouse click, specifically a This next binding looks for a The last binding ( You may have noticed we're being a bit cagey, referring to the "left" mouse button and the "third" mouse button… not the "right" mouse button. On Windows and Linux/X11, which have three button mouses, button #1 is the left button and button #3 is the right button. On macOS, things are different. Sometimes, only a single button mouse is available, in which case we'll never get an event for button #3. When a three button mouse is available on macOS, however, the right button is actually button #2, not button #3. On macOS, button #3 is the middle button (or scroll wheel button), which is button #2 on Windows and Linux/X11. We'll return to this in the chapter on menus. This last binding also shows an example of how to use event parameters. Many events carry additional information, e.g., the position of the mouse when it's clicked. Tk provides access to these parameters in Tcl callback scripts through the use of percent substitutions. These percent substitutions let you capture them so they can be used in your script. We'll see percent substitutions used later in another context, entry widget validation. Tkinter abstracts away these percent substitutions and instead encapsulates all the event parameters in an event object.
Above, we used the What's with the
As we've described here, and throughout Tk's documentation, events in Tk are surrounded by angle brackets, e.g. Tkx lets us provide command callbacks as just a Perl function (the first five), or as a two element
array (the last case). The first element is the Perl code to be called, while the second array element
specifies parameters to pass to that code. The function Multiple bindings for an eventWe've just seen how event bindings can be assigned to an individual widget. When a matching event is received by that widget, the binding is triggered. But that's not all you can do. Your binding can capture not only a single event but a short sequence of events. The For keyboard events, case matters. If you want to bind to a capital A, use You can also assign an event binding to a toplevel window. When a matching event occurs anywhere in that window, the binding is triggered. In our feet to meters example, we set up a binding for the "Return" key on the main application toplevel window. If the "Return" key is pressed when any widget contained in the toplevel window had the focus, that binding will fire. Less commonly, you can create event bindings triggered when a matching event occurs anywhere in the application or even for events received by any widget of a given class, e.g., all buttons.
More than one binding can fire for an event. This keeps event handlers concise and limited in scope, making for more modular code.
For example, the behavior of each widget class in Tk is itself defined with script-level event bindings. These stay separate from event bindings in your application.
Event bindings assigned to a widget can also be changed (or deleted) at any time. They can be modified to alter event handling
for widgets of a certain class or parts of your application. You can reorder, extend, or change the sequence
of event bindings that are triggered for each widget;
see the Available eventsThe most common events are described below, along with the circumstances when they are generated.
Some are generated on some platforms and not others.
For a complete description of all the different event names,
modifiers, and the different event parameters that are available with each, the best place to look is the
Event detail for mouse events is the button that was pressed, e.g., Event modifiers can include, e.g., Virtual eventsThe events we've seen so far are low-level operating system events like mouse clicks and window resizes.
Many widgets also generate higher-level, semantic events called virtual events. These are indicated
by double angle brackets around the event name, e.g.,
As we've mentioned, Ruby/Tk strips away the (single) angle brackets from regular event names. Virtual events use
a single set of angle brackets, e.g.,
<foo>.
For example, a listbox widget
generates a Tk also defines virtual events for common operations that are triggered in different ways for different platforms.
These include You can define your own virtual events, which can be specific to your application. This can be a useful way to keep platform-specific details isolated in a single module while using the virtual event throughout your application. Your own code can generate virtual events that work in exactly the same way that virtual events generated by Tk do. |
| You are visitor 01402503 — GeezerVison does not store the pages you look up. Best viewed with Netscape Navigator 4.7 or Internet Explorer 6 at 800×600. No cookies required. |