GeezerVisonThe World Wide Web, restored to 800 pixels of glory. | ||||||||||||||||||||||||||||||||||||||||||||||||||||||||||||||||||||||||||||||||||||||||||||||||||||||
| Home|About|Gaming cabinet|Archives|How it works|Starter sites | ||||||||||||||||||||||||||||||||||||||||||||||||||||||||||||||||||||||||||||||||||||||||||||||||||||||
GeezerVison is showing www.tutorialspoint.com — Python Data Structure - Quick Guide 
Python Data Structures Useful Resources Selected Reading
Python Data Structure - Quick GuidePython - DS IntroductionHere, we will understand what is data structure with regards to Python programming language. Data Structure OverviewData structures are fundamental concepts of computer science which helps is writing efficient programs in any language. Python is a high-level, interpreted, interactive and object-oriented scripting language using which we can study the fundamentals of data structure in a simpler way as compared to other programming languages. In this chapter we are going to study a short overview of some frequently used data structures in general and how they are related to some specific python data types. There are also some data structures specific to python which is listed as another category. General Data StructuresThe various data structures in computer science are divided broadly into two categories shown below. We will discuss about each of the below data structures in detail in subsequent chapters. Liner Data StructuresThese are the data structures which store the data elements in a sequential manner.
Non-Liner Data StructuresThese are the data structures in which there is no sequential linking of data elements. Any pair or group of data elements can be linked to each other and can be accessed without a strict sequence.
Python Specific Data StructuresThese data structures are specific to python language and they give greater flexibility in storing different types of data and faster processing in python environment.
In the next chapters we are going to learn the details of how each of these data structures can be implemented using Python. Python - DS EnvironmentPython is available on a wide variety of platforms including Linux and Mac OS X. Let's understand how to set up our Python environment. Local Environment SetupOpen a terminal window and type "python" to find out if it is already installed and which version is installed.
Getting PythonThe most up-to-date and current source code, binaries, documentation, news, etc., is available on the official website of Python www.python.org You can download Python documentation from this website given herewith,www.python.org/doc. The documentation is available in HTML, PDF, and PostScript formats. Installing PythonPython distribution is available for a wide variety of platforms. You need to download only the binary code applicable for your platform and install Python. If the binary code for your platform is not available, you need a C compiler to compile the source code manually. Compiling the source code offers more flexibility in terms of choice of features that you require in your installation. Here is a quick overview of installing Python on various platforms − Unix and Linux InstallationHere are the simple steps to install Python on Unix/Linux machine.
This installs Python at standard location /usr/local/bin and its libraries at /usr/local/lib/pythonXX where XX is the version of Python. Windows InstallationHere are the steps to install Python on Windows machine.
Macintosh InstallationRecent Macs come with Python installed, but it may be several years out of date. See www.python.org/download/mac/ for instructions on getting the current version along with extra tools to support development on the Mac. For older Mac OS's before Mac OS X 10.3 (released in 2003), MacPython is available. Jack Jansen maintains it and you can have full access to the entire documentation at his website − https://homepages.cwi.nl/~jack/macpython/index.html. You can find complete installation details for Mac OS installation. Setting up PATHPrograms and other executable files can be in many directories, so operating systems provide a search path that lists the directories that the OS searches for executables. The path is stored in an environment variable, which is a named string maintained by the operating system. This variable contains information available to the command shell and other programs. The path variable is named as PATH in Unix or Path in Windows (Unix is case sensitive; Windows is not). In Mac OS, the installer handles the path details. To invoke the Python interpreter from any particular directory, you must add the Python directory to your path. Setting path at Unix/LinuxTo add the Python directory to the path for a particular session in Unix −
Setting path at WindowsTo add the Python directory to the path for a particular session in Windows −
Python Environment VariablesHere are important environment variables, which can be recognized by Python −
Running PythonThere are three different ways to start Python, which are as follows − Interactive Interpreter
$python # Unix/Linux
or
python% # Unix/Linux
or
C:> python # Windows/DOS
Here is the list of all the available command line options, which is as mentioned below −
Script from the Command-lineA Python script can be executed at command line by invoking the interpreter on your application, as in the following − $python script.py # Unix/Linux or python% script.py # Unix/Linux or C: >python script.py # Windows/DOS
Integrated Development Environment(IDE)You can run Python from a Graphical User Interface (GUI) environment as well, if you have a GUI application on your system that supports Python.
If you are not able to set up the environment properly, then you can take help from your system admin. Make sure the Python environment is properly set up and working perfectly fine.
We already have set up Python Programming environment online, so that you can execute all the available examples online at the same time when you are learning theory. Feel free to modify any example and execute it online. Python - ArraysArray is a container which can hold a fix number of items and these items should be of the same type. Most of the data structures make use of arrays to implement their algorithms. Following are the important terms to understand the concept of Array are as follows −
Array RepresentationArrays can be declared in various ways in different languages. Below is an illustration. 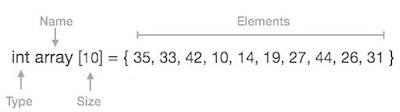
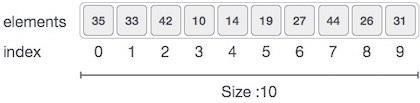
As per the above illustration, following are the important points to be considered −
Basic OperationsThe basic operations supported by an array are as stated below −
Array is created in Python by importing array module to the python program. Then, the array is declared as shown below − from array import * arrayName = array(typecode, [Initializers]) Typecode are the codes that are used to define the type of value the array will hold. Some common typecodes used are as follows −
Before looking at various array operations lets create and print an array using python. ExampleThe below code creates an array named array1. from array import *
array1 = array('i', [10,20,30,40,50])
for x in array1:
print(x)
OutputWhen we compile and execute the above program, it produces the following result − 10 20 30 40 50 Accessing Array ElementWe can access each element of an array using the index of the element. The below code shows how to access an array element. Examplefrom array import *
array1 = array('i', [10,20,30,40,50])
print (array1[0])
print (array1[2])
OutputWhen we compile and execute the above program, it produces the following result, which shows the element is inserted at index position 1. 10 30 Insertion OperationInsert operation is to insert one or more data elements into an array. Based on the requirement, a new element can be added at the beginning, end, or any given index of array. ExampleHere, we add a data element at the middle of the array using the python in-built insert() method. from array import *
array1 = array('i', [10,20,30,40,50])
array1.insert(1,60)
for x in array1:
print(x)
When we compile and execute the above program, it produces the following result which shows the element is inserted at index position 1. Output10 60 20 30 40 50 Deletion OperationDeletion refers to removing an existing element from the array and re-organizing all elements of an array. ExampleHere, we remove a data element at the middle of the array using the python in-built remove() method. from array import *
array1 = array('i', [10,20,30,40,50])
array1.remove(40)
for x in array1:
print(x)
OutputWhen we compile and execute the above program, it produces the following result which shows the element is removed form the array. 10 20 30 50 Search OperationYou can perform a search for an array element based on its value or its index. ExampleHere, we search a data element using the python in-built index() method. from array import *
array1 = array('i', [10,20,30,40,50])
print (array1.index(40))
OutputWhen we compile and execute the above program, it produces the following result which shows the index of the element. If the value is not present in the array then th eprogram returns an error. 3 Update OperationUpdate operation refers to updating an existing element from the array at a given index. ExampleHere, we simply reassign a new value to the desired index we want to update. from array import *
array1 = array('i', [10,20,30,40,50])
array1[2] = 80
for x in array1:
print(x)
OutputWhen we compile and execute the above program, it produces the following result which shows the new value at the index position 2. 10 20 80 40 50 Python - ListsThe list is a most versatile datatype available in Python which can be written as a list of comma-separated values (items) between square brackets. Important thing about a list is that items in a list need not be of the same type. Creating a list is as simple as putting different comma-separated values between square brackets. For examplelist1 = ['physics', 'chemistry', 1997, 2000] list2 = [1, 2, 3, 4, 5 ] list3 = ["a", "b", "c", "d"] Similar to string indices, list indices start at 0, and lists can be sliced, concatenated and so on. Accessing ValuesTo access values in lists, use the square brackets for slicing along with the index or indices to obtain value available at that index. For example#!/usr/bin/python
list1 = ['physics', 'chemistry', 1997, 2000]
list2 = [1, 2, 3, 4, 5, 6, 7 ]
print ("list1[0]: ", list1[0])
print ("list2[1:5]: ", list2[1:5])
When the above code is executed, it produces the following result − list1[0]: physics list2[1:5]: [2, 3, 4, 5] Updating ListsYou can update single or multiple elements of lists by giving the slice on the left-hand side of the assignment operator, and you can add to elements in a list with the append() method. For example#!/usr/bin/python
list = ['physics', 'chemistry', 1997, 2000]
print ("Value available at index 2 : ")
print (list[2])
list[2] = 2001
print ("New value available at index 2 : ")
print (list[2])
When the above code is executed, it produces the following result − Value available at index 2 : 1997 New value available at index 2 : 2001 Delete List ElementsTo remove a list element, you can use either the del statement if you know exactly which element(s) you are deleting or the remove() method if you do not know. For example#!/usr/bin/python
list1 = ['physics', 'chemistry', 1997, 2000]
print (list1)
del list1[2]
print ("After deleting value at index 2 : ")
print (list1)
When the above code is executed, it produces following result − ['physics', 'chemistry', 1997, 2000] After deleting value at index 2 : ['physics', 'chemistry', 2000]
Basic List OperationsLists respond to the + and * operators much like strings; they mean concatenation and repetition here too, except that the result is a new list, not a string. In fact, lists respond to all of the general sequence operations we used on strings in the prior chapter.
Python - TuplesA tuple is a sequence of immutable Python objects. Tuples are sequences, just like lists. The differences between tuples and lists are, the tuples cannot be changed unlike lists and tuples use parentheses, whereas lists use square brackets. Creating a tuple is as simple as putting different comma-separated values. Optionally you can put these comma-separated values between parentheses also. For exampletup1 = ('physics', 'chemistry', 1997, 2000);
tup2 = (1, 2, 3, 4, 5 );
tup3 = "a", "b", "c", "d";
The empty tuple is written as two parentheses containing nothing − tup1 = (); To write a tuple containing a single value you have to include a comma, even though there is only one value − tup1 = (50,); Like string indices, tuple indices start at 0, and they can be sliced, concatenated, and so on. Accessing Values in TuplesTo access values in tuple, use the square brackets for slicing along with the index or indices to obtain value available at that index. For example#!/usr/bin/python
tup1 = ('physics', 'chemistry', 1997, 2000);
tup2 = (1, 2, 3, 4, 5, 6, 7 );
print ("tup1[0]: ", tup1[0])
print ("tup2[1:5]: ", tup2[1:5])
When the above code is executed, it produces the following result − tup1[0]: physics tup2[1:5]: [2, 3, 4, 5] Updating TuplesTuples are immutable which means you cannot update or change the values of tuple elements. You are able to take portions of existing tuples to create new tuples as the following example demonstrates − #!/usr/bin/python
tup1 = (12, 34.56);
tup2 = ('abc', 'xyz');
# Following action is not valid for tuples
# tup1[0] = 100;
# So let's create a new tuple as follows
tup3 = tup1 + tup2;
print (tup3);
When the above code is executed, it produces the following result − (12, 34.56, 'abc', 'xyz') Delete Tuple ElementsRemoving individual tuple elements is not possible. There is, of course, nothing wrong with putting together another tuple with the undesired elements discarded. To explicitly remove an entire tuple, just use the del statement. For example#!/usr/bin/python
tup = ('physics', 'chemistry', 1997, 2000);
print (tup);
del tup;
print ("After deleting tup : ");
print (tup);
This produces the following result − ('physics', 'chemistry', 1997, 2000)
After deleting tup :
Traceback (most recent call last):
File "test.py", line 9, in <module>
print tup;
NameError: name 'tup' is not defined
Basic Tuples OperationsTuples respond to the + and * operators much like strings; they mean concatenation and repetition here too, except that the result is a new tuple, not a string. In fact, tuples respond to all of the general sequence operations we used on strings in the prior chapter.
Python - DictionaryIn Dictionary each key is separated from its value by a colon (:), the items are separated by commas, and the whole thing is enclosed in curly braces. An empty dictionary without any items is written with just two curly braces, like this − {}. Keys are unique within a dictionary while values may not be. The values of a dictionary can be of any type, but the keys must be of an immutable data type such as strings, numbers, or tuples. Accessing Values in DictionaryTo access dictionary elements, you can use the familiar square brackets along with the key to obtain its value. ExampleA simple example is as follows − #!/usr/bin/python
dict = {'Name': 'Zara', 'Age': 7, 'Class': 'First'}
print ("dict['Name']: ", dict['Name'])
print ("dict['Age']: ", dict['Age'])
OutputWhen the above code is executed, it produces the following result − dict['Name']: Zara dict['Age']: 7 If we attempt to access a data item with a key, which is not part of the dictionary, we get an error as follows − Example#!/usr/bin/python
dict = {'Name': 'Zara', 'Age': 7, 'Class': 'First'}
print ("dict['Alice']: ", dict['Alice'])
OutputWhen the above code is executed, it produces the following result − dict['Alice']:
Traceback (most recent call last):
File "test.py", line 4, in <module>
print "dict['Alice']: ", dict['Alice'];
KeyError: 'Alice'
Updating DictionaryYou can update a dictionary by adding a new entry or a key-value pair, modifying an existing entry, or deleting an existing entry as shown below in the simple example − Example#!/usr/bin/python
dict = {'Name': 'Zara', 'Age': 7, 'Class': 'First'}
dict['Age'] = 8; # update existing entry
dict['School'] = "DPS School"; # Add new entry
print ("dict['Age']: ", dict['Age'])
print ("dict['School']: ", dict['School'])
OutputWhen the above code is executed, it produces the following result − dict['Age']: 8 dict['School']: DPS School Delete Dictionary ElementsYou can either remove individual dictionary elements or clear the entire contents of a dictionary. You can also delete entire dictionary in a single operation. ExampleTo explicitly remove an entire dictionary, just use the del statement. A simple example is as mentioned below − #!/usr/bin/python
dict = {'Name': 'Zara', 'Age': 7, 'Class': 'First'}
del dict['Name']; # remove entry with key 'Name'
dict.clear();     # remove all entries in dict
del dict ;        # delete entire dictionary

print ("dict['Age']: ", dict['Age'])
print ("dict['School']: ", dict['School'])
OutputThis produces the following result − dict['Age']: dict['Age'] dict['School']: dict['School']
Properties of Dictionary KeysDictionary values have no restrictions. They can be any arbitrary Python object, either standard objects or user-defined objects. However, same is not true for the keys. There are two important points to remember about dictionary keys −
For example#!/usr/bin/python
dict = {'Name': 'Zara', 'Age': 7, 'Name': 'Manni'}
print ("dict['Name']: ", dict['Name'])
OutputWhen the above code is executed, it produces the following result − dict['Name']: Manni Keys must be immutable. Which means you can use strings, numbers or tuples as dictionary keys but something like ['key'] is not allowed. ExampleAn example is as follows − #!/usr/bin/python
dict = {['Name']: 'Zara', 'Age': 7}
print ("dict['Name']: ", dict['Name'])
OutputWhen the above code is executed, it produces the following result − Traceback (most recent call last):
File "test.py", line 3, in <module>
dict = {['Name']: 'Zara', 'Age': 7};
TypeError: list objects are unhashable
Python - 2-D ArrayTwo dimensional array is an array within an array. It is an array of arrays. In this type of array the position of an data element is referred by two indices instead of one. So it represents a table with rows an dcolumns of data. In the below example of a two dimensional array, observer that each array element itself is also an array. Consider the example of recording temperatures 4 times a day, every day. Some times the recording instrument may be faulty and we fail to record data. Such data for 4 days can be presented as a two dimensional array as below. Day 1 - 11 12 5 2 Day 2 - 15 6 10 Day 3 - 10 8 12 5 Day 4 - 12 15 8 6 The above data can be represented as a two dimensional array as below. T = [[11, 12, 5, 2], [15, 6,10], [10, 8, 12, 5], [12,15,8,6]] Accessing ValuesThe data elements in two dimesnional arrays can be accessed using two indices. One index referring to the main or parent array and another index referring to the position of the data element in the inner array.If we mention only one index then the entire inner array is printed for that index position. ExampleThe example below illustrates how it works. from array import * T = [[11, 12, 5, 2], [15, 6,10], [10, 8, 12, 5], [12,15,8,6]] print(T[0]) print(T[1][2]) OutputWhen the above code is executed, it produces the following result − [11, 12, 5, 2] 10 To print out the entire two dimensional array we can use python for loop as shown below. We use end of line to print out the values in different rows. Examplefrom array import *
T = [[11, 12, 5, 2], [15, 6,10], [10, 8, 12, 5], [12,15,8,6]]
for r in T:
for c in r:
print(c,end = " ")
print()
OutputWhen the above code is executed, it produces the following result − 11 12 5 2 15 6 10 10 8 12 5 12 15 8 6 Inserting ValuesWe can insert new data elements at specific position by using the insert() method and specifying the index. ExampleIn the below example a new data element is inserted at index position 2. from array import *
T = [[11, 12, 5, 2], [15, 6,10], [10, 8, 12, 5], [12,15,8,6]]
T.insert(2, [0,5,11,13,6])
for r in T:
for c in r:
print(c,end = " ")
print()
OutputWhen the above code is executed, it produces the following result − 11 12 5 2 15 6 10 0 5 11 13 6 10 8 12 5 12 15 8 6 Updating ValuesWe can update the entire inner array or some specific data elements of the inner array by reassigning the values using the array index. Examplefrom array import *
T = [[11, 12, 5, 2], [15, 6,10], [10, 8, 12, 5], [12,15,8,6]]
T[2] = [11,9]
T[0][3] = 7
for r in T:
for c in r:
print(c,end = " ")
print()
OutputWhen the above code is executed, it produces the following result − 11 12 5 7 15 6 10 11 9 12 15 8 6 Deleting the ValuesWe can delete the entire inner array or some specific data elements of the inner array by reassigning the values using the del() method with index. But in case you need to remove specific data elements in one of the inner arrays, then use the update process described above. Examplefrom array import *
T = [[11, 12, 5, 2], [15, 6,10], [10, 8, 12, 5], [12,15,8,6]]
del T[3]
for r in T:
for c in r:
print(c,end = " ")
print()
OutputWhen the above code is executed, it produces the following result − 11 12 5 2 15 6 10 10 8 12 5 Python - MatrixMatrix is a special case of two dimensional array where each data element is of strictly same size. So every matrix is also a two dimensional array but not vice versa. Matrices are very important data structures for many mathematical and scientific calculations. As we have already discussed two dimnsional array data structure in the previous chapter we will be focusing on data structure operations specific to matrices in this chapter. We also be using the numpy package for matrix data manipulation. Matrix ExampleConsider the case of recording temprature for 1 week measured in the morning, mid-day, evening and mid-night. It can be presented as a 7X5 matrix using an array and the reshape method available in numpy. from numpy import * a = array([['Mon',18,20,22,17],['Tue',11,18,21,18], ['Wed',15,21,20,19],['Thu',11,20,22,21], ['Fri',18,17,23,22],['Sat',12,22,20,18], ['Sun',13,15,19,16]]) m = reshape(a,(7,5)) print(m) OutputThe above data can be represented as a two dimensional array as below − [ ['Mon' '18' '20' '22' '17'] ['Tue' '11' '18' '21' '18'] ['Wed' '15' '21' '20' '19'] ['Thu' '11' '20' '22' '21'] ['Fri' '18' '17' '23' '22'] ['Sat' '12' '22' '20' '18'] ['Sun' '13' '15' '19' '16'] ] Accessing ValuesThe data elements in a matrix can be accessed by using the indexes. The access method is same as the way data is accessed in Two dimensional array. Examplefrom numpy import *
m = array([['Mon',18,20,22,17],['Tue',11,18,21,18],
['Wed',15,21,20,19],['Thu',11,20,22,21],
['Fri',18,17,23,22],['Sat',12,22,20,18],
['Sun',13,15,19,16]])
# Print data for Wednesday
print(m[2])
# Print data for friday evening
print(m[4][3])
OutputWhen the above code is executed, it produces the following result − ['Wed', 15, 21, 20, 19] 23 Adding a rowUse the below mentioned code to add a row in a matrix. Examplefrom numpy import * m = array([['Mon',18,20,22,17],['Tue',11,18,21,18], ['Wed',15,21,20,19],['Thu',11,20,22,21], ['Fri',18,17,23,22],['Sat',12,22,20,18], ['Sun',13,15,19,16]]) m_r = append(m,[['Avg',12,15,13,11]],0) print(m_r) OutputWhen the above code is executed, it produces the following result − [ ['Mon' '18' '20' '22' '17'] ['Tue' '11' '18' '21' '18'] ['Wed' '15' '21' '20' '19'] ['Thu' '11' '20' '22' '21'] ['Fri' '18' '17' '23' '22'] ['Sat' '12' '22' '20' '18'] ['Sun' '13' '15' '19' '16'] ['Avg' '12' '15' '13' '11'] ] Adding a columnWe can add column to a matrix using the insert() method. here we have to mention the index where we want to add the column and a array containing the new values of the columns added.In the below example we add t a new column at the fifth position from the beginning. Examplefrom numpy import * m = array([['Mon',18,20,22,17],['Tue',11,18,21,18], ['Wed',15,21,20,19],['Thu',11,20,22,21], ['Fri',18,17,23,22],['Sat',12,22,20,18], ['Sun',13,15,19,16]]) m_c = insert(m,[5],[[1],[2],[3],[4],[5],[6],[7]],1) print(m_c) OutputWhen the above code is executed, it produces the following result − [ ['Mon' '18' '20' '22' '17' '1'] ['Tue' '11' '18' '21' '18' '2'] ['Wed' '15' '21' '20' '19' '3'] ['Thu' '11' '20' '22' '21' '4'] ['Fri' '18' '17' '23' '22' '5'] ['Sat' '12' '22' '20' '18' '6'] ['Sun' '13' '15' '19' '16' '7'] ] Delete a rowWe can delete a row from a matrix using the delete() method. We have to specify the index of the row and also the axis value which is 0 for a row and 1 for a column. Examplefrom numpy import * m = array([['Mon',18,20,22,17],['Tue',11,18,21,18], ['Wed',15,21,20,19],['Thu',11,20,22,21], ['Fri',18,17,23,22],['Sat',12,22,20,18], ['Sun',13,15,19,16]]) m = delete(m,[2],0) print(m) OutputWhen the above code is executed, it produces the following result − [ ['Mon' '18' '20' '22' '17'] ['Tue' '11' '18' '21' '18'] ['Thu' '11' '20' '22' '21'] ['Fri' '18' '17' '23' '22'] ['Sat' '12' '22' '20' '18'] ['Sun' '13' '15' '19' '16'] ] Delete a columnWe can delete a column from a matrix using the delete() method. We have to specify the index of the column and also the axis value which is 0 for a row and 1 for a column. Examplefrom numpy import * m = array([['Mon',18,20,22,17],['Tue',11,18,21,18], ['Wed',15,21,20,19],['Thu',11,20,22,21], ['Fri',18,17,23,22],['Sat',12,22,20,18], ['Sun',13,15,19,16]]) m = delete(m,s_[2],1) print(m) OutputWhen the above code is executed, it produces the following result − [ ['Mon' '18' '22' '17'] ['Tue' '11' '21' '18'] ['Wed' '15' '20' '19'] ['Thu' '11' '22' '21'] ['Fri' '18' '23' '22'] ['Sat' '12' '20' '18'] ['Sun' '13' '19' '16'] ] Update a rowTo update the values in the row of a matrix we simply re-assign the values at the index of the row. In the below example all the values for thrusday's data is marked as zero. The index for this row is 3. Examplefrom numpy import * m = array([['Mon',18,20,22,17],['Tue',11,18,21,18], ['Wed',15,21,20,19],['Thu',11,20,22,21], ['Fri',18,17,23,22],['Sat',12,22,20,18], ['Sun',13,15,19,16]]) m[3] = ['Thu',0,0,0,0] print(m) OutputWhen the above code is executed, it produces the following result − [ ['Mon' '18' '20' '22' '17'] ['Tue' '11' '18' '21' '18'] ['Wed' '15' '21' '20' '19'] ['Thu' '0' '0' '0' '0'] ['Fri' '18' '17' '23' '22'] ['Sat' '12' '22' '20' '18'] ['Sun' '13' '15' '19' '16'] ] Python - SetsMathematically a set is a collection of items not in any particular order. A Python set is similar to this mathematical definition with below additional conditions.
Set OperationsThe sets in python are typically used for mathematical operations like union, intersection, difference and complement etc. We can create a set, access its elements and carry out these mathematical operations as shown below. Creating a setA set is created by using the set() function or placing all the elements within a pair of curly braces. ExampleDays=set(["Mon","Tue","Wed","Thu","Fri","Sat","Sun"])
Months={"Jan","Feb","Mar"}
Dates={21,22,17}
print(Days)
print(Months)
print(Dates)
OutputWhen the above code is executed, it produces the following result. Please note how the order of the elements has changed in the result. set(['Wed', 'Sun', 'Fri', 'Tue', 'Mon', 'Thu', 'Sat']) set(['Jan', 'Mar', 'Feb']) set([17, 21, 22]) Accessing Values in a SetWe cannot access individual values in a set. We can only access all the elements together as shown above. But we can also get a list of individual elements by looping through the set. ExampleDays=set(["Mon","Tue","Wed","Thu","Fri","Sat","Sun"]) for d in Days: print(d) OutputWhen the above code is executed, it produces the following result − Wed Sun Fri Tue Mon Thu Sat Adding Items to a SetWe can add elements to a set by using add() method. Again as discussed there is no specific index attached to the newly added element. ExampleDays=set(["Mon","Tue","Wed","Thu","Fri","Sat"])
Days.add("Sun")
print(Days)
OutputWhen the above code is executed, it produces the following result − set(['Wed', 'Sun', 'Fri', 'Tue', 'Mon', 'Thu', 'Sat']) Removing Item from a SetWe can remove elements from a set by using discard() method. Again as discussed there is no specific index attached to the newly added element. ExampleDays=set(["Mon","Tue","Wed","Thu","Fri","Sat"])
Days.discard("Sun")
print(Days)
OutputWhen the above code is executed, it produces the following result. set(['Wed', 'Fri', 'Tue', 'Mon', 'Thu', 'Sat']) Union of SetsThe union operation on two sets produces a new set containing all the distinct elements from both the sets. In the below example the element Wed is present in both the sets. ExampleDaysA = set(["Mon","Tue","Wed"]) DaysB = set(["Wed","Thu","Fri","Sat","Sun"]) AllDays = DaysA|DaysB print(AllDays) OutputWhen the above code is executed, it produces the following result. Please note the result has only one wed. set(['Wed', 'Fri', 'Tue', 'Mon', 'Thu', 'Sat']) Intersection of SetsThe intersection operation on two sets produces a new set containing only the common elements from both the sets. In the below example the element Wed is present in both the sets. ExampleDaysA = set(["Mon","Tue","Wed"]) DaysB = set(["Wed","Thu","Fri","Sat","Sun"]) AllDays = DaysA & DaysB print(AllDays) OutputWhen the above code is executed, it produces the following result. Please note the result has only one wed. set(['Wed']) Difference of SetsThe difference operation on two sets produces a new set containing only the elements from the first set and none from the second set. In the below example the element Wed is present in both the sets so it will not be found in the result set. ExampleDaysA = set(["Mon","Tue","Wed"]) DaysB = set(["Wed","Thu","Fri","Sat","Sun"]) AllDays = DaysA - DaysB print(AllDays) OutputWhen the above code is executed, it produces the following result. Please note the result has only one wed. set(['Mon', 'Tue']) Compare SetsWe can check if a given set is a subset or superset of another set. The result is True or False depending on the elements present in the sets. ExampleDaysA = set(["Mon","Tue","Wed"]) DaysB = set(["Mon","Tue","Wed","Thu","Fri","Sat","Sun"]) SubsetRes = DaysA <= DaysB SupersetRes = DaysB >= DaysA print(SubsetRes) print(SupersetRes) OutputWhen the above code is executed, it produces the following result − True True Python - MapsPython Maps also called ChainMap is a type of data structure to manage multiple dictionaries together as one unit. The combined dictionary contains the key and value pairs in a specific sequence eliminating any duplicate keys. The best use of ChainMap is to search through multiple dictionaries at a time and get the proper key-value pair mapping. We also see that these ChainMaps behave as stack data structure. Creating a ChainMapWe create two dictionaries and club them using the ChainMap method from the collections library. Then we print the keys and values of the result of the combination of the dictionaries. If there are duplicate keys, then only the value from the first key is preserved. Exampleimport collections
dict1 = {'day1': 'Mon', 'day2': 'Tue'}
dict2 = {'day3': 'Wed', 'day1': 'Thu'}
res = collections.ChainMap(dict1, dict2)
# Creating a single dictionary
print(res.maps,'\n')
print('Keys = {}'.format(list(res.keys())))
print('Values = {}'.format(list(res.values())))
print()
# Print all the elements from the result
print('elements:')
for key, val in res.items():
print('{} = {}'.format(key, val))
print()
# Find a specific value in the result
print('day3 in res: {}'.format(('day1' in res)))
print('day4 in res: {}'.format(('day4' in res)))
OutputWhen the above code is executed, it produces the following result − [{'day1': 'Mon', 'day2': 'Tue'}, {'day1': 'Thu', 'day3': 'Wed'}]
Keys = ['day1', 'day3', 'day2']
Values = ['Mon', 'Wed', 'Tue']
elements:
day1 = Mon
day3 = Wed
day2 = Tue
day3 in res: True
day4 in res: False
Map ReorderingIf we change the order the dictionaries while clubbing them in the above example we see that the position of the elements get interchanged as if they are in a continuous chain. This again shows the behavior of Maps as stacks. Exampleimport collections
dict1 = {'day1': 'Mon', 'day2': 'Tue'}
dict2 = {'day3': 'Wed', 'day4': 'Thu'}
res1 = collections.ChainMap(dict1, dict2)
print(res1.maps,'\n')
res2 = collections.ChainMap(dict2, dict1)
print(res2.maps,'\n')
OutputWhen the above code is executed, it produces the following result − [{'day1': 'Mon', 'day2': 'Tue'}, {'day3': 'Wed', 'day4': 'Thu'}]
[{'day3': 'Wed', 'day4': 'Thu'}, {'day1': 'Mon', 'day2': 'Tue'}]
Updating MapWhen the element of the dictionary is updated, the result is instantly updated in the result of the ChainMap. In the below example we see that the new updated value reflects in the result without explicitly applying the ChainMap method again. Exampleimport collections
dict1 = {'day1': 'Mon', 'day2': 'Tue'}
dict2 = {'day3': 'Wed', 'day4': 'Thu'}
res = collections.ChainMap(dict1, dict2)
print(res.maps,'\n')
dict2['day4'] = 'Fri'
print(res.maps,'\n')
OutputWhen the above code is executed, it produces the following result − [{'day1': 'Mon', 'day2': 'Tue'}, {'day3': 'Wed', 'day4': 'Thu'}]
[{'day1': 'Mon', 'day2': 'Tue'}, {'day3': 'Wed', 'day4': 'Fri'}]
Python - Linked ListsA linked list is a sequence of data elements, which are connected together via links. Each data element contains a connection to another data element in form of a pointer. Python does not have linked lists in its standard library. We implement the concept of linked lists using the concept of nodes as discussed in the previous chapter. We have already seen how we create a node class and how to traverse the elements of a node.In this chapter we are going to study the types of linked lists known as singly linked lists. In this type of data structure there is only one link between any two data elements. We create such a list and create additional methods to insert, update and remove elements from the list. Creation of Linked listA linked list is created by using the node class we studied in the last chapter. We create a Node object and create another class to use this ode object. We pass the appropriate values through the node object to point the to the next data elements. The below program creates the linked list with three data elements. In the next section we will see how to traverse the linked list. class Node:
def __init__(self, dataval=None):
self.dataval = dataval
self.nextval = None
class SLinkedList:
def __init__(self):
self.headval = None
list1 = SLinkedList()
list1.headval = Node("Mon")
e2 = Node("Tue")
e3 = Node("Wed")
# Link first Node to second node
list1.headval.nextval = e2
# Link second Node to third node
e2.nextval = e3
Traversing a Linked ListSingly linked lists can be traversed in only forward direction starting form the first data element. We simply print the value of the next data element by assigning the pointer of the next node to the current data element. Exampleclass Node:
def __init__(self, dataval=None):
self.dataval = dataval
self.nextval = None
class SLinkedList:
def __init__(self):
self.headval = None
def listprint(self):
printval = self.headval
while printval is not None:
print (printval.dataval)
printval = printval.nextval
list = SLinkedList()
list.headval = Node("Mon")
e2 = Node("Tue")
e3 = Node("Wed")
# Link first Node to second node
list.headval.nextval = e2
# Link second Node to third node
e2.nextval = e3
list.listprint()
OutputWhen the above code is executed, it produces the following result − Mon Tue Wed Insertion in a Linked ListInserting element in the linked list involves reassigning the pointers from the existing nodes to the newly inserted node. Depending on whether the new data element is getting inserted at the beginning or at the middle or at the end of the linked list, we have the below scenarios. Inserting at the BeginningThis involves pointing the next pointer of the new data node to the current head of the linked list. So the current head of the linked list becomes the second data element and the new node becomes the head of the linked list. Exampleclass Node:
def __init__(self, dataval=None):
self.dataval = dataval
self.nextval = None
class SLinkedList:
def __init__(self):
self.headval = None
# Print the linked list
def listprint(self):
printval = self.headval
while printval is not None:
print (printval.dataval)
printval = printval.nextval
def AtBegining(self,newdata):
NewNode = Node(newdata)
# Update the new nodes next val to existing node
NewNode.nextval = self.headval
self.headval = NewNode
list = SLinkedList()
list.headval = Node("Mon")
e2 = Node("Tue")
e3 = Node("Wed")
list.headval.nextval = e2
e2.nextval = e3
list.AtBegining("Sun")
list.listprint()
OutputWhen the above code is executed, it produces the following result − Sun Mon Tue Wed Inserting at the EndThis involves pointing the next pointer of the the current last node of the linked list to the new data node. So the current last node of the linked list becomes the second last data node and the new node becomes the last node of the linked list. Exampleclass Node:
def __init__(self, dataval=None):
self.dataval = dataval
self.nextval = None
class SLinkedList:
def __init__(self):
self.headval = None
# Function to add newnode
def AtEnd(self, newdata):
NewNode = Node(newdata)
if self.headval is None:
self.headval = NewNode
return
laste = self.headval
while(laste.nextval):
laste = laste.nextval
laste.nextval=NewNode
# Print the linked list
def listprint(self):
printval = self.headval
while printval is not None:
print (printval.dataval)
printval = printval.nextval
list = SLinkedList()
list.headval = Node("Mon")
e2 = Node("Tue")
e3 = Node("Wed")
list.headval.nextval = e2
e2.nextval = e3
list.AtEnd("Thu")
list.listprint()
OutputWhen the above code is executed, it produces the following result − Mon Tue Wed Thu Inserting in between two Data NodesThis involves changing the pointer of a specific node to point to the new node. That is possible by passing in both the new node and the existing node after which the new node will be inserted. So we define an additional class which will change the next pointer of the new node to the next pointer of middle node. Then assign the new node to next pointer of the middle node. class Node:
def __init__(self, dataval=None):
self.dataval = dataval
self.nextval = None
class SLinkedList:
def __init__(self):
self.headval = None
# Function to add node
def Inbetween(self,middle_node,newdata):
if middle_node is None:
print("The mentioned node is absent")
return
NewNode = Node(newdata)
NewNode.nextval = middle_node.nextval
middle_node.nextval = NewNode
# Print the linked list
def listprint(self):
printval = self.headval
while printval is not None:
print (printval.dataval)
printval = printval.nextval
list = SLinkedList()
list.headval = Node("Mon")
e2 = Node("Tue")
e3 = Node("Thu")
list.headval.nextval = e2
e2.nextval = e3
list.Inbetween(list.headval.nextval,"Fri")
list.listprint()
OutputWhen the above code is executed, it produces the following result − Mon Tue Fri Thu Removing an ItemWe can remove an existing node using the key for that node. In the below program we locate the previous node of the node which is to be deleted.Then, point the next pointer of this node to the next node of the node to be deleted. Exampleclass Node:
def __init__(self, data=None):
self.data = data
self.next = None
class SLinkedList:
def __init__(self):
self.head = None
def Atbegining(self, data_in):
NewNode = Node(data_in)
NewNode.next = self.head
self.head = NewNode
# Function to remove node
def RemoveNode(self, Removekey):
HeadVal = self.head
if (HeadVal is not None):
if (HeadVal.data == Removekey):
self.head = HeadVal.next
HeadVal = None
return
while (HeadVal is not None):
if HeadVal.data == Removekey:
break
prev = HeadVal
HeadVal = HeadVal.next
if (HeadVal == None):
return
prev.next = HeadVal.next
HeadVal = None
def LListprint(self):
printval = self.head
while (printval):
print(printval.data),
printval = printval.next
llist = SLinkedList()
llist.Atbegining("Mon")
llist.Atbegining("Tue")
llist.Atbegining("Wed")
llist.Atbegining("Thu")
llist.RemoveNode("Tue")
llist.LListprint()
OutputWhen the above code is executed, it produces the following result − Thu Wed Mon Python - StackIn the english dictionary the word stack means arranging objects on over another. It is the same way memory is allocated in this data structure. It stores the data elements in a similar fashion as a bunch of plates are stored one above another in the kitchen. So stack data strcuture allows operations at one end wich can be called top of the stack.We can add elements or remove elements only form this en dof the stack. In a stack the element insreted last in sequence will come out first as we can remove only from the top of the stack. Such feature is known as Last in First Out(LIFO) feature. The operations of adding and removing the elements is known as PUSH and POP. In the following program we implement it as add and and remove functions. We declare an empty list and use the append() and pop() methods to add and remove the data elements. PUSH into a StackLet us understand, how to use PUSH in Stack. Refer the program mentioned program below − Exampleclass Stack:
def __init__(self):
self.stack = []
def add(self, dataval):
# Use list append method to add element
if dataval not in self.stack:
self.stack.append(dataval)
return True
else:
return False
# Use peek to look at the top of the stack
def peek(self):
return self.stack[-1]
AStack = Stack()
AStack.add("Mon")
AStack.add("Tue")
AStack.peek()
print(AStack.peek())
AStack.add("Wed")
AStack.add("Thu")
print(AStack.peek())
OutputWhen the above code is executed, it produces the following result − Tue Thu POP from a StackAs we know we can remove only the top most data element from the stack, we implement a python program which does that. The remove function in the following program returns the top most element. we check the top element by calculating the size of the stack first and then use the in-built pop() method to find out the top most element. class Stack:
def __init__(self):
self.stack = []
def add(self, dataval):
# Use list append method to add element
if dataval not in self.stack:
self.stack.append(dataval)
return True
else:
return False
# Use list pop method to remove element
def remove(self):
if len(self.stack) <= 0:
return ("No element in the Stack")
else:
return self.stack.pop()
AStack = Stack()
AStack.add("Mon")
AStack.add("Tue")
AStack.add("Wed")
AStack.add("Thu")
print(AStack.remove())
print(AStack.remove())
OutputWhen the above code is executed, it produces the following result − Thu Wed Python - QueueWe are familiar with queue in our day to day life as we wait for a service. The queue data structure aslo means the same where the data elements are arranged in a queue. The uniqueness of queue lies in the way items are added and removed. The items are allowed at on end but removed form the other end. So it is a First-in-First out method. A queue can be implemented using python list where we can use the insert() and pop() methods to add and remove elements. Their is no insertion as data elements are always added at the end of the queue. Adding ElementsIn the below example we create a queue class where we implement the First-in-First-Out method. We use the in-built insert method for adding data elements. Exampleclass Queue:
def __init__(self):
self.queue = list()
def addtoq(self,dataval):
# Insert method to add element
if dataval not in self.queue:
self.queue.insert(0,dataval)
return True
return False
def size(self):
return len(self.queue)
TheQueue = Queue()
TheQueue.addtoq("Mon")
TheQueue.addtoq("Tue")
TheQueue.addtoq("Wed")
print(TheQueue.size())
OutputWhen the above code is executed, it produces the following result − 3 Removing ElementIn the below example we create a queue class where we insert the data and then remove the data using the in-built pop method. Exampleclass Queue:
def __init__(self):
self.queue = list()
def addtoq(self,dataval):
# Insert method to add element
if dataval not in self.queue:
self.queue.insert(0,dataval)
return True
return False
# Pop method to remove element
def removefromq(self):
if len(self.queue)>0:
return self.queue.pop()
return ("No elements in Queue!")
TheQueue = Queue()
TheQueue.addtoq("Mon")
TheQueue.addtoq("Tue")
TheQueue.addtoq("Wed")
print(TheQueue.removefromq())
print(TheQueue.removefromq())
OutputWhen the above code is executed, it produces the following result − Mon Tue Python - DequeueA double-ended queue, or deque, supports adding and removing elements from either end. The more commonly used stacks and queues are degenerate forms of deques, where the inputs and outputs are restricted to a single end. Exampleimport collections
DoubleEnded = collections.deque(["Mon","Tue","Wed"])
DoubleEnded.append("Thu")
print ("Appended at right - ")
print (DoubleEnded)
DoubleEnded.appendleft("Sun")
print ("Appended at right at left is - ")
print (DoubleEnded)
DoubleEnded.pop()
print ("Deleting from right - ")
print (DoubleEnded)
DoubleEnded.popleft()
print ("Deleting from left - ")
print (DoubleEnded)
OutputWhen the above code is executed, it produces the following result − Appended at right - deque(['Mon', 'Tue', 'Wed', 'Thu']) Appended at right at left is - deque(['Sun', 'Mon', 'Tue', 'Wed', 'Thu']) Deleting from right - deque(['Sun', 'Mon', 'Tue', 'Wed']) Deleting from left - deque(['Mon', 'Tue', 'Wed']) Python - Advanced Linked listWe have already seen Linked List in earlier chapter in which it is possible only to travel forward. In this chapter we see another type of linked list in which it is possible to travel both forward and backward. Such a linked list is called Doubly Linked List. Following is the features of doubly linked list.
Creating Doubly linked listWe create a Doubly Linked list by using the Node class. Now we use the same approach as used in the Singly Linked List but the head and next pointers will be used for proper assignation to create two links in each of the nodes in addition to the data present in the node. Exampleclass Node:
def __init__(self, data):
self.data = data
self.next = None
self.prev = None
class doubly_linked_list:
def __init__(self):
self.head = None
# Adding data elements
def push(self, NewVal):
NewNode = Node(NewVal)
NewNode.next = self.head
if self.head is not None:
self.head.prev = NewNode
self.head = NewNode
# Print the Doubly Linked list
def listprint(self, node):
while (node is not None):
print(node.data),
last = node
node = node.next
dllist = doubly_linked_list()
dllist.push(12)
dllist.push(8)
dllist.push(62)
dllist.listprint(dllist.head)
OutputWhen the above code is executed, it produces the following result − 62 8 12 Inserting into Doubly Linked ListHere, we are going to see how to insert a node to the Doubly Link List using the following program. The program uses a method named insert which inserts the new node at the third position from the head of the doubly linked list. Example# Create the Node class
class Node:
def __init__(self, data):
self.data = data
self.next = None
self.prev = None
# Create the doubly linked list
class doubly_linked_list:
def __init__(self):
self.head = None
# Define the push method to add elements
def push(self, NewVal):
NewNode = Node(NewVal)
NewNode.next = self.head
if self.head is not None:
self.head.prev = NewNode
self.head = NewNode
# Define the insert method to insert the element
def insert(self, prev_node, NewVal):
if prev_node is None:
return
NewNode = Node(NewVal)
NewNode.next = prev_node.next
prev_node.next = NewNode
NewNode.prev = prev_node
if NewNode.next is not None:
NewNode.next.prev = NewNode
# Define the method to print the linked list
def listprint(self, node):
while (node is not None):
print(node.data),
last = node
node = node.next
dllist = doubly_linked_list()
dllist.push(12)
dllist.push(8)
dllist.push(62)
dllist.insert(dllist.head.next, 13)
dllist.listprint(dllist.head)
OutputWhen the above code is executed, it produces the following result − 62 8 13 12 Appending to a Doubly linked listAppending to a doubly linked list will add the element at the end. Example# Create the node class
class Node:
def __init__(self, data):
self.data = data
self.next = None
self.prev = None
# Create the doubly linked list class
class doubly_linked_list:
def __init__(self):
self.head = None
# Define the push method to add elements at the begining
def push(self, NewVal):
NewNode = Node(NewVal)
NewNode.next = self.head
if self.head is not None:
self.head.prev = NewNode
self.head = NewNode
# Define the append method to add elements at the end
def append(self, NewVal):
NewNode = Node(NewVal)
NewNode.next = None
if self.head is None:
NewNode.prev = None
self.head = NewNode
return
last = self.head
while (last.next is not None):
last = last.next
last.next = NewNode
NewNode.prev = last
return
# Define the method to print
def listprint(self, node):
while (node is not None):
print(node.data),
last = node
node = node.next
dllist = doubly_linked_list()
dllist.push(12)
dllist.append(9)
dllist.push(8)
dllist.push(62)
dllist.append(45)
dllist.listprint(dllist.head)
OutputWhen the above code is executed, it produces the following result − 62 8 12 9 45 Please note the position of the elements 9 and 45 for the append operation. Python - Hash TableHash tables are a type of data structure in which the address or the index value of the data element is generated from a hash function. That makes accessing the data faster as the index value behaves as a key for the data value. In other words Hash table stores key-value pairs but the key is generated through a hashing function. So the search and insertion function of a data element becomes much faster as the key values themselves become the index of the array which stores the data. In Python, the Dictionary data types represent the implementation of hash tables. The Keys in the dictionary satisfy the following requirements.
So we see the implementation of hash table by using the dictionary data types as below. Accessing Values in DictionaryTo access dictionary elements, you can use the familiar square brackets along with the key to obtain its value. Example# Declare a dictionary
dict = {'Name': 'Zara', 'Age': 7, 'Class': 'First'}
# Accessing the dictionary with its key
print ("dict['Name']: ", dict['Name'])
print ("dict['Age']: ", dict['Age'])
OutputWhen the above code is executed, it produces the following result − dict['Name']: Zara dict['Age']: 7 Updating DictionaryYou can update a dictionary by adding a new entry or a key-value pair, modifying an existing entry, or deleting an existing entry as shown below in the simple example − Example# Declare a dictionary
dict = {'Name': 'Zara', 'Age': 7, 'Class': 'First'}
dict['Age'] = 8; # update existing entry
dict['School'] = "DPS School"; # Add new entry
print ("dict['Age']: ", dict['Age'])
print ("dict['School']: ", dict['School'])
OutputWhen the above code is executed, it produces the following result − dict['Age']: 8 dict['School']: DPS School Delete Dictionary ElementsYou can either remove individual dictionary elements or clear the entire contents of a dictionary. You can also delete entire dictionary in a single operation.To explicitly remove an entire dictionary, just use the del statement. Exampledict = {'Name': 'Zara', 'Age': 7, 'Class': 'First'}
del dict['Name']; # remove entry with key 'Name'
dict.clear(); # remove all entries in dict
del dict ; # delete entire dictionary
print ("dict['Age']: ", dict['Age'])
print ("dict['School']: ", dict['School'])
OutputThis produces the following result. Note that an exception is raised because after del dict dictionary does not exist anymore. dict['Age']: dict['Age'] dict['School']: dict['School'] Python - Binary TreeTree represents the nodes connected by edges. It is a non-linear data structure. It has the following properties −
We create a tree data structure in python by using the concept os node discussed earlier. We designate one node as root node and then add more nodes as child nodes. Below is program to create the root node. Create RootWe just create a Node class and add assign a value to the node. This becomes tree with only a root node. Exampleclass Node:
def __init__(self, data):
self.left = None
self.right = None
self.data = data
def PrintTree(self):
print(self.data)
root = Node(10)
root.PrintTree()
OutputWhen the above code is executed, it produces the following result − 10 Inserting into a TreeTo insert into a tree we use the same node class created above and add a insert class to it. The insert class compares the value of the node to the parent node and decides to add it as a left node or a right node. Finally the PrintTree class is used to print the tree. Exampleclass Node:
def __init__(self, data):
self.left = None
self.right = None
self.data = data
def insert(self, data):
# Compare the new value with the parent node
if self.data:
if data self.data:
if self.right is None:
self.right = Node(data)
else:
self.right.insert(data)
else:
self.data = data
# Print the tree
def PrintTree(self):
if self.left:
self.left.PrintTree()
print( self.data),
if self.right:
self.right.PrintTree()
# Use the insert method to add nodes
root = Node(12)
root.insert(6)
root.insert(14)
root.insert(3)
root.PrintTree()
OutputWhen the above code is executed, it produces the following result − 3 6 12 14 Traversing a TreeThe tree can be traversed by deciding on a sequence to visit each node. As we can clearly see we can start at a node then visit the left sub-tree first and right sub-tree next. Or we can also visit the right sub-tree first and left sub-tree next. Accordingly there are different names for these tree traversal methods. Tree Traversal AlgorithmsTraversal is a process to visit all the nodes of a tree and may print their values too. Because, all nodes are connected via edges (links) we always start from the root (head) node. That is, we cannot randomly access a node in a tree. There are three ways which we use to traverse a tree.
In-order TraversalIn this traversal method, the left subtree is visited first, then the root and later the right sub-tree. We should always remember that every node may represent a subtree itself. In the below python program, we use the Node class to create place holders for the root node as well as the left and right nodes. Then, we create an insert function to add data to the tree. Finally, the In-order traversal logic is implemented by creating an empty list and adding the left node first followed by the root or parent node. At last the left node is added to complete the In-order traversal. Please note that this process is repeated for each sub-tree until all the nodes are traversed. Exampleclass Node:
def __init__(self, data):
self.left = None
self.right = None
self.data = data
# Insert Node
def insert(self, data):
if self.data:
if data < self.data:
if self.left is None:
self.left = Node(data)
else:
self.left.insert(data)
else data > self.data:
if self.right is None:
self.right = Node(data)
else:
self.right.insert(data)
else:
self.data = data
# Print the Tree
def PrintTree(self):
if self.left:
self.left.PrintTree()
print( self.data),
if self.right:
self.right.PrintTree()
# Inorder traversal
# Left -> Root -> Right
def inorderTraversal(self, root):
res = []
if root:
res = self.inorderTraversal(root.left)
res.append(root.data)
res = res + self.inorderTraversal(root.right)
return res
root = Node(27)
root.insert(14)
root.insert(35)
root.insert(10)
root.insert(19)
root.insert(31)
root.insert(42)
print(root.inorderTraversal(root))
OutputWhen the above code is executed, it produces the following result − [10, 14, 19, 27, 31, 35, 42] Pre-order TraversalIn this traversal method, the root node is visited first, then the left subtree and finally the right subtree. In the below python program, we use the Node class to create place holders for the root node as well as the left and right nodes. Then, we create an insert function to add data to the tree. Finally, the Pre-order traversal logic is implemented by creating an empty list and adding the root node first followed by the left node. At last, the right node is added to complete the Pre-order traversal. Please note that, this process is repeated for each sub-tree until all the nodes are traversed. Exampleclass Node:
def __init__(self, data):
self.left = None
self.right = None
self.data = data
# Insert Node
def insert(self, data):
if self.data:
if data < self.data:
if self.left is None:
self.left = Node(data)
else:
self.left.insert(data)
elif data > self.data:
if self.right is None:
self.right = Node(data)
else:
self.right.insert(data)
else:
self.data = data
# Print the Tree
def PrintTree(self):
if self.left:
self.left.PrintTree()
print( self.data),
if self.right:
self.right.PrintTree()
# Preorder traversal
# Root -> Left ->Right
def PreorderTraversal(self, root):
res = []
if root:
res.append(root.data)
res = res + self.PreorderTraversal(root.left)
res = res + self.PreorderTraversal(root.right)
return res
root = Node(27)
root.insert(14)
root.insert(35)
root.insert(10)
root.insert(19)
root.insert(31)
root.insert(42)
print(root.PreorderTraversal(root))
OutputWhen the above code is executed, it produces the following result − [27, 14, 10, 19, 35, 31, 42] Post-order TraversalIn this traversal method, the root node is visited last, hence the name. First, we traverse the left subtree, then the right subtree and finally the root node. In the below python program, we use the Node class to create place holders for the root node as well as the left and right nodes. Then, we create an insert function to add data to the tree. Finally, the Post-order traversal logic is implemented by creating an empty list and adding the left node first followed by the right node. At last the root or parent node is added to complete the Post-order traversal. Please note that, this process is repeated for each sub-tree until all the nodes are traversed. Exampleclass Node:
def __init__(self, data):
self.left = None
self.right = None
self.data = data
# Insert Node
def insert(self, data):
if self.data:
if data < self.data:
if self.left is None:
self.left = Node(data)
else:
self.left.insert(data)
else if data > self.data:
if self.right is None:
self.right = Node(data)
else:
self.right.insert(data)
else:
self.data = data
# Print the Tree
def PrintTree(self):
if self.left:
self.left.PrintTree()
print( self.data),
if self.right:
self.right.PrintTree()
# Postorder traversal
# Left ->Right -> Root
def PostorderTraversal(self, root):
res = []
if root:
res = self.PostorderTraversal(root.left)
res = res + self.PostorderTraversal(root.right)
res.append(root.data)
return res
root = Node(27)
root.insert(14)
root.insert(35)
root.insert(10)
root.insert(19)
root.insert(31)
root.insert(42)
print(root.PostorderTraversal(root))
OutputWhen the above code is executed, it produces the following result − [10, 19, 14, 31, 42, 35, 27] Python - Search TreeA Binary Search Tree (BST) is a tree in which all the nodes follow the below-mentioned properties.The left sub-tree of a node has a key less than or equal to its parent node's key.The right sub-tree of a node has a key greater than to its parent node's key.Thus, BST divides all its sub-trees into two segments; the left sub-tree and the right sub-tree left_subtree (keys) node (key) right_subtree (keys) Search for a value in a B-treeSearching for a value in a tree involves comparing the incoming value with the value exiting nodes. Here also we traverse the nodes from left to right and then finally with the parent. If the searched for value does not match any of the exiting value, then we return not found message, or else the found message is returned. Exampleclass Node:
def __init__(self, data):
self.left = None
self.right = None
self.data = data
# Insert method to create nodes
def insert(self, data):
if self.data:
if data < self.data:
if self.left is None:
self.left = Node(data)
else:
self.left.insert(data)
else data > self.data:
if self.right is None:
self.right = Node(data)
else:
self.right.insert(data)
else:
self.data = data
# findval method to compare the value with nodes
def findval(self, lkpval):
if lkpval < self.data:
if self.left is None:
return str(lkpval)+" Not Found"
return self.left.findval(lkpval)
else if lkpval > self.data:
if self.right is None:
return str(lkpval)+" Not Found"
return self.right.findval(lkpval)
else:
print(str(self.data) + ' is found')
# Print the tree
def PrintTree(self):
if self.left:
self.left.PrintTree()
print( self.data),
if self.right:
self.right.PrintTree()
root = Node(12)
root.insert(6)
root.insert(14)
root.insert(3)
print(root.findval(7))
print(root.findval(14))
OutputWhen the above code is executed, it produces the following result − 7 Not Found 14 is found Python - HeapsHeap is a special tree structure in which each parent node is less than or equal to its child node. Then it is called a Min Heap. If each parent node is greater than or equal to its child node then it is called a max heap. It is very useful is implementing priority queues where the queue item with higher weightage is given more priority in processing. A detailed discussion on heaps is available in our website here. Please study it first if you are new to heap data structure. In this chapter we will see the implementation of heap data structure using python. Create a HeapA heap is created by using pythons inbuilt library named heapq. This library has the relevant functions to carry out various operations on heap data structure. Below is a list of these functions.
Creating a HeapA heap is created by simply using a list of elements with the heapify function. In the below example we supply a list of elements and the heapify function rearranges the elements bringing the smallest element to the first position. Exampleimport heapq H = [21,1,45,78,3,5] # Use heapify to rearrange the elements heapq.heapify(H) print(H) OutputWhen the above code is executed, it produces the following result − [1, 3, 5, 78, 21, 45] Inserting into heapInserting a data element to a heap always adds the element at the last index. But you can apply heapify function again to bring the newly added element to the first index only if it smallest in value. In the below example we insert the number 8. Exampleimport heapq H = [21,1,45,78,3,5] # Covert to a heap heapq.heapify(H) print(H) # Add element heapq.heappush(H,8) print(H) OutputWhen the above code is executed, it produces the following result − [1, 3, 5, 78, 21, 45] [1, 3, 5, 78, 21, 45, 8] Removing from heapYou can remove the element at first index by using this function. In the below example the function will always remove the element at the index position 1. Exampleimport heapq H = [21,1,45,78,3,5] # Create the heap heapq.heapify(H) print(H) # Remove element from the heap heapq.heappop(H) print(H) OutputWhen the above code is executed, it produces the following result − [1, 3, 5, 78, 21, 45] [3, 21, 5, 78, 45] Replacing in a HeapThe heap replace function always removes the smallest element of the heap and inserts the new incoming element at some place not fixed by any order. Exampleimport heapq H = [21,1,45,78,3,5] # Create the heap heapq.heapify(H) print(H) # Replace an element heapq.heapreplace(H,6) print(H) OutputWhen the above code is executed, it produces the following result − [1, 3, 5, 78, 21, 45] [3, 6, 5, 78, 21, 45] Python - GraphsA graph is a pictorial representation of a set of objects where some pairs of objects are connected by links. The interconnected objects are represented by points termed as vertices, and the links that connect the vertices are called edges. The various terms and functionalities associated with a graph is described in great detail in our tutorial here. In this chapter we are going to see how to create a graph and add various data elements to it using a python program. Following are the basic operations we perform on graphs.
A graph can be easily presented using the python dictionary data types. We represent the vertices as the keys of the dictionary and the connection between the vertices also called edges as the values in the dictionary. Take a look at the following graph − 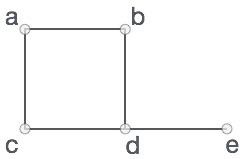
In the above graph, V = {a, b, c, d, e}
E = {ab, ac, bd, cd, de}
ExampleWe can present this graph in a python program as below − # Create the dictionary with graph elements
graph = {
"a" : ["b","c"],
"b" : ["a", "d"],
"c" : ["a", "d"],
"d" : ["e"],
"e" : ["d"]
}
# Print the graph
print(graph)
OutputWhen the above code is executed, it produces the following result − {'c': ['a', 'd'], 'a': ['b', 'c'], 'e': ['d'], 'd': ['e'], 'b': ['a', 'd']}
Display graph verticesTo display the graph vertices we simple find the keys of the graph dictionary. We use the keys() method. class graph:
def __init__(self,gdict=None):
if gdict is None:
gdict = []
self.gdict = gdict
# Get the keys of the dictionary
def getVertices(self):
return list(self.gdict.keys())
# Create the dictionary with graph elements
graph_elements = {
"a" : ["b","c"],
"b" : ["a", "d"],
"c" : ["a", "d"],
"d" : ["e"],
"e" : ["d"]
}
g = graph(graph_elements)
print(g.getVertices())
OutputWhen the above code is executed, it produces the following result − ['d', 'b', 'e', 'c', 'a'] Display graph edgesFinding the graph edges is little tricker than the vertices as we have to find each of the pairs of vertices which have an edge in between them. So we create an empty list of edges then iterate through the edge values associated with each of the vertices. A list is formed containing the distinct group of edges found from the vertices. class graph:
def __init__(self,gdict=None):
if gdict is None:
gdict = {}
self.gdict = gdict
def edges(self):
return self.findedges()
# Find the distinct list of edges
def findedges(self):
edgename = []
for vrtx in self.gdict:
for nxtvrtx in self.gdict[vrtx]:
if {nxtvrtx, vrtx} not in edgename:
edgename.append({vrtx, nxtvrtx})
return edgename
# Create the dictionary with graph elements
graph_elements = {
"a" : ["b","c"],
"b" : ["a", "d"],
"c" : ["a", "d"],
"d" : ["e"],
"e" : ["d"]
}
g = graph(graph_elements)
print(g.edges())
OutputWhen the above code is executed, it produces the following result − [{'b', 'a'}, {'b', 'd'}, {'e', 'd'}, {'a', 'c'}, {'c', 'd'}]
Adding a vertexAdding a vertex is straight forward where we add another additional key to the graph dictionary. Exampleclass graph:
def __init__(self,gdict=None):
if gdict is None:
gdict = {}
self.gdict = gdict
def getVertices(self):
return list(self.gdict.keys())
# Add the vertex as a key
def addVertex(self, vrtx):
if vrtx not in self.gdict:
self.gdict[vrtx] = []
# Create the dictionary with graph elements
graph_elements = {
"a" : ["b","c"],
"b" : ["a", "d"],
"c" : ["a", "d"],
"d" : ["e"],
"e" : ["d"]
}
g = graph(graph_elements)
g.addVertex("f")
print(g.getVertices())
OutputWhen the above code is executed, it produces the following result − ['a', 'b', 'c', 'd', 'e','f'] Adding an edgeAdding an edge to an existing graph involves treating the new vertex as a tuple and validating if the edge is already present. If not then the edge is added. class graph:
def __init__(self,gdict=None):
if gdict is None:
gdict = {}
self.gdict = gdict
def edges(self):
return self.findedges()
# Add the new edge
def AddEdge(self, edge):
edge = set(edge)
(vrtx1, vrtx2) = tuple(edge)
if vrtx1 in self.gdict:
self.gdict[vrtx1].append(vrtx2)
else:
self.gdict[vrtx1] = [vrtx2]
# List the edge names
def findedges(self):
edgename = []
for vrtx in self.gdict:
for nxtvrtx in self.gdict[vrtx]:
if {nxtvrtx, vrtx} not in edgename:
edgename.append({vrtx, nxtvrtx})
return edgename
# Create the dictionary with graph elements
graph_elements = {
"a" : ["b","c"],
"b" : ["a", "d"],
"c" : ["a", "d"],
"d" : ["e"],
"e" : ["d"]
}
g = graph(graph_elements)
g.AddEdge({'a','e'})
g.AddEdge({'a','c'})
print(g.edges())
OutputWhen the above code is executed, it produces the following result − [{'e', 'd'}, {'b', 'a'}, {'b', 'd'}, {'a', 'c'}, {'a', 'e'}, {'c', 'd'}]
Python - Algorithm DesignAlgorithm is a step-by-step procedure, which defines a set of instructions to be executed in a certain order to get the desired output. Algorithms are generally created independent of underlying languages, i.e. an algorithm can be implemented in more than one programming language. From the data structure point of view, following are some important categories of algorithms −
Characteristics of an AlgorithmNot all procedures can be called an algorithm. An algorithm should have the following characteristics −
How to Write an Algorithm?There are no well-defined standards for writing algorithms. Rather, it is problem and resource dependent. Algorithms are never written to support a particular programming code. As we know that all programming languages share basic code constructs like loops (do, for, while), flow-control (if-else), etc. These common constructs can be used to write an algorithm. We write algorithms in a step-by-step manner, but it is not always the case. Algorithm writing is a process and is executed after the problem domain is well-defined. That is, we should know the problem domain, for which we are designing a solution. ExampleLet's try to learn algorithm-writing by using an example.
step 1 − START step 2 − declare three integers a, b & c step 3 − define values of a & b step 4 − add values of a & b step 5 − store output of step 4 to c step 6 − print c step 7 − STOP Algorithms tell the programmers how to code the program. Alternatively, the algorithm can be written as − step 1 − START ADD step 2 − get values of a & b step 3 − c ← a + b step 4 − display c step 5 − STOP In design and analysis of algorithms, usually the second method is used to describe an algorithm. It makes it easy for the analyst to analyze the algorithm ignoring all unwanted definitions. He can observe what operations are being used and how the process is flowing. Writing step numbers, is optional. We design an algorithm to get a solution of a given problem. A problem can be solved in more than one ways. 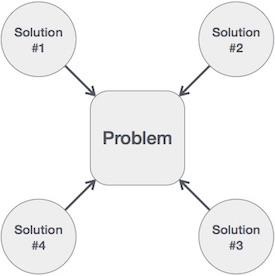
Hence, many solution algorithms can be derived for a given problem. The next step is to analyze those proposed solution algorithms and implement the best suitable solution. Python - Divide and ConquerIn divide and conquer approach, the problem in hand, is divided into smaller sub-problems and then each problem is solved independently. When we keep on dividing the subproblems into even smaller sub-problems, we may eventually reach a stage where no more division is possible. Those "atomic" smallest possible sub-problem (fractions) are solved. The solution of all sub-problems is finally merged in order to obtain the solution of an original problem. 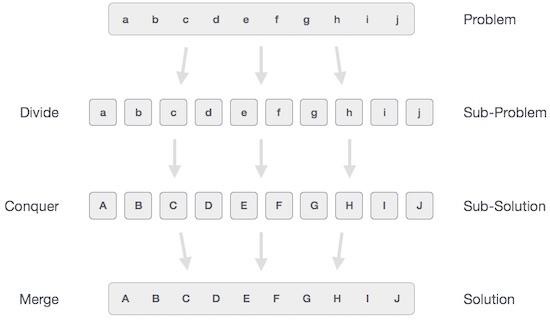
Broadly, we can understand divide-and-conquer approach in a three-step process. Divide/BreakThis step involves breaking the problem into smaller sub-problems. Sub-problems should represent a part of the original problem. This step generally takes a recursive approach to divide the problem until no sub-problem is further divisible. At this stage, sub-problems become atomic in nature but still represent some part of the actual problem. Conquer/SolveThis step receives a lot of smaller sub-problems to be solved. Generally, at this level, the problems are considered 'solved' on their own. Merge/CombineWhen the smaller sub-problems are solved, this stage recursively combines them until they formulate a solution of the original problem. This algorithmic approach works recursively and conquer &s; merge steps works so close that they appear as one. ExamplesThe following program is an example of divide-and-conquer programming approach where the binary search is implemented using python. Binary Search implementationIn binary search we take a sorted list of elements and start looking for an element at the middle of the list. If the search value matches with the middle value in the list we complete the search. Otherwise we eleminate half of the list of elements by choosing whether to procees with the right or left half of the list depending on the value of the item searched. This is possible as the list is sorted and it is much quicker than linear search.Here we divide the given list and conquer by choosing the proper half of the list. We repeat this approcah till we find the element or conclude about it's absence in the list. Exampledef bsearch(list, val):
list_size = len(list) - 1
idx0 = 0
idxn = list_size
# Find the middle most value
while idx0 <= idxn:
midval = (idx0 + idxn)// 2
if list[midval] == val:
return midval
# Compare the value the middle most value
if val > list[midval]:
idx0 = midval + 1
else:
idxn = midval - 1
if idx0 > idxn:
return None
# Initialize the sorted list
list = [2,7,19,34,53,72]
# Print the search result
print(bsearch(list,72))
print(bsearch(list,11))
OutputWhen the above code is executed, it produces the following result − 5 None Python - RecursionRecursion allows a function to call itself. Fixed steps of code get executed again and again for new values. We also have to set criteria for deciding when the recursive call ends. In the below example we see a recursive approach to the binary search. We take a sorted list and give its index range as input to the recursive function. Binary Search using RecursionWe implement the algorithm of binary search using python as shown below. We use an ordered list of items and design a recursive function to take in the list along with starting and ending index as input. Then, the binary search function calls itself till find the searched item or concludes about its absence in the list. Exampledef bsearch(list, idx0, idxn, val):
if (idxn < idx0):
return None
else:
midval = idx0 + ((idxn - idx0) // 2)
# Compare the search item with middle most value
if list[midval] > val:
return bsearch(list, idx0, midval-1,val)
else if list[midval] < val:
return bsearch(list, midval+1, idxn, val)
else:
return midval
list = [8,11,24,56,88,131]
print(bsearch(list, 0, 5, 24))
print(bsearch(list, 0, 5, 51))
OutputWhen the above code is executed, it produces the following result − 2 None Python - BacktrackingBacktracking is a form of recursion. But it involves choosing only option out of any possibilities. We begin by choosing an option and backtrack from it, if we reach a state where we conclude that this specific option does not give the required solution. We repeat these steps by going across each available option until we get the desired solution. Below is an example of finding all possible order of arrangements of a given set of letters. When we choose a pair we apply backtracking to verify if that exact pair has already been created or not. If not already created, the pair is added to the answer list else it is ignored. Exampledef permute(list, s):
if list == 1:
return s
else:
return [
y + x
for y in permute(1, s)
for x in permute(list - 1, s)
]
print(permute(1, ["a","b","c"]))
print(permute(2, ["a","b","c"]))
OutputWhen the above code is executed, it produces the following result − ['a', 'b', 'c'] ['aa', 'ab', 'ac', 'ba', 'bb', 'bc', 'ca', 'cb', 'cc'] Python - Sorting AlgorithmsSorting refers to arranging data in a particular format. Sorting algorithm specifies the way to arrange data in a particular order. Most common orders are in numerical or lexicographical order. The importance of sorting lies in the fact that data searching can be optimized to a very high level, if data is stored in a sorted manner. Sorting is also used to represent data in more readable formats. Below we see five such implementations of sorting in python.
Bubble SortIt is a comparison-based algorithm in which each pair of adjacent elements is compared and the elements are swapped if they are not in order. Exampledef bubblesort(list):
# Swap the elements to arrange in order
for iter_num in range(len(list)-1,0,-1):
for idx in range(iter_num):
if list[idx]>list[idx+1]:
temp = list[idx]
list[idx] = list[idx+1]
list[idx+1] = temp
list = [19,2,31,45,6,11,121,27]
bubblesort(list)
print(list)
OutputWhen the above code is executed, it produces the following result − [2, 6, 11, 19, 27, 31, 45, 121] Merge SortMerge sort first divides the array into equal halves and then combines them in a sorted manner. Exampledef merge_sort(unsorted_list):
if len(unsorted_list) <= 1:
return unsorted_list
# Find the middle point and devide it
middle = len(unsorted_list) // 2
left_list = unsorted_list[:middle]
right_list = unsorted_list[middle:]
left_list = merge_sort(left_list)
right_list = merge_sort(right_list)
return list(merge(left_list, right_list))
# Merge the sorted halves
def merge(left_half,right_half):
res = []
while len(left_half) != 0 and len(right_half) != 0:
if left_half[0] < right_half[0]:
res.append(left_half[0])
left_half.remove(left_half[0])
else:
res.append(right_half[0])
right_half.remove(right_half[0])
if len(left_half) == 0:
res = res + right_half
else:
res = res + left_half
return res
unsorted_list = [64, 34, 25, 12, 22, 11, 90]
print(merge_sort(unsorted_list))
OutputWhen the above code is executed, it produces the following result − [11, 12, 22, 25, 34, 64, 90] Insertion SortInsertion sort involves finding the right place for a given element in a sorted list. So in beginning we compare the first two elements and sort them by comparing them. Then we pick the third element and find its proper position among the previous two sorted elements. This way we gradually go on adding more elements to the already sorted list by putting them in their proper position. Exampledef insertion_sort(InputList):
for i in range(1, len(InputList)):
j = i-1
nxt_element = InputList[i]
# Compare the current element with next one
while (InputList[j] > nxt_element) and (j >= 0):
InputList[j+1] = InputList[j]
j=j-1
InputList[j+1] = nxt_element
list = [19,2,31,45,30,11,121,27]
insertion_sort(list)
print(list)
OutputWhen the above code is executed, it produces the following result − [19, 2, 31, 45, 30, 11, 27, 121] Shell SortShell Sort involves sorting elements which are away from each other. We sort a large sublist of a given list and go on reducing the size of the list until all elements are sorted. The below program finds the gap by equating it to half of the length of the list size and then starts sorting all elements in it. Then we keep resetting the gap until the entire list is sorted. Exampledef shellSort(input_list):
gap = len(input_list) // 2
while gap > 0:
for i in range(gap, len(input_list)):
temp = input_list[i]
j = i
# Sort the sub list for this gap
while j >= gap and input_list[j - gap] > temp:
input_list[j] = input_list[j - gap]
j = j-gap
input_list[j] = temp
# Reduce the gap for the next element
gap = gap//2
list = [19,2,31,45,30,11,121,27]
shellSort(list)
print(list)
OutputWhen the above code is executed, it produces the following result − [2, 11, 19, 27, 30, 31, 45, 121] Selection SortIn selection sort we start by finding the minimum value in a given list and move it to a sorted list. Then we repeat the process for each of the remaining elements in the unsorted list. The next element entering the sorted list is compared with the existing elements and placed at its correct position.So, at the end all the elements from the unsorted list are sorted. Exampledef selection_sort(input_list):
for idx in range(len(input_list)):
min_idx = idx
for j in range( idx +1, len(input_list)):
if input_list[min_idx] > input_list[j]:
min_idx = j
# Swap the minimum value with the compared value
input_list[idx], input_list[min_idx] = input_list[min_idx], input_list[idx]
l = [19,2,31,45,30,11,121,27]
selection_sort(l)
print(l)
OutputWhen the above code is executed, it produces the following result − [19, 2, 31, 45, 30, 11, 121, 27] Python - Searching AlgorithmsSearching is a very basic necessity when you store data in different data structures. The simplest approach is to go across every element in the data structure and match it with the value you are searching for.This is known as Linear search. It is inefficient and rarely used, but creating a program for it gives an idea about how we can implement some advanced search algorithms. Linear SearchIn this type of search, a sequential search is made over all items one by one. Every item is checked and if a match is found then that particular item is returned, otherwise the search continues till the end of the data structure. Exampledef linear_search(values, search_for):
search_at = 0
search_res = False
# Match the value with each data element
while search_at < len(values) and search_res is False:
if values[search_at] == search_for:
search_res = True
else:
search_at = search_at + 1
return search_res
l = [64, 34, 25, 12, 22, 11, 90]
print(linear_search(l, 12))
print(linear_search(l, 91))
OutputWhen the above code is executed, it produces the following result − True False Interpolation SearchThis search algorithm works on the probing position of the required value. For this algorithm to work properly, the data collection should be in a sorted form and equally distributed.Initially, the probe position is the position of the middle most item of the collection.If a match occurs, then the index of the item is returned.If the middle item is greater than the item, then the probe position is again calculated in the sub-array to the right of the middle item. Otherwise, the item is searched in the subarray to the left of the middle item. This process continues on the sub-array as well until the size of subarray reduces to zero. ExampleThere is a specific formula to calculate the middle position which is indicated in the program below − def intpolsearch(values,x ):
idx0 = 0
idxn = (len(values) - 1)
while idx0 <= idxn and x >= values[idx0] and x <= values[idxn]:
# Find the mid point
mid = idx0 +\
int(((float(idxn - idx0)/( values[idxn] - values[idx0]))
* ( x - values[idx0])))
# Compare the value at mid point with search value
if values[mid] == x:
return "Found "+str(x)+" at index "+str(mid)
if values[mid] < x:
idx0 = mid + 1
return "Searched element not in the list"
l = [2, 6, 11, 19, 27, 31, 45, 121]
print(intpolsearch(l, 2))
OutputWhen the above code is executed, it produces the following result − Found 2 at index 0 Python - Graph AlgorithmsGraphs are very useful data structures in solving many important mathematical challenges. For example computer network topology or analysing molecular structures of chemical compounds. They are also used in city traffic or route planning and even in human languages and their grammar. All these applications have a common challenge of traversing the graph using their edges and ensuring that all nodes of the graphs are visited. There are two common established methods to do this traversal which is described below. Depth First TraversalAlso called depth first search (DFS),this algorithm traverses a graph in a depth ward motion and uses a stack to remember to get the next vertex to start a search, when a dead end occurs in any iteration. We implement DFS for a graph in python using the set data types as they provide the required functionalities to keep track of visited and unvisited nodes. Exampleclass graph:
def __init__(self,gdict=None):
if gdict is None:
gdict = {}
self.gdict = gdict
# Check for the visisted and unvisited nodes
def dfs(graph, start, visited = None):
if visited is None:
visited = set()
visited.add(start)
print(start)
for next in graph[start] - visited:
dfs(graph, next, visited)
return visited
gdict = {
"a" : set(["b","c"]),
"b" : set(["a", "d"]),
"c" : set(["a", "d"]),
"d" : set(["e"]),
"e" : set(["a"])
}
dfs(gdict, 'a')
OutputWhen the above code is executed, it produces the following result − a b d e c Breadth First TraversalAlso called breadth first search (BFS),this algorithm traverses a graph breadth ward motion and uses a queue to remember to get the next vertex to start a search, when a dead end occurs in any iteration. Please visit this link in our website to understand the details of BFS steps for a graph. We implement BFS for a graph in python using queue data structure discussed earlier. When we keep visiting the adjacent unvisited nodes and keep adding it to the queue. Then we start dequeue only the node which is left with no unvisited nodes. We stop the program when there is no next adjacent node to be visited. Exampleimport collections
class graph:
def __init__(self,gdict=None):
if gdict is None:
gdict = {}
self.gdict = gdict
def bfs(graph, startnode):
# Track the visited and unvisited nodes using queue
seen, queue = set([startnode]), collections.deque([startnode])
while queue:
vertex = queue.popleft()
marked(vertex)
for node in graph[vertex]:
if node not in seen:
seen.add(node)
queue.append(node)
def marked(n):
print(n)
# The graph dictionary
gdict = {
"a" : set(["b","c"]),
"b" : set(["a", "d"]),
"c" : set(["a", "d"]),
"d" : set(["e"]),
"e" : set(["a"])
}
bfs(gdict, "a")
OutputWhen the above code is executed, it produces the following result − a c b d e Python - Algorithm AnalysisEfficiency of an algorithm can be analyzed at two different stages, before implementation and after implementation. They are the following −
Algorithm ComplexitySuppose X is an algorithm and n is the size of input data, the time and space used by the algorithm X are the two main factors, which decide the efficiency of X.
The complexity of an algorithm f(n) gives the running time and/or the storage space required by the algorithm in terms of n as the size of input data. Space ComplexitySpace complexity of an algorithm represents the amount of memory space required by the algorithm in its life cycle. The space required by an algorithm is equal to the sum of the following two components −
Space complexity S(P) of any algorithm P is S(P) = C + SP(I), where C is the fixed part and S(I) is the variable part of the algorithm, which depends on instance characteristic I. Following is a simple example that tries to explain the concept − Algorithm: SUM(A, B) Step 1 − START Step 2 − C ← A + B + 10 Step 3 − Stop Here we have three variables A, B, and C and one constant. Hence S(P) = 1 + 3. Now, space depends on data types of given variables and constant types and it will be multiplied accordingly. Time ComplexityTime complexity of an algorithm represents the amount of time required by the algorithm to run to completion. Time requirements can be defined as a numerical function T(n), where T(n) can be measured as the number of steps, provided each step consumes constant time. For example, addition of two n-bit integers takes n steps. Consequently, the total computational time is T(n) = c ∗ n, where c is the time taken for the addition of two bits. Here, we observe that T(n) grows linearly as the input size increases. Python - Algorithm TypesThe efficiency and accuracy of algorithms have to be analysed to compare them and choose a specific algorithm for certain scenarios. The process of making this analysis is called Asymptotic analysis. It refers to computing the running time of any operation in mathematical units of computation. For example, the running time of one operation is computed as f(n) and may be for another operation it is computed as g(n2). This means the first operation running time will increase linearly with the increase in n and the running time of the second operation will increase exponentially when n increases. Similarly, the running time of both operations will be nearly the same if n is significantly small. Usually, the time required by an algorithm falls under three types −
Asymptotic NotationsThe commonly used asymptotic notations to calculate the running time complexity of an algorithm.
Big Oh Notation, ΟThe notation Ο(n) is the formal way to express the upper bound of an algorithm's running time. It measures the worst case time complexity or the longest amount of time an algorithm can possibly take to complete. 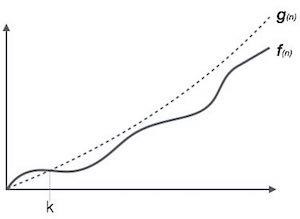
For example, for a function f(n) Ο(f(n)) = { g(n) : there exists c > 0 and n0 such that f(n) ≤ c.g(n) for all n > n0. }
Omega Notation, ΩThe notation Ω(n) is the formal way to express the lower bound of an algorithm's running time. It measures the best case time complexity or the best amount of time an algorithm can possibly take to complete. 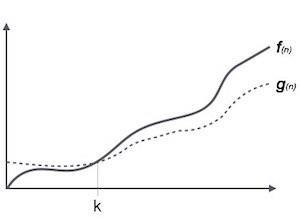
For example, for a function f(n) Ω(f(n)) ≥ { g(n) : there exists c > 0 and n0 such that g(n) ≤ c.f(n) for all n > n0. }
Theta Notation, θThe notation θ(n) is the formal way to express both the lower bound and the upper bound of an algorithm's running time. It is represented as follows − 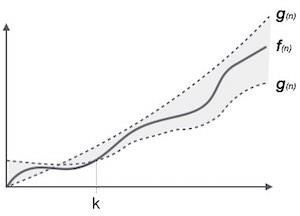
θ(f(n)) = { g(n) if and only if g(n) = Ο(f(n)) and g(n) = Ω(f(n)) for all n > n0. }
Common Asymptotic NotationsA list of some common asymptotic notations is mentioned below −
Python - Algorithm ClassesAlgorithms are unambiguous steps which should give us a well-defined output by processing zero or more inputs. This leads to many approaches in designing and writing the algorithms. It has been observed that most of the algorithms can be classified into the following categories. Greedy AlgorithmsGreedy algorithms try to find a localized optimum solution, which may eventually lead to globally optimized solutions. However, generally greedy algorithms do not provide globally optimized solutions. So greedy algorithms look for a easy solution at that point in time without considering how it impacts the future steps. It is similar to how humans solve problems without going through the complete details of the inputs provided. Most networking algorithms use the greedy approach. Here is a list of few of them −
Divide and ConquerThis class of algorithms involve dividing the given problem into smaller sub-problems and then solving each of the sub-problem independently. When the problem can not be further sub divided, we start merging the solution to each of the sub-problem to arrive at the solution for the bigger problem. The important examples of divide and conquer algorithms are −
Dynamic ProgrammingDynamic programming involves dividing the bigger problem into smaller ones but unlike divide and conquer it does not involve solving each sub-problem independently. Rather the results of smaller sub-problems are remembered and used for similar or overlapping sub-problems. Mostly, these algorithms are used for optimization. Before solving the in-hand sub-problem, dynamic algorithm will try to examine the results of the previously solved sub-problems.Dynamic algorithms are motivated for an overall optimization of the problem and not the local optimization. The important examples of Dynamic programming algorithms are −
Python - Amortized AnalysisAmortized analysis involves estimating the run time for the sequence of operations in a program without taking into consideration the span of the data distribution in the input values. A simple example is finding a value in a sorted list is quicker than in an unsorted list. If the list is already sorted, it does not matter how distributed the data is. But of course the length of the list has an impact as it decides the number of steps the algorithm has to go through to get the final result. So we see that if the initial cost of a single step of obtaining a sorted list is high, then the cost of subsequent steps of finding an element becomes considerably low. So Amortized analysis helps us find a bound on the worst-case running time for a sequence of operations. There are three approaches to amortized analysis.
In the reverse scenario it will be negative credit. To keep track of these accumulated credits, we use a stack or tree data structure. The operations which are carried out early ( like sorting the list) have high amortized cost but the operations that are late in sequence have lower amortized cost as the accumulated credit is utilized. So the amortized cost is an upper bound of actual cost. Python - Algorithm JustificationsIn order to make claims about an Algorithm being efficient we need some mathematical tools as proof. These tools help us on providing a mathematically satisfying explanation on the performance and accuracy of the algorithms. Below is a list of some of those mathematical tools which can be used for justifying one algorithm over another.

Advertisements
| ||||||||||||||||||||||||||||||||||||||||||||||||||||||||||||||||||||||||||||||||||||||||||||||||||||||
| You are visitor 01402503 — GeezerVison does not store the pages you look up. Best viewed with Netscape Navigator 4.7 or Internet Explorer 6 at 800×600. No cookies required. |