Customize agents for your workflow
- View as Markdown
- Ask in VS Code
- Ask in VS Code Insiders
Agent customizations adapt agents to your coding standards, workflows, and development systems. Start by looking for an existing skill, plugin, or integration in a customization marketplace before creating your own. This guide helps you find, install, and verify customizations in Visual Studio Code, or create project-specific guidance.
To understand how customization types differ and work together, see Agent customization concepts.
Choose how to customize
Start with a recurring task or an observed problem, such as the agent using the wrong test command. Choose a representative task and define the result you expect. If the agent already meets your needs, don't add a customization. Put one-time requirements in the current request instead.
| If you want to | Start with |
|---|---|
| Adopt an existing workflow or packaged setup | Browse customization marketplaces for skills, plugins, and integrations |
| Stop repeating project commands and conventions | Create or refine project instructions |
| Reuse a multi-step process specific to your team | Create or adapt an agent skill |
| Give a recurring role focused guidance and tools | Create a custom agent |
| Connect an external service | Use a Copilot connector or add an MCP server |
| Run an action at specific events of the agent's workflow | Configure a hook |
To understand what each type contributes, see customization building blocks.
Agent Customizations editor
The Agent Customizations editor brings discovery, authoring, and management into one place:
- Discover reusable skills, plugins, and integrations through the Customization Marketplace (Preview).
- Inspect customizations by type and source to see what is available.
- Create and edit instructions, skills, custom agents, and supported configurations using inline editors and forms.
- Manage availability with the enablement and tool-selection controls supported by the selected harness.
Available actions depend on the customization type, source, and harness. Some entries are read-only.
The editor shows customizations for the selected session, not a combined list for all sessions. Switching sessions can change what appears because the harness, workspace, or execution environment differs. You can see the active harness in the editor's title bar.
The editor can also list disabled items. A listed customization isn't necessarily used in every request: verify it with a representative task.
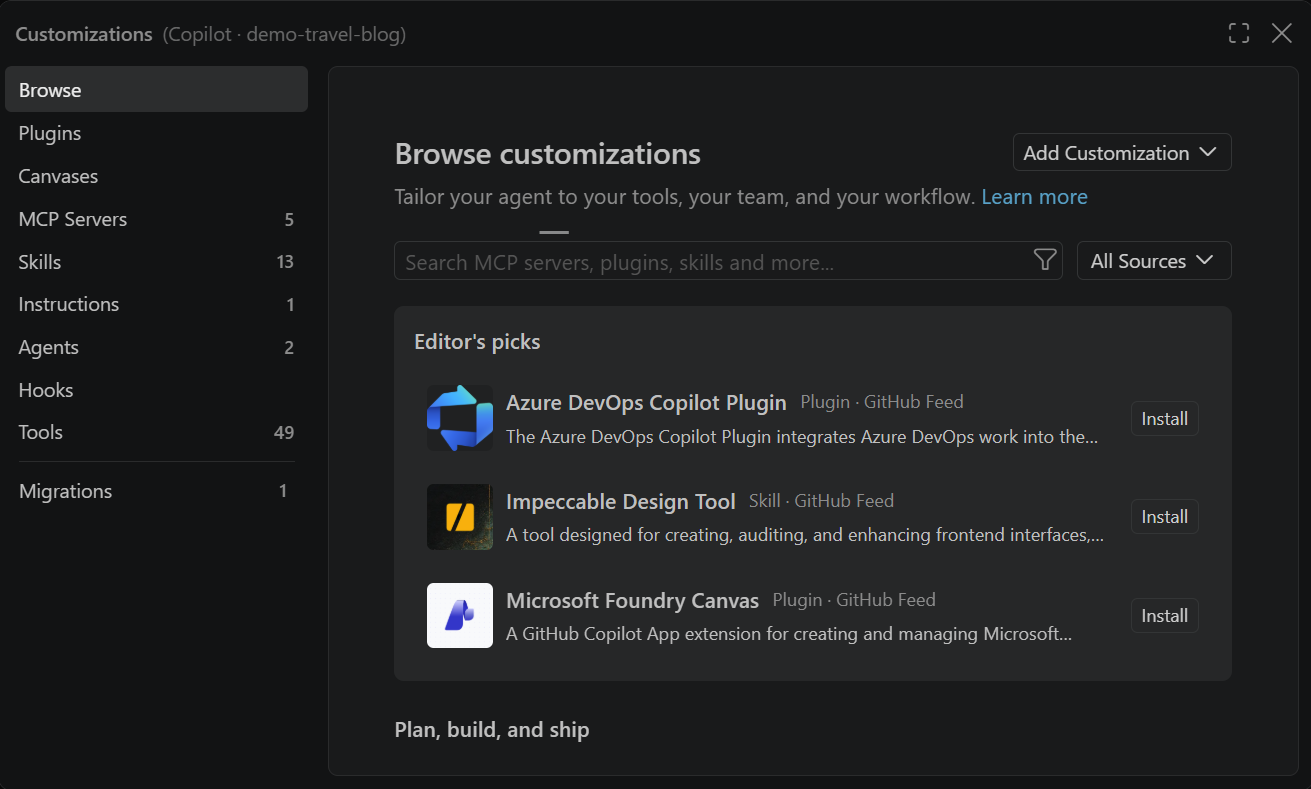
To open the Agent Customizations editor:
-
Select a session and harness for which you want to configure customizations.
-
Open the Agent Customizations editor:
-
Agents window: select Customizations in the left sidebar.
-
Chat view: select Open Customizations in the title bar, or run Chat: Open Customizations from the Command Palette (⇧⌘P (Windows, Linux Ctrl+Shift+P)).
-
-
Use the tabs in the editor to navigate between different customization types, such as skills, custom agents, hooks, and MCP servers.
The experimental Extensions section also lets you install and manage extensions in the Agents window.
For remote hosts and Dev Containers, see Manage customizations for remote sessions.
If the Agent Customizations editor shows Migrations , Copilot cannot use one or more customizations in their current location or format. Select Migrations to review the required work, and follow Migrate Copilot customizations in VS Code for detailed steps.
Reuse customizations across harnesses
For new customizations, select the intended session before creating them in the editor. The editor offers locations and configuration fields for that harness.
When reusing existing customizations, check more than the file's presence:
- Location: personal customizations can live in different directories for each harness.
- Format: skills use a shared format, but custom-agent fields and hook configuration can differ.
- Behavior: referenced tools, scripts, and commands must work in the target session's environment.
After adapting a customization, verify it in a session using the target harness.
Discover and install existing customizations (Preview)
Use the customization marketplace to find a workflow or integration you can reuse instead of building it from scratch. The unified Browse page in the Agent Customizations editor brings together available sources, including plugin marketplaces, GitHub Feed, and Copilot connectors .
The list of available sources and installation actions depends on the selected harness and organization policy.
You can install an individual skill or a plugin that bundles related customizations, such as skills, custom agents, hooks, and MCP servers. For a service integration, find an MCP server or connect a supported service without server setup.
To find and install a customization:
-
Open the Agent Customizations editor and select Browse.
-
Use the source menu to browse all sources or select a specific available source, such as GitHub Feed or an individual plugin marketplace.
-
Search by name or use a type filter, such as
@type:skillor@type:mcp. -
Select an item and review its publisher, source, installation details, and any setup requirements.
-
Select Install and choose a scope when prompted for a destination. For Copilot connectors , select Connect and complete authorization instead.
If your team shares plugins through another marketplace, select Configure Marketplaces from the source menu to add or manage plugin marketplaces. Adding a marketplace makes its plugins available to browse. It doesn't install them.
After installation, complete any publisher setup and verify the customization with a representative task. For type-specific guidance, see install a skill, install a plugin, or find an MCP server.
Marketplace availability
The Browse page appears when a marketplace source is available. Marketplace discovery is enabled by default with chat.customizations.marketplace.enabled Open in VS Code Open in VS Code Insiders .
If Browse isn't available, check that the setting is enabled and your organization permits Editor preview features. Disabling that policy forces the unified Browse experience and Copilot connectors off. See organization and enterprise settings.
The experimental GitHub Feed source is enabled by default for harnesses that provide marketplace search. Local sessions don't provide this source, and organization policy can restrict access. Use the chat.customizations.marketplace.sources.publicFeed.enabled Open in VS Code Open in VS Code Insiders setting to show or hide this source. For plugin discovery without the unified Browse page, follow the plugin installation guide.
Create a customization
For file-based customizations, use the editor to create a file at user or workspace scope:
-
Select the intended session and confirm its harness, workspace, and execution environment. Open the Agent Customizations editor and select a customization type.
-
Select the
+button next to User or Workspace for your chosen scope. -
Enter a name and choose a storage location when prompted.
-
Edit the customization in the inline editor, which provides syntax highlighting and validation.
-
Review and save the customization.
You can also run the Chat: New <customization-type> command from the Command Palette (⇧⌘P (Windows, Linux Ctrl+Shift+P)). The command creates the corresponding file in a supported location for that customization type.
To add an MCP server manually, select MCP Servers, select Add Server (+) in the User or Workspace group, and follow the guided flow. For detailed steps, see Add MCP servers. To update an existing connection, see Edit an MCP server configuration.
Creating or saving a file doesn't establish that the agent uses it. Verify the customization before relying on it or sharing it with your team.
Choose a customization scope
When installing or creating a customization, choose a supported destination:
-
User: use it across your workspaces without committing it to the project.
-
Workspace: store it with the project so contributors can share it through source control.
The available destinations depend on the customization type and harness. Follow the individual customization guide for supported locations. For centrally managed configuration and company-shared packages, see personal and shared customizations.
Verify a customization
Repeat your representative task in a fresh chat with the intended harness, workspace, and execution host. For remote sessions, connect from the client you intend to use so its contributions are included. Don't repeat the customization's rules in the test prompt. Check these three stages separately:
-
Discovery: open the Agent Customizations editor and confirm that the customization is listed without validation errors.
-
Inclusion or invocation: check whether the request uses the customization. For instructions and skills, inspect the response's References section, where available, or Agent Debug Logs. For tools and hooks, inspect the corresponding tool activity or execution logs.
-
Effectiveness: review the changes, commands, and results against the outcome you defined. Inclusion doesn't guarantee that the agent follows the guidance.
For example, if project instructions specify the correct test command, ask the agent to make a small code change without restating that command. Confirm that it runs the expected tests and reports their results.
If a stage fails, troubleshoot that stage before adding more guidance. Once the customization meets your goal, review it before sharing it.
Manage existing customizations
Use the Agent Customizations editor to find and update customizations for the selected session's context. Select the intended session and check its harness, workspace, and host before editing:
-
Open the Agent Customizations editor and select the customization type.
-
Use the search box to find the customization.
-
Select the customization to open its details.
-
If the customization is editable, update its form or file and save your changes. For a read-only customization, use the available action to open the source file.
The available actions depend on the customization type and its source. Use the inline actions or context menu to access supported operations, such as revealing an editable file in your operating system or deleting it. Check what the change affects before editing a shared file or changing enablement. Manage plugin-provided customizations from the Plugins section.
Understand what a change affects
Changes made from one session's editor aren't necessarily limited to that session:
| Action | What changes |
|---|---|
| Edit a workspace instruction or skill | The project file changes. Other sessions that read that file can use the updated content. Sharing the file through source control also shares the change with contributors. |
| Disable an MCP server for one session | The server is unavailable to that session without deleting its configuration or changing the shared server definition. |
| Change a client-tool selection | The selection persists for that harness across windows and profiles, rather than only for the current request. For remote sessions, selections are stored separately for each remote host and harness. |
Available global, workspace, or session enablement actions depend on the customization type and harness. Check the action's scope before applying it. A global action isn't confined to the selected session, even when the customization is stored in the workspace.
For detailed controls, see plugin enablement, MCP server enablement, and tool availability.
Troubleshoot customization issues
Use the verification result to choose your next action:
| Symptom | What to check |
|---|---|
| Different customizations appear when I switch sessions | The editor follows the selected session, not all open sessions. Compare the sessions' harnesses, workspaces, and execution hosts. Switching sessions doesn't remove customizations from the previous one. |
| The customization isn't listed | Confirm the selected session, harness, workspace, and host. Check the file name and supported location. For remote sessions, check whether the customization comes from the remote host or connected client. |
| A marketplace-installed skill shows Missing files | Repair the installation to restore missing files without replacing your edits. |
| The customization has validation errors | Correct the reported file or configuration errors. |
| It's discovered but isn't included or invoked | Check that it is enabled in the relevant scope, then check activation conditions against the current file or task. Invoke an on-demand customization explicitly when supported. |
| It's included but doesn't improve the result | Resolve conflicting guidance, make vague rules more specific, and repeat the task in a fresh chat. |
For hooks, also verify the script's event inputs and outputs. Hooks in user folders, settings, repositories, custom agents, and plugins can require manual migration to the shared Copilot runtime, even when the file is discovered.
If the issue continues, follow customization diagnostics and agent troubleshooting.
Repair marketplace installations
If a Marketplace-installed skill shows Missing files, select Repair to restore only the missing files. Repair preserves files that you edited or added. Installed indicates that the recorded target is available.
A Marketplace-installed customization and a local customization with the same name remain separate. Deleting the Marketplace installation doesn't remove the unrelated local customization.
Advanced scenarios
Manage customizations for remote sessions
Select the remote session before opening the editor. Its harness and remote workspace determine the relevant customizations, rather than the project open on your local machine.
The inventory can include customizations from these sources:
| Source | What it provides |
|---|---|
| Remote workspace | Supported project customizations in the remote session's workspace or worktree. |
| Remote host | User-level configuration and installed customizations on the machine or in the Dev Container that runs the agent. |
| Connected client | Eligible user instructions, skills, custom agents, and contributions from plugins, extensions, and the Agents window. The client can also supply tools and supported MCP configurations. |
Client contributions depend on harness compatibility, discovery, and your enablement and sync choices. Connecting from another machine preserves the existing session's host-owned customizations, but can change the client contributions. Client tools require the client to remain connected.
For Dev Container sessions, configure host-owned customizations in the container's user home or workspace. The outer machine's user configuration isn't automatically inherited.
Not every client customization is forwarded:
- Standalone hook files aren't forwarded. Configure them in a supported location on the execution host, or use a compatible plugin.
- Native Copilot user MCP configuration isn't forwarded to another host. See MCP configuration sources.
Where Local and Remote groups appear, they distinguish client-supplied customizations from host-owned customizations. These labels identify the source, not whether the customization applies to the remote session.
Some client-supplied entries are read-only reflections of their source configuration. Manage them at the source rather than trying to edit a remote copy. For host-owned customizations, use the actions and writable locations offered by the remote harness. A global change on the remote host can affect other sessions on that host, not just the selected session.
To connect to a host or resume its work, see Run and manage remote agent sessions.
Open customization pages with deep links
You can also use chat-customizations/open URLs to navigate directly to a specific section in the Agent Customizations editor:
vscode://chat-customizations/open?page=<page>&search=<query>
Parameters:
page(required): The customization section to open. Supported values include:discover: Opens the Customization Marketplace (Browse page). Requires chat.customizations.marketplace.enabled Open in VS Code Open in VS Code Insiders .agents: Opens the Custom Agents section.skills: Opens the Agent Skills section.instructions: Opens the Custom Instructions section.hooks: Opens the Hooks section.mcp-servers: Opens the MCP Servers section (also acceptsmcp-server).plugins: Opens the Agent Plugins section.tools: Opens the Tools section.migrations: Opens the Migrations review view.
search(optional): A search query to pre-populate in the section's search field. URL-encode query values.
These links navigate within the selected session's customization context. They do not select a different session, install customizations, or bypass consent, workspace trust, or enterprise policies.
Examples:
-
Open the plugins section:
vscode://chat-customizations/open?page=plugins -
Open skills filtered to "python":
vscode://chat-customizations/open?page=skills&search=python -
Open the Discover marketplace:
vscode://chat-customizations/open?page=discover
For VS Code Insiders, use the vscode-insiders:// scheme instead of vscode://. To share links on web pages or markdown badges, use the HTTPS redirect wrapper: https://vscode.dev/redirect?url=<url-encoded-vscode-URL>. For more information on URL handlers, see URL handling.
Manage canvas extensions
The Canvases section lists canvas extensions available to the active local Copilot session and groups them by source. For prerequisites, opening canvases, and managing extension enablement, see Use canvases with agents.
Use customizations in a monorepo
In monorepo setups, you might open a subfolder of a repository rather than the repo root. For Local harness discovery , enable chat.useCustomizationsInParentRepositories Open in VS Code Open in VS Code Insiders to also discover customizations from the parent repository. Other harnesses use their own discovery rules. See nested project instructions.
When this setting is enabled, VS Code walks up the folder hierarchy from each workspace folder until it finds a .git folder. If found, it collects customizations from all folders between the workspace folder and the repository root (inclusive). This applies to all customization types: always-on instructions (copilot-instructions.md, AGENTS.md, CLAUDE.md), file-based instructions, prompt files, custom agents, agent skills, and hooks.
For example, consider the following monorepo structure:
my-monorepo/              # repo root (has .git folder)
├── .github/
│   ├── copilot-instructions.md
│   ├── instructions/
│   │   └── style.instructions.md
│   ├── prompts/
│   │   └── review.prompt.md
│   └── agents/
│       └── reviewer.agent.md
├── packages/
│   └── frontend/          # opened as workspace folder
│       └── src/
If you open only packages/frontend/ in VS Code and enable the setting, VS Code discovers the customization files at the repo root, such as copilot-instructions.md, style.instructions.md, review.prompt.md, and reviewer.agent.md.
Conditions for parent repository discovery:
- The workspace folder does not contain a
.gitfolder (it is not itself a repository root). - A parent folder contains a
.gitfolder. - The parent repository folder is trusted. VS Code prompts you to trust the parent folder when the workspace is opened.
The chat.useCustomizationsInParentRepositories Open in VS Code Open in VS Code Insiders setting is disabled by default.
Evaluate and improve customization files (Preview)
For larger customization collections, the separately published Chat Customizations Evaluations extension analyzes skills, custom agents, instructions, and prompt files for ambiguity, contradictions, and overly complex rules.
After installing the extension, open a customization file and run Chat Customizations Evaluations: Analyze from the Command Palette (⇧⌘P (Windows, Linux Ctrl+Shift+P)). Review the diagnostics in the Problems panel (⇧⌘M (Windows, Linux Ctrl+Shift+M)) before selecting Implement Suggestions.
For analysis guidance and skill evaluations with Waza, run Chat Customizations Evaluations: Open Analysis and Fix User Guide. File analysis complements, but doesn't replace, testing the customization on a representative task.