GeezerVisonThe World Wide Web, restored to 800 pixels of glory. | ||||||||||||||||||||||||||||||||||||||||||||||||||||||
| Home|About|Gaming cabinet|Archives|How it works|Starter sites | ||||||||||||||||||||||||||||||||||||||||||||||||||||||
GeezerVison is showing www.tutorialspoint.com — Python - GUI Programming 
Selected Reading
Python - GUI ProgrammingPython provides various options for developing graphical user interfaces (GUIs). The most important features are listed below.
There are many other interfaces available, which you can find them on the net. Tkinter ProgrammingTkinter is the standard GUI library for Python. Python when combined with Tkinter provides a fast and easy way to create GUI applications. Tkinter provides a powerful object-oriented interface to the Tk GUI toolkit. The tkinter package includes following modules −
Creating a GUI application using Tkinter is an easy task. All you need to do is perform the following steps.
Example# note that module name has changed from Tkinter in Python 2 # to tkinter in Python 3 import tkinter top = tkinter.Tk() # Code to add widgets will go here... top.mainloop() This would create a following window − 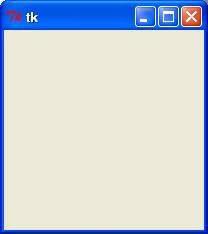
When the program becomes more complex, using an object-oriented programming approach makes the code more organized. import tkinter as tk
class App(tk.Tk):
def __init__(self):
super().__init__()
app = App()
app.mainloop()
Tkinter WidgetsTkinter provides various controls, such as buttons, labels and text boxes used in a GUI application. These controls are commonly called widgets. There are currently 15 types of widgets in Tkinter. We present these widgets as well as a brief description in the following table −
Let us study these widgets in detail. Standard AttributesLet us look at how some of the common attributes, such as sizes, colors and fonts are specified. Let us study them briefly − Geometry ManagementAll Tkinter widgets have access to the specific geometry management methods, which have the purpose of organizing widgets throughout the parent widget area. Tkinter exposes the following geometry manager classes: pack, grid, and place.
Let us study the geometry management methods briefly − SimpleDialogThe simpledialog module in tkinter package includes a dialog class and convenience functions for accepting user input through a modal dialog. It consists of a label, an entry widget and two buttons Ok and Cancel. These functions are −
The above three functions provide dialogs that prompt the user to enter a value of the desired type. If Ok is pressed, the input is returned, if Cancel is pressed, None is returned. askintegerfrom tkinter.simpledialog import askinteger
from tkinter import *
from tkinter import messagebox
top = Tk()
top.geometry("100x100")
def show():
num = askinteger("Input", "Input an Integer")
print(num)
B = Button(top, text ="Click", command = show)
B.place(x=50,y=50)
top.mainloop()
It will produce the following output − 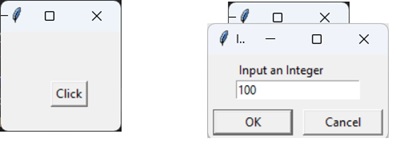
askfloatfrom tkinter.simpledialog import askfloat
from tkinter import *
top = Tk()
top.geometry("100x100")
def show():
num = askfloat("Input", "Input a floating point number")
print(num)
B = Button(top, text ="Click", command = show)
B.place(x=50,y=50)
top.mainloop()
It will produce the following output − 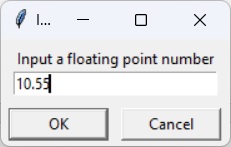
askstringfrom tkinter.simpledialog import askstring
from tkinter import *
top = Tk()
top.geometry("100x100")
def show():
name = askstring("Input", "Enter you name")
print(name)
B = Button(top, text ="Click", command = show)
B.place(x=50,y=50)
top.mainloop()
It will produce the following output − 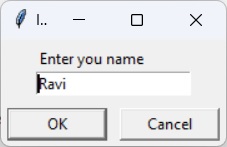
The FileDialog ModuleThe filedialog module in Tkinter package includes a FileDialog class. It also defines convenience functions that enable the user to perform open file, save file, and open directory activities.
askopenfileThis function lets the user choose a desired file from the filesystem. The file dialog window has Open and Cancel buttons. The file name along with its path is returned when Ok is pressed, None if Cancel is pressed. from tkinter.filedialog import askopenfile
from tkinter import *
top = Tk()
top.geometry("100x100")
def show():
filename = askopenfile()
print(filename)
B = Button(top, text ="Click", command = show)
B.place(x=50,y=50)
top.mainloop()
It will produce the following output − 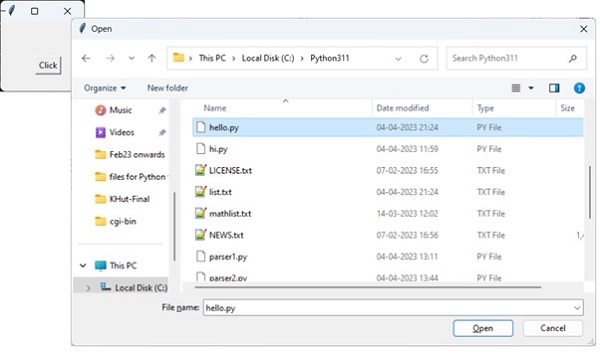
ColorChooserThe colorchooser module included in tkinter package has the feature of letting the user choose a desired color object through the color dialog. The askcolor() function presents with the color dialog with predefined color swatches and facility to choose custome color by setting RGB values. The dialog returns a tuple of RGB values of chosen color as well as its hex value. from tkinter.colorchooser import askcolor
from tkinter import *
top = Tk()
top.geometry("100x100")
def show():
color = askcolor()
print(color)
B = Button(top, text ="Click", command = show)
B.place(x=50,y=50)
top.mainloop()
It will produce the following output − 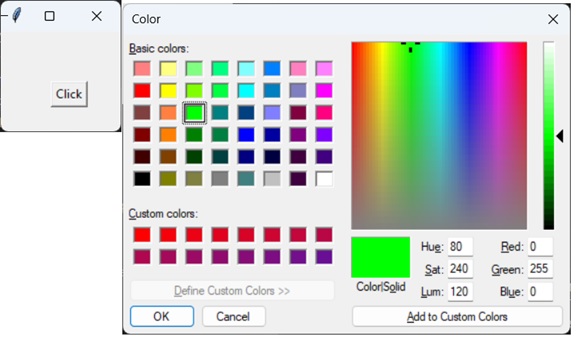
((0, 255, 0), '#00ff00') ttk moduleThe term ttk stands from Tk Themed widgets. The ttk module was introduced with Tk 8.5 onwards. It provides additional benefits including anti-aliased font rendering under X11 and window transparency. It provides theming and styling support for Tkinter. The ttk module comes bundled with 18 widgets, out of which 12 are already present in Tkinter. Importing ttk over-writes these widgets with new ones which are designed to have a better and more modern look across all platforms. The 6 new widgets in ttk are, the Combobox, Separator, Sizegrip, Treeview, Notebook and ProgressBar. To override the basic Tk widgets, the import should follow the Tk import − from tkinter import * from tkinter.ttk import * The original Tk widgets are automatically replaced by tkinter.ttk widgets. They are Button, Checkbutton, Entry, Frame, Label, LabelFrame, Menubutton, PanedWindow, Radiobutton, Scale and Scrollbar. New widgets which gives a better look and feel across platforms; however, the replacement widgets are not completely compatible. The main difference is that widget options such as "fg", "bg" and others related to widget styling are no longer present in Ttk widgets. Instead, use the ttk.Style class for improved styling effects. The new widgets in ttk module are −
Combobox WidgetThe Python ttk Combobox presents a drop down list of options and displays them one at a time. It is a sub class of the widget Entry. Hence it inherits many options and methods from the Entry class. Syntaxfrom tkinter import ttk Combo = ttk.Combobox(master, values.......) The get() function to retrieve the current value of the Combobox. Examplefrom tkinter import *
from tkinter import ttk
top = Tk()
top.geometry("200x150")
frame = Frame(top)
frame.pack()
langs = ["C", "C++", "Java",
"Python", "PHP"]
Combo = ttk.Combobox(frame, values = langs)
Combo.set("Pick an Option")
Combo.pack(padx = 5, pady = 5)
top.mainloop()
It will produce the following output − 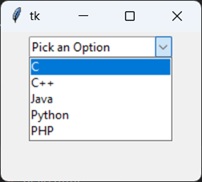
ProgressbarThe ttk ProgressBar widget, and how it can be used to create loading screens or show the progress of a current task. Syntaxttk.Progressbar(parent, orient, length, mode) Parameters
ExampleThe code given below creates a progressbar with three buttons which are linked to three different functions. The first function increments the "value" or "progress" in the progressbar by 20. This is done with the step() function which takes an integer value to change progress amount. (Default is 1.0) The second function decrements the "value" or "progress" in the progressbar by 20. The third function prints out the current progress level in the progressbar. import tkinter as tk from tkinter import ttk root = tk.Tk() frame= ttk.Frame(root) def increment(): progressBar.step(20) def decrement(): progressBar.step(-20) def display(): print(progressBar["value"]) progressBar= ttk.Progressbar(frame, mode='determinate') progressBar.pack(padx = 10, pady = 10) button= ttk.Button(frame, text= "Increase", command= increment) button.pack(padx = 10, pady = 10, side = tk.LEFT) button= ttk.Button(frame, text= "Decrease", command= decrement) button.pack(padx = 10, pady = 10, side = tk.LEFT) button= ttk.Button(frame, text= "Display", command= display) button.pack(padx = 10, pady = 10, side = tk.LEFT) frame.pack(padx = 5, pady = 5) root.mainloop() It will produce the following output − 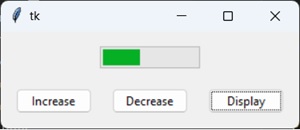
NotebookTkinter ttk module has a new useful widget called Notebook. It is a of collection of of containers (e.g frames) which have many widgets as children inside. Each "tab" or "window" has a tab ID associated with it, which is used to determine which tab to swap to. You can swap between these containers like you would on a regular text editor. Syntaxnotebook = ttk.Notebook(master, *options) ExampleIn this example, add 3 windows to our Notebook widget in two different ways. The first method involves the add() function, which simply appends a new tab to the end. The other method is the insert() function which can be used to add a tab to a specific position. The add() function takes one mandatory parameter which is the container widget to be added, and the rest are optional parameters such as text (text to be displayed as tab title), image and compound. The insert() function requires a tab_id, which defines the location where it should be inserted. The tab_id can be either an index value or it can be string literal like "end", which will append it to the end. import tkinter as tk
from tkinter import ttk
root = tk.Tk()
nb = ttk.Notebook(root)
# Frame 1 and 2
frame1 = ttk.Frame(nb)
frame2 = ttk.Frame(nb)
label1 = ttk.Label(frame1, text = "This is Window One")
label1.pack(pady = 50, padx = 20)
label2 = ttk.Label(frame2, text = "This is Window Two")
label2.pack(pady = 50, padx = 20)
frame1.pack(fill= tk.BOTH, expand=True)
frame2.pack(fill= tk.BOTH, expand=True)
nb.add(frame1, text = "Window 1")
nb.add(frame2, text = "Window 2")
frame3 = ttk.Frame(nb)
label3 = ttk.Label(frame3, text = "This is Window Three")
label3.pack(pady = 50, padx = 20)
frame3.pack(fill= tk.BOTH, expand=True)
nb.insert("end", frame3, text = "Window 3")
nb.pack(padx = 5, pady = 5, expand = True)
root.mainloop()
It will produce the following output − 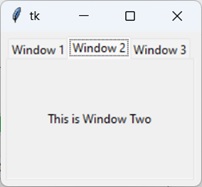
TreeviewThe Treeview widget is used to display items in a tabular or hierarchical manner. It has support for features like creating rows and columns for items, as well as allowing items to have children as well, leading to a hierarchical format. Syntaxtree = ttk.Treeview(container, **options) Options
ExampleIn this example we will create a simple Treeview ttk Widget and fill in some data into it. We have some data already stored in a list which will be reading and adding to the Treeview widget in our read_data() function. We first need to define a list/tuple of column names. We have left out the column "Name" because there already exists a (default) column with a blank name. We then assign that list/tuple to the columns option in Treeview, followed by defining the "headings", where the column is the actual column, whereas the heading is just the title of the column that appears when the widget is displayed. We give each a column a name. "#0" is the name of the default column. The tree.insert() function has the following parameters −
Value we will pass the the other 2 values we obtained from the list. The Complete Codeimport tkinter as tk
import tkinter.ttk as ttk
from tkinter import simpledialog
root = tk.Tk()
data = [
["Bobby",26,20000],
["Harrish",31,23000],
["Jaya",18,19000],
["Mark",22, 20500],
]
index=0
def read_data():
for index, line in enumerate(data):
tree.insert('', tk.END, iid = index,
text = line[0], values = line[1:])
columns = ("age", "salary")
tree= ttk.Treeview(root, columns=columns ,height = 20)
tree.pack(padx = 5, pady = 5)
tree.heading('#0', text='Name')
tree.heading('age', text='Age')
tree.heading('salary', text='Salary')
read_data()
root.mainloop()
It will produce the following output − 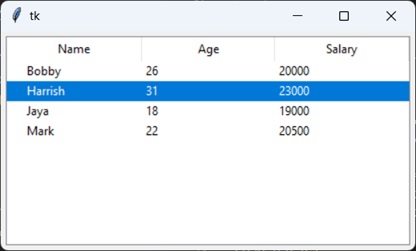
SizegripThe Sizegrip widget is basically a small arrow-like grip that is typically placed at the bottom-right corner of the screen. Dragging the Sizegrip across the screen also resizes the container to which it is attached to. Syntaxsizegrip = ttk.Sizegrip(parent, **options) Exampleimport tkinter as tk
import tkinter.ttk as ttk
root = tk.Tk()
root.geometry("100x100")
frame = ttk.Frame(root)
label = ttk.Label(root, text = "Hello World")
label.pack(padx = 5, pady = 5)
sizegrip = ttk.Sizegrip(frame)
sizegrip.pack(expand = True, fill = tk.BOTH, anchor = tk.SE)
frame.pack(padx = 10, pady = 10, expand = True, fill = tk.BOTH)
root.mainloop()
It will produce the following output − 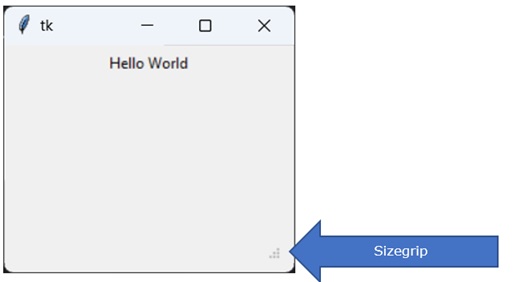
SeparatorThe ttk Separator widget is a very simple widget, that has just one purpose and that is to help "separate" widgets into groups/partitions by drawing a line between them. We can change the orientation of this line (separator) to either horizontal or vertical, and change its length/height. Syntaxseparator = ttk.Separator(parent, **options) The "orient", which can either be tk.VERTICAL or tk.HORIZTONAL, for a vertical and horizontal separator respectively. ExampleHere we have created two Label widgets, and then created a Horizontal Separator between them. import tkinter as tk
import tkinter.ttk as ttk
root = tk.Tk()
root.geometry("200x150")
frame = ttk.Frame(root)
label = ttk.Label(frame, text = "Hello World")
label.pack(padx = 5)
separator = ttk.Separator(frame,orient= tk.HORIZONTAL)
separator.pack(expand = True, fill = tk.X)
label = ttk.Label(frame, text = "Welcome To TutorialsPoint")
label.pack(padx = 5)
frame.pack(padx = 10, pady = 50, expand = True, fill = tk.BOTH)
root.mainloop()
It will produce the following output − 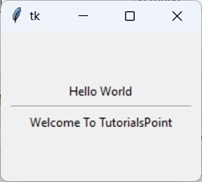

Advertisements
| ||||||||||||||||||||||||||||||||||||||||||||||||||||||
| You are visitor 01402503 — GeezerVison does not store the pages you look up. Best viewed with Netscape Navigator 4.7 or Internet Explorer 6 at 800×600. No cookies required. |